This post may contain affiliate links. If you make a purchase through these links, I may earn a small commission at no extra cost to you. Thank you so much for your support.
Valentine’s Day crafts for kids turn everyday supplies into sweet cards, cheerful decorations, and little gifts made with love.
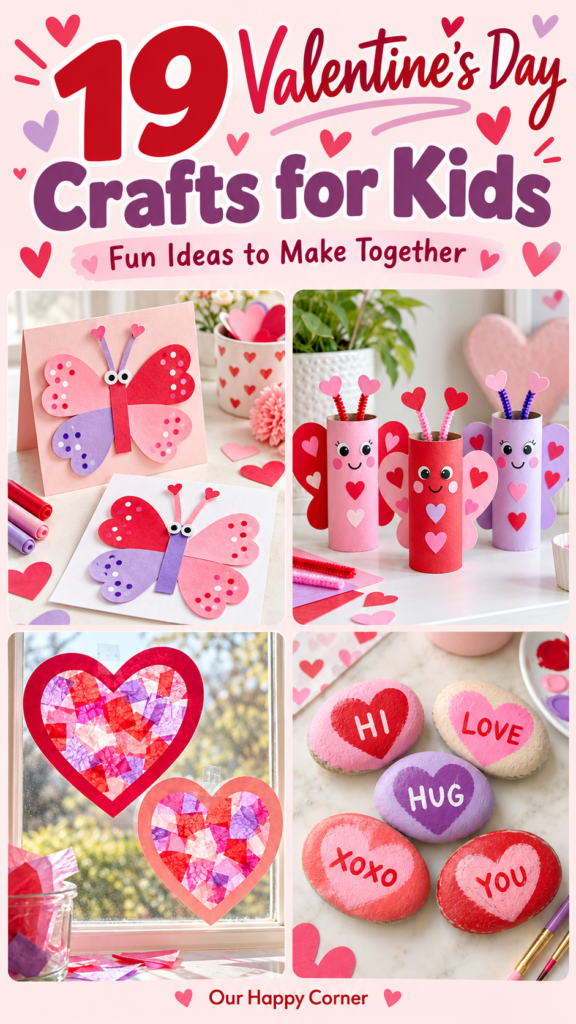
A few sheets of colored paper can become butterflies, flowers, or a crown, while yarn, craft sticks, and paint add new textures to explore.
These ideas give children room to choose their own colors, add a message, and make something they feel proud to share.
Pick a quick paper project for a busy afternoon or a keepsake craft when you have a little more time.
You can make one Valentine for someone special or set out supplies for a group. The best part is letting each child’s version have its own personality.
Choose a Valentine Craft That Fits Your Child
For younger children, prepare the paper shapes and let them focus on arranging, gluing, stamping, and decorating. Handprint cards, paper-plate wreaths, and tissue-paper suncatchers are good places to start.
Children who enjoy a little more detail may prefer weaving a card, threading yarn, or folding puppet limbs.
Think about where the finished craft will go, too. A bookmark makes a useful gift, a mailbox holds classroom Valentines, and a garland brightens a party space.
Some projects need drying time, so plan to finish glued frames, painted rocks, and puppets before they need to be used.
Gather Your Valentine Craft Supplies
Start with colored paper, sturdy cardstock, child-appropriate scissors, glue sticks, washable markers, and tape. Add washable paint, ribbon, yarn, craft sticks, or clean cardboard tubes for the projects you choose.
Pink, red, and purple work well together, but there is no need to buy every color or every supply on the list.
Set out only what your chosen craft needs, and cover the work surface for painting.
An adult can handle tricky cutting, hole punching, stapling, and exposed chenille-stem wire ends.
Follow the age guidance on supplies; beads, pom-poms, and small craft eyes are not suitable for children under 3 or anyone who still mouths small objects. Paper eyes and larger paper decorations are easy alternatives.
You May Also Like: Free Printable Valentine’s Day Cards
Valentine’s Day crafts for kids
1. Tissue-Paper Heart Suncatchers
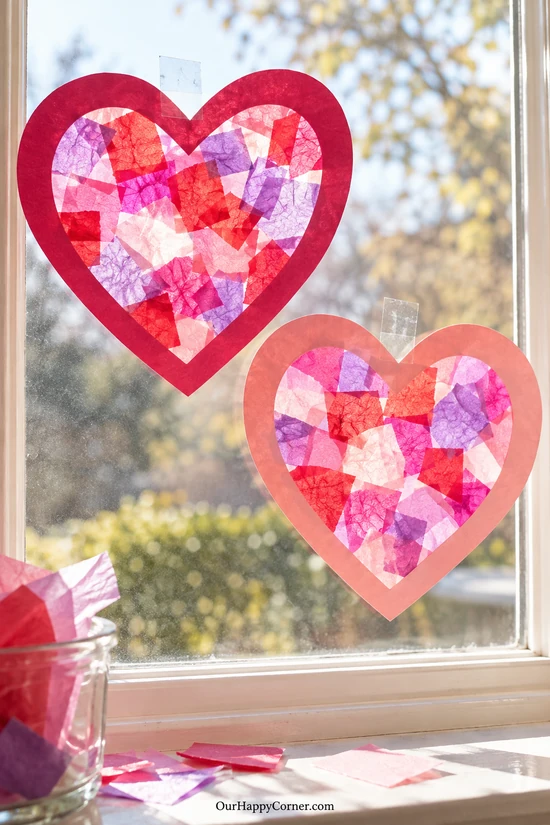
A sunny window makes these tissue-paper hearts glow without adding anything complicated to the craft. Torn tissue pieces create a cheerful patchwork, so there is no need for perfectly cut squares.
Make one large heart or a pair in different shades of pink and red. This is a lovely choice for children who enjoy choosing colors and arranging little pieces.
Materials: Construction paper, tissue paper, clear self-adhesive contact paper, scissors, pencil, and removable tape.
How to make it:
- Fold construction paper in half and cut a heart about 8 inches tall. Cut a smaller heart from its center, leaving a frame about 1 inch wide.
- Place the frame on a piece of contact paper with its sticky side facing up. Fill the opening with small tissue pieces, overlapping them lightly.
- Cover with a second piece of contact paper, pressing from the center outward. Trim around the outside of the paper frame.
- Attach the finished heart to a window with removable tape.
Helpful tip: Keep some lighter tissue pieces in the mix so sunlight can shine through the layers.
2. Paper-Plate Heart Wreath
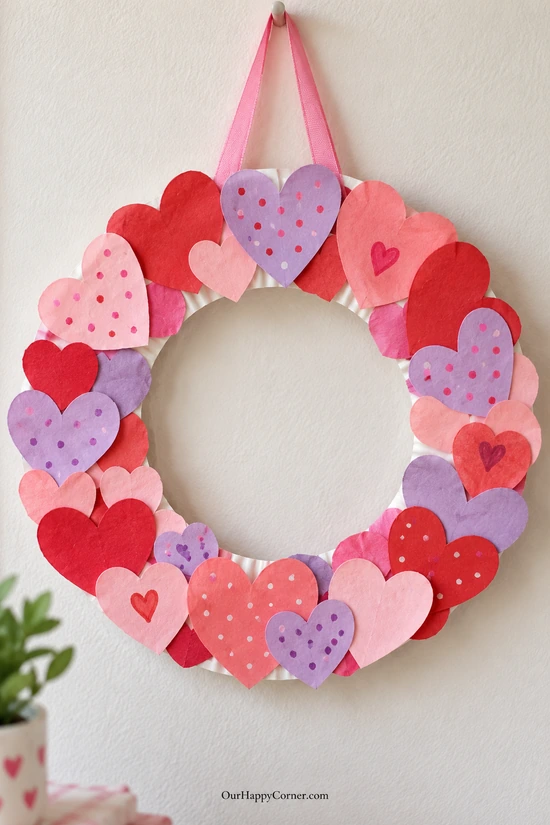
Turn a paper plate into a heart wreath that children can hang on their bedroom door. Overlapping hearts give it plenty of color while the sturdy ring keeps everything together.
A mix of large and small hearts makes the arrangement feel playful. Children can add dots, tiny hearts, or their initials before gluing the pieces down.
Materials: Paper plate, pink/red/purple paper, scissors, washable markers, craft glue, ribbon, and tape.
How to make it:
- Cut out the center of the plate, leaving a ring about 1½ inches wide. An adult can prepare this part.
- Cut paper hearts in two or three sizes. Decorate a few with markers.
- Glue the hearts around the ring, overlapping their edges while keeping the center open.
- Tape a short ribbon loop securely to the back and let the glue dry before hanging.
Helpful tip: Lay out the hearts first to spread the colors evenly around the wreath.
3. Yarn-Laced Heart Decorations
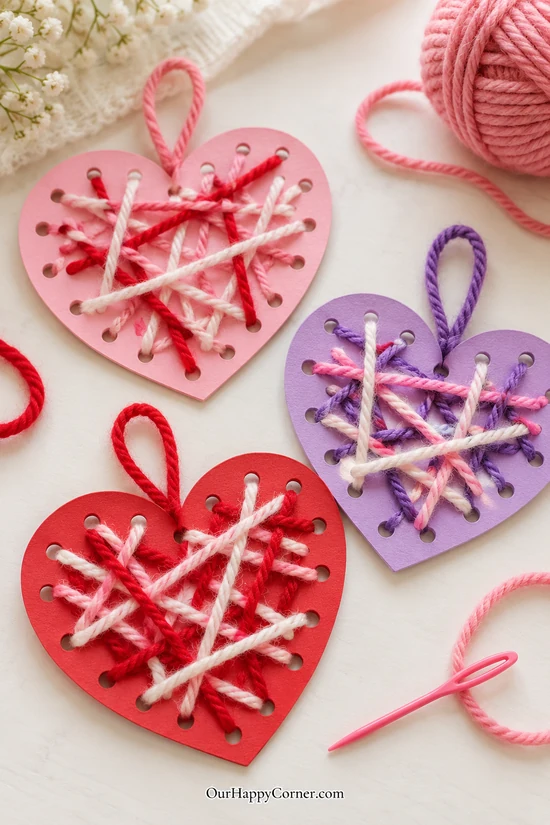
These yarn hearts combine a bold paper shape with a little threading practice. The crisscrossed yarn creates texture without needing complicated stitching.
Children can use one color or add a second short piece for a contrasting layer. Finished hearts look sweet hanging on a wall or attached to a Valentine gift.
Materials: Thin cardboard or sturdy cardstock, pencil, scissors, hole punch, yarn, and tape.
How to make it:
- Cut a heart about 6 inches wide from sturdy cardstock or thin cardboard.
- Punch evenly spaced holes around the edge, keeping them about ½ inch inside the outline.
- Tape one end of a piece of yarn to the back. Wrap the other end with a little tape to make threading easier.
- Thread through different holes across the heart. Tie or tape the end to the back, then repeat with another color if desired.
- Add a short yarn loop through two top holes for hanging.
Helpful tip: Use manageable yarn lengths rather than one very long strand that tangles easily.
4. Heart-Wing Butterfly Cards
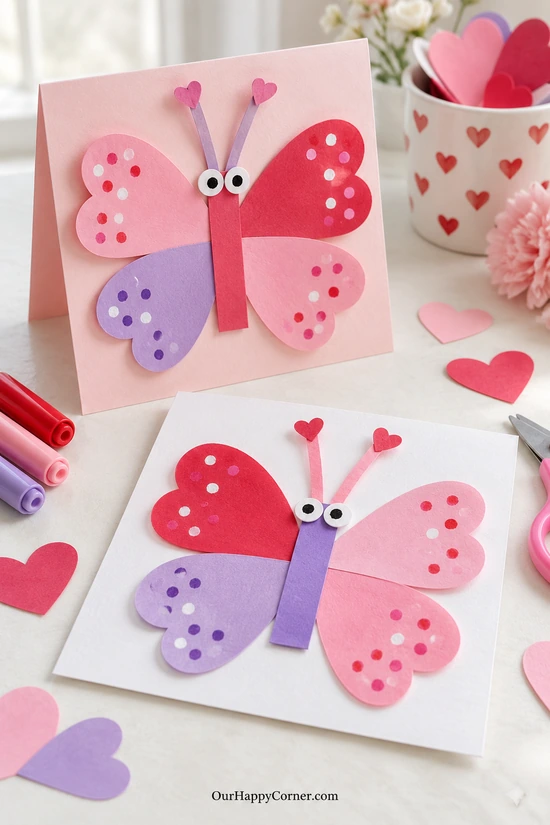
Heart shapes become butterfly wings in these cheerful handmade cards. The simple design leaves plenty of room for dots, stripes, and little messages.
Pink and purple wings work beautifully together, but children can choose their own combination. Make the butterfly on the front of a folded card so there is space for a personal note inside.
Materials: Folded cardstock, colored paper, scissors, glue stick, markers, and paper eye circles or optional craft eyes.
How to make it:
- Cut two larger hearts for the upper wings and two smaller hearts for the lower wings.
- Arrange them on the card with their points meeting near the center, then glue them down.
- Glue a narrow paper rectangle over the center for the body. Add two short paper antennae with tiny hearts at their tips.
- Draw a face or add paper eyes, decorate the wings, and write a message inside.
Helpful tip: Paper eyes are an easy substitute for small plastic craft eyes.
5. Cardboard-Tube Love Bugs
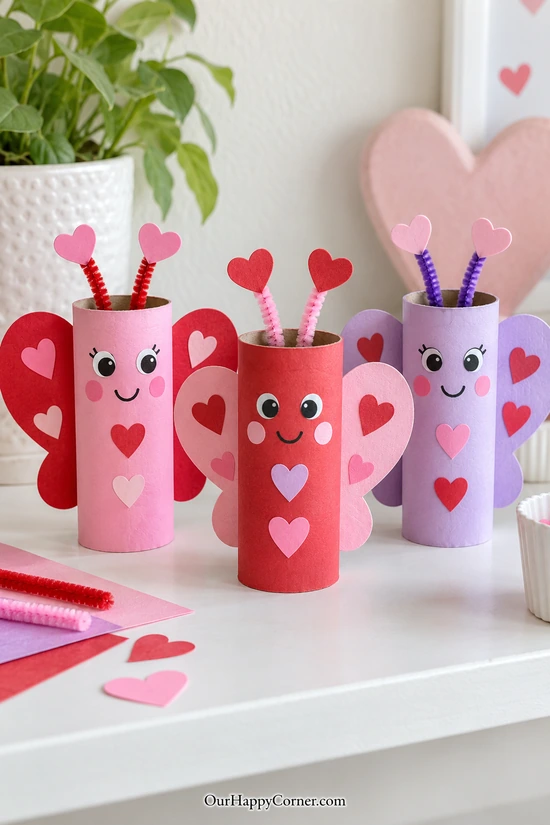
These little love bugs give cardboard tubes a colorful second life. Heart wings and bendy antennae make each character feel different, even when children start with the same basic shape.
A few paper hearts on the body tie the whole design together. Line them up for a Valentine display or let children name their own bugs.
Materials: Clean cardboard craft tubes, colored paper, glue, scissors, markers, chenille stems, and tape.
How to make it:
- Cut paper to fit around each tube and glue it in place.
- Cut two paper hearts for wings and glue their points to the sides or back of the tube.
- Draw a face, or glue on paper eyes and add pupils with a marker.
- Tape two short chenille stems inside the top. Curl the ends or sandwich each end between two small paper hearts.
- Add small hearts to the body and let everything dry.
Helpful tip: Use new craft tubes if you prefer, and have an adult turn any exposed wire ends inward.
6. Paper Heart Flower Bouquet
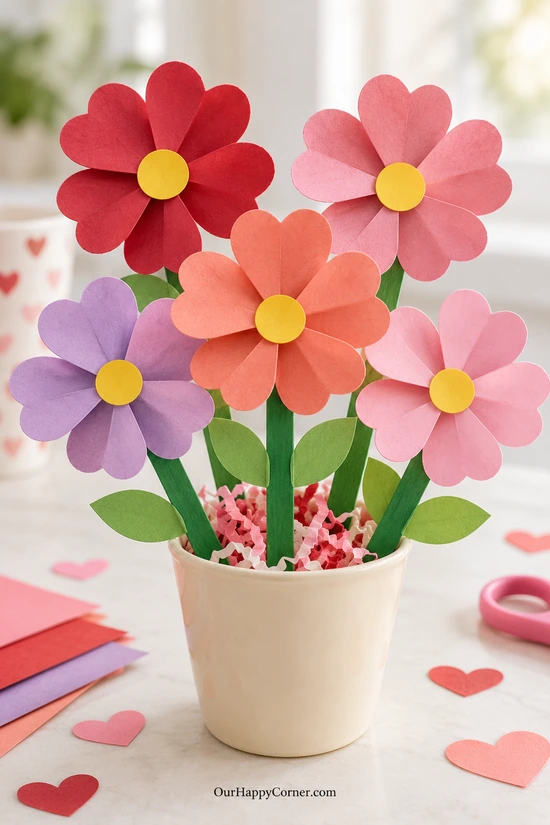
A paper heart bouquet makes a sweet gift that will not wilt. Each flower uses repeated heart petals, giving children a useful pattern to follow.
A mix of red, pink, and purple flowers keeps the bouquet lively. Painted craft sticks and paper leaves make sturdy stems that can stand in a small cup.
Materials: Colored paper, yellow paper, craft sticks, green washable paint, glue, scissors, unbreakable cup, and crumpled paper.
How to make it:
- Paint the craft sticks green and let them dry.
- Cut five similarly sized hearts for each flower. Fold each heart lightly down the middle.
- Glue the points around a small paper backing circle, then cover the meeting points with a yellow center.
- Glue each flower to a stick and add paper leaves along the stem.
- Fill the cup with crumpled paper and tuck in the stems, adjusting their heights.
Helpful tip: Let the flower heads dry flat before assembling the bouquet.
7. Paper Heart Chain Garland
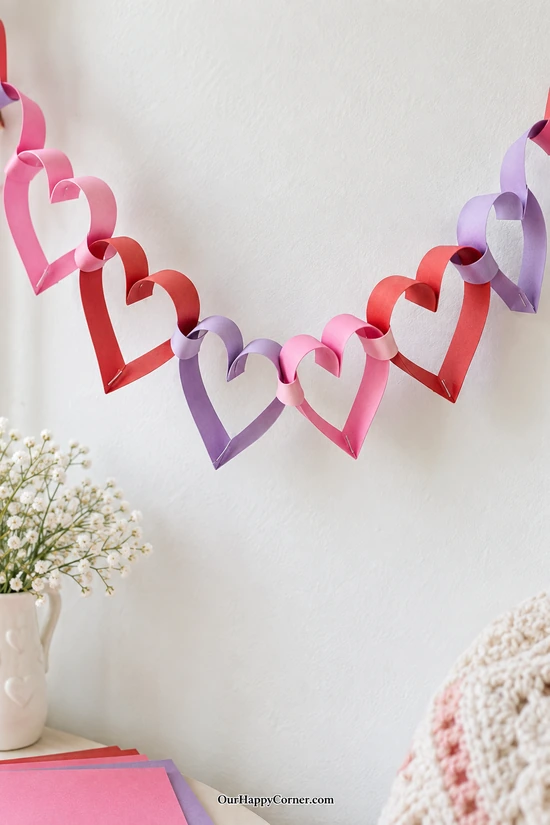
A paper heart chain brings Valentine color to a shelf, wall, or party corner. The open shapes feel light and airy, and each link uses a simple paper strip.
Children can alternate colors or make a repeating pattern. This is a good shared project because everyone can prepare a few strips for the same garland.
Materials: Colored paper, ruler, scissors, stapler for adult use, and removable hanging tape.
How to make it:
- Cut paper into strips about 1 inch wide and 10–12 inches long.
- Fold one strip in half. Curve both free ends inward toward the fold and staple the ends together to form a heart.
- Pass the next strip through the finished heart, fold it in half, and curve its ends inward. Staple to close the new heart.
- Repeat until the chain is the length you want, then tape its ends to your display spot.
Helpful tip: An adult should handle the stapler; keep the finished chain away from areas where children walk.
8. Paper-Weaving Heart Card
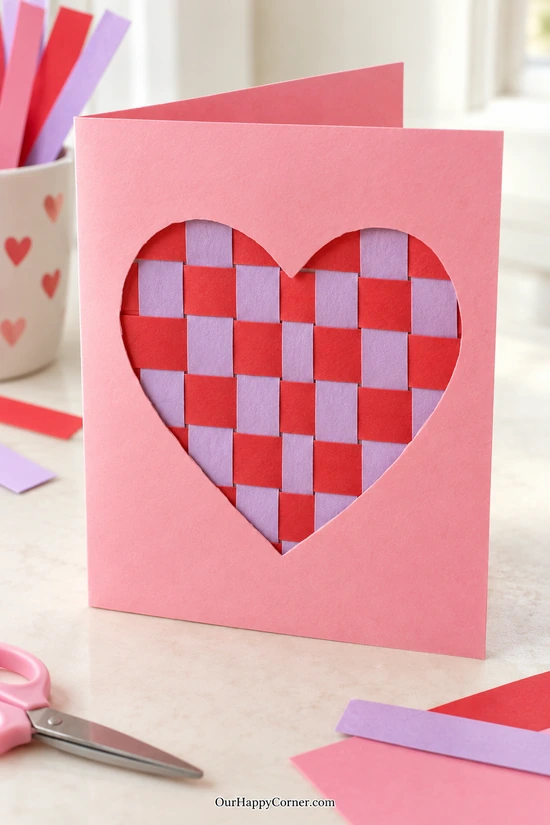
Paper weaving gives this Valentine card a bold checkerboard center. The heart window frames the pattern so the edges of the woven piece stay hidden.
Red and purple strips stand out against a pink card, but two other contrasting colors work just as well. This is especially satisfying for children who enjoy repeating patterns.
Materials: Pink cardstock, two colors of paper, ruler, pencil, scissors, glue stick, and tape.
How to make it:
- Fold the cardstock into a card and cut a heart window in its front. An adult can prepare the window.
- Cut strips about ¾ inch wide from both paper colors. Make enough to cover an area slightly larger than the window.
- Lay one set side by side and tape the tops to your work surface. Weave the other set over and under, reversing the pattern on each new row.
- Glue the strip ends to secure the woven piece. Attach it behind the heart window and cover its back with another piece of paper.
- Write your Valentine message inside the card.
Helpful tip: Keep the strips close together so the pattern fills the entire heart.
9. Fingerprint Heart Tree
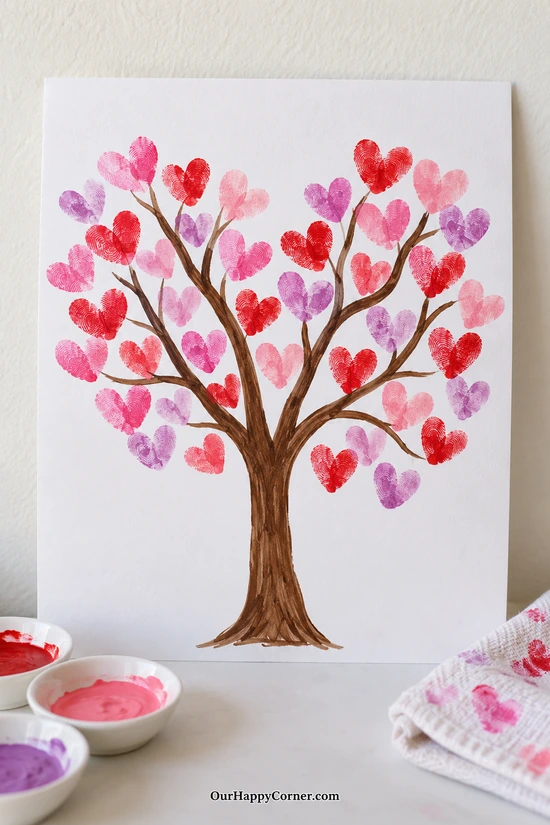
A fingerprint heart tree makes a colorful keepsake with very little preparation. Paired prints become tiny hearts along the branches, giving the finished piece a personal touch.
Children can use several shades or keep to a red-and-pink palette. Add a name and date on the back before giving it to a grandparent or displaying it at home.
Materials: White cardstock, brown marker, washable finger paint, shallow paint tray, and wipes.
How to make it:
- Draw a tree trunk and spreading branches on the cardstock.
- Put a little paint into the tray. Press a fingertip into the paint and make a slanted print near a branch.
- Add a second slanted print beside it so the two meet at the bottom like a heart.
- Repeat around the branches with different colors, then leave the artwork flat to dry.
Helpful tip: Use a small amount of paint to keep the heart shapes clear rather than heavily smudged.
10. Handprint Heart Keepsake Card
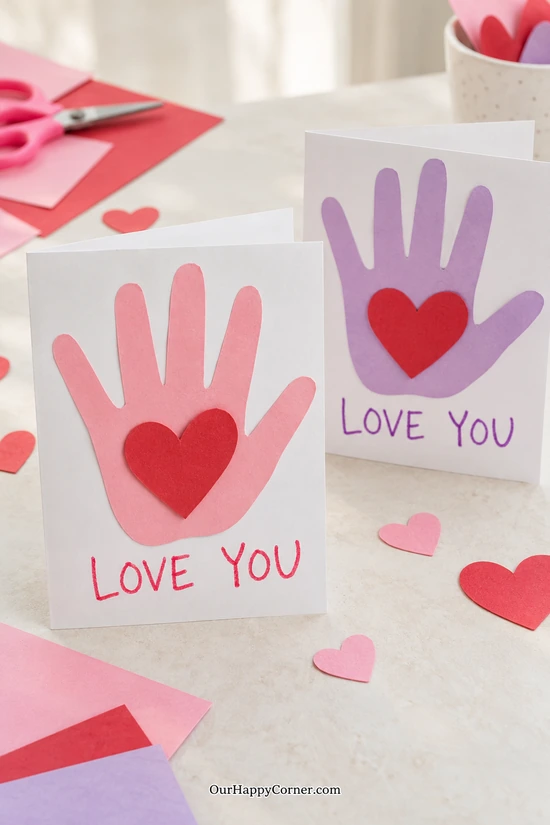
A traced handprint makes this Valentine card a keepsake worth saving. A small heart in the palm gives it a clear focal point without covering the hand shape.
Children can choose the colors and write a short message underneath. The empty inside of the folded card leaves room for a longer note or an extra drawing.
Materials: White cardstock, colored paper, pencil, scissors, glue stick, and markers.
How to make it:
- Fold the white cardstock into a card.
- Trace a hand onto colored paper and cut around the outline.
- Glue the handprint onto the card front, then glue a small paper heart onto its palm.
- Write “Love You,” “Happy Valentine’s Day,” or your own message below it. Add a note inside.
Helpful tip: An adult can cut the outline for younger children while they choose the colors and message.
11. Craft-Stick Valentine Frame
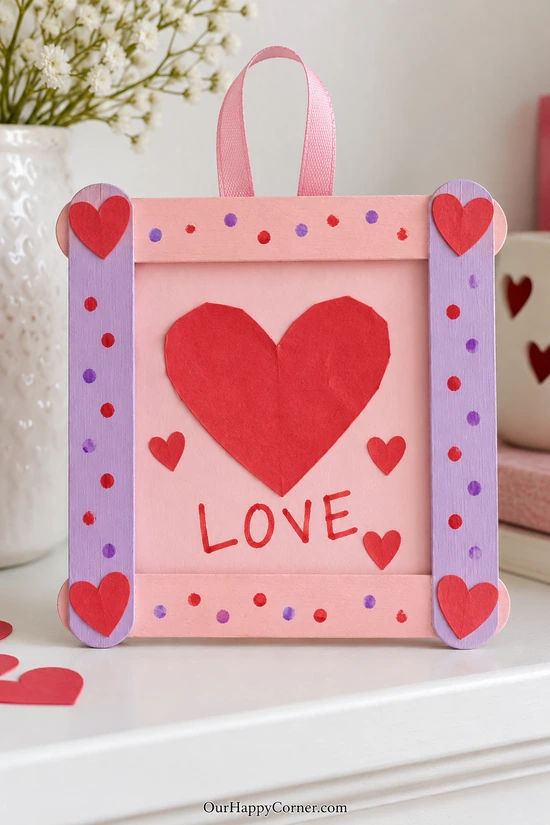
Four craft sticks make a sturdy little Valentine frame. Painted sticks, paper hearts, and marker dots give it a cheerful finish without a long supply list.
The center can hold a drawing, a handwritten message, or a small printed photo. Let children decorate the frame in their own style rather than matching every detail.
Materials: Four wide craft sticks, washable paint, cardstock, paper hearts, craft glue suitable for wood, markers, and ribbon.
How to make it:
- Paint the sticks and let them dry fully.
- Arrange them in a square, overlapping the ends. Glue the corners and leave the frame flat until set.
- Cut a cardstock backing to fit behind the frame. Decorate its center with a heart and message or attach a small photo.
- Glue the backing to the frame, then add paper hearts and marker dots to the front.
- Secure a short ribbon loop to the back and let it dry before hanging.
Helpful tip: Use a frame opening that fits your photo or message before gluing the corners.
12. Painted Conversation-Heart Rocks
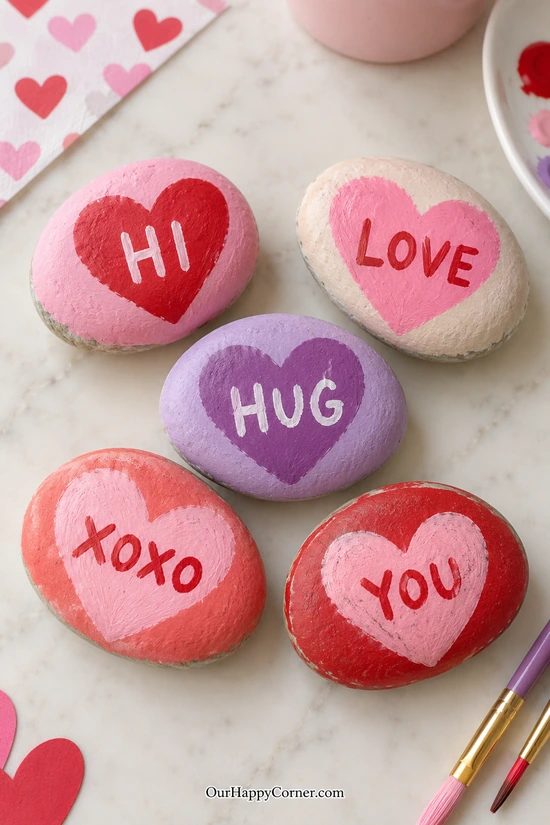
Painted message rocks turn a handful of smooth stones into lasting Valentines. Bright hearts stand out beautifully against the natural stone edges.
Short words are easiest to fit, so use greetings such as “Hi,” “Love,” or “Hug.” Children can give one to a friend or arrange several in a small dish at home.
Materials: Smooth stones, soap and water, child-appropriate craft paint, paintbrush, and suitable paint marker.
How to make it:
- Wash the stones and let them dry completely.
- Paint a heart on the broadest surface of each stone. Let the first coat dry and add another if needed.
- Write a short message inside each heart once the paint is dry.
- Leave the stones to dry according to the paint directions before handling or gifting.
Helpful tip: Choose craft paint suited to the stone surface; these are decorative keepsakes, not play food.
13. Paper Heart Snails
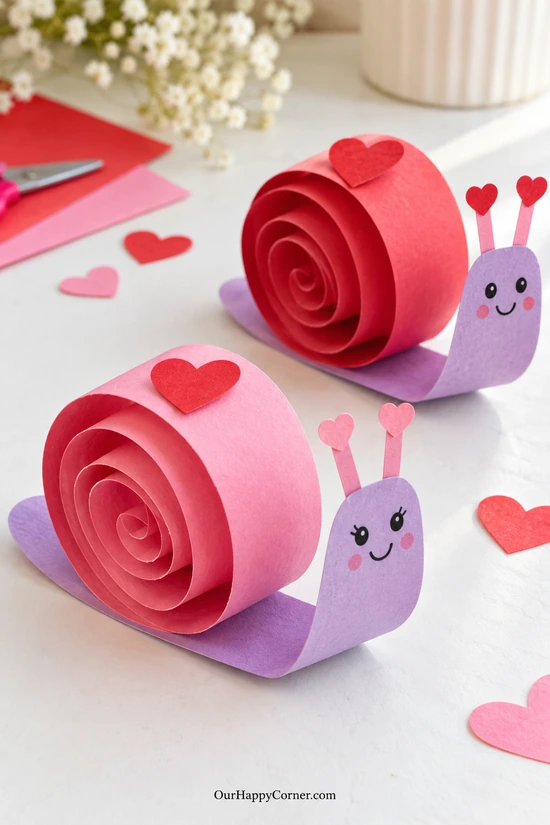
These paper snails have big spiral shells and sweet heart details. Rolling the shell adds dimension while the body stays simple enough to cut from one piece of paper.
Pink, red, and purple give the characters a Valentine feel. Make a pair with different expressions for a little tabletop display.
Materials: Colored paper or light cardstock, ruler, scissors, glue, tape, pencil, and markers.
How to make it:
- Cut a strip about 1½ inches wide for the shell. Join two or three strips end to end with tape on the inner side for a longer coil.
- Roll the strip into a spiral, keeping it loose enough to show the layers. Glue the outer end to hold its shape.
- Cut a body strip from cardstock. Leave a flat base for the shell, then curl the front upward around a pencil to form the head.
- Glue the coil upright onto the base and hold it until secure. Add paper feelers, a face, and a small heart on the shell.
Helpful tip: A slightly wider body base helps the snail stand; let the join dry before moving it.
14. Valentine Heart Bookmarks
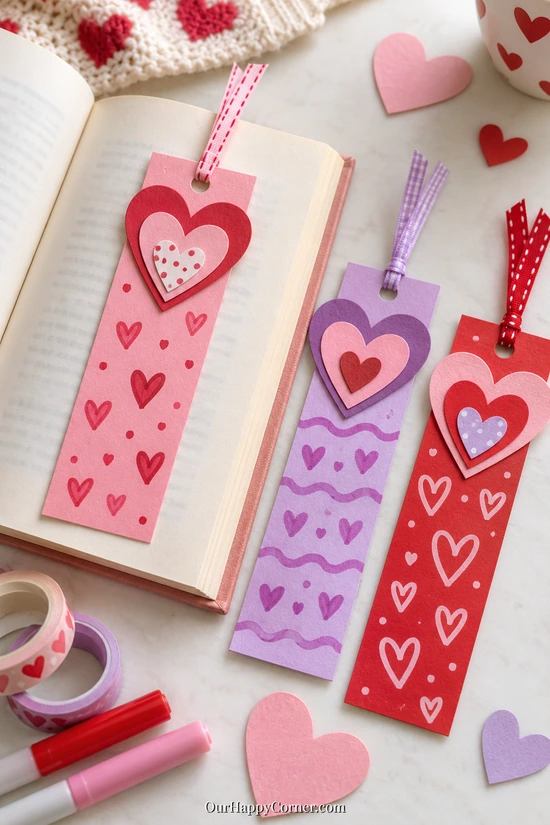
Heart bookmarks make useful Valentines for friends who love books. Sturdy cardstock keeps the shape neat, while layered paper hearts add color without much bulk.
Children can draw dots, tiny hearts, or their friend’s initials down the strip. A short ribbon at the top makes the bookmark easy to find between pages.
Materials: Cardstock, colored paper, ruler, scissors, glue stick, markers, hole punch, and ribbon.
How to make it:
- Cut cardstock strips about 2 inches wide and 6 inches long.
- Glue flat paper hearts near the top and decorate the rest with markers.
- Punch a hole near the upper edge, leaving enough cardstock around it so it will not tear.
- Thread a short ribbon through the hole and tie it securely. Let the glue dry before using the bookmark.
Helpful tip: Keep the paper layers thin so the bookmark sits comfortably inside a book.
15. Paper-Bag Valentine Mailbox
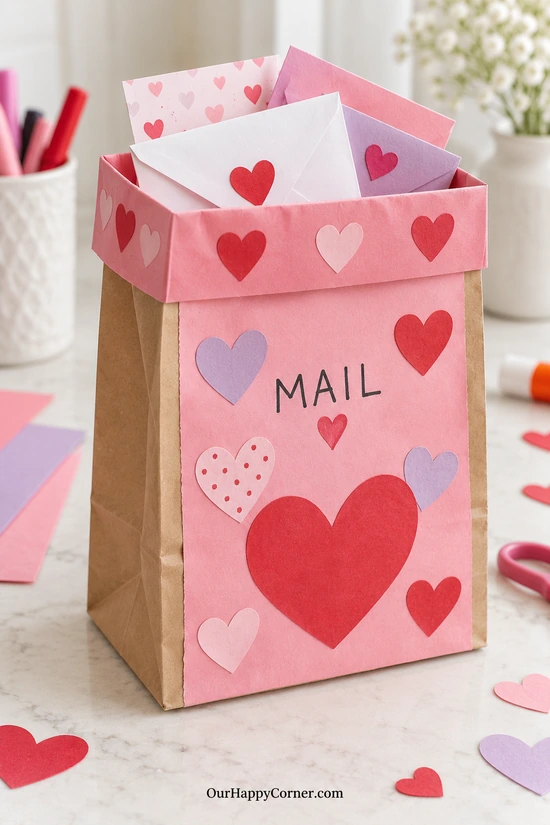
A paper-bag mailbox gives children a place to collect Valentine cards. The pink front panel makes an ordinary lunch bag feel festive while leaving the sides easy to fold.
Paper hearts and a handwritten label are all it needs. This is a handy choice for a classroom exchange or a family Valentine activity.
Materials: Paper lunch bag, colored paper, scissors, glue stick, markers, and optional tape.
How to make it:
- Open the bag and fold its top edge outward once or twice to strengthen the rim.
- Cut a paper panel to fit the front without covering the folded rim. Glue it in place.
- Add paper hearts and write “Mail” or the child’s name on the front.
- Stand the bag upright and tuck in Valentine cards or small paper envelopes.
Helpful tip: Decorate the bag while it is flat if that is easier, then open and reshape it after the glue dries.
16. Accordion-Leg Heart Puppets
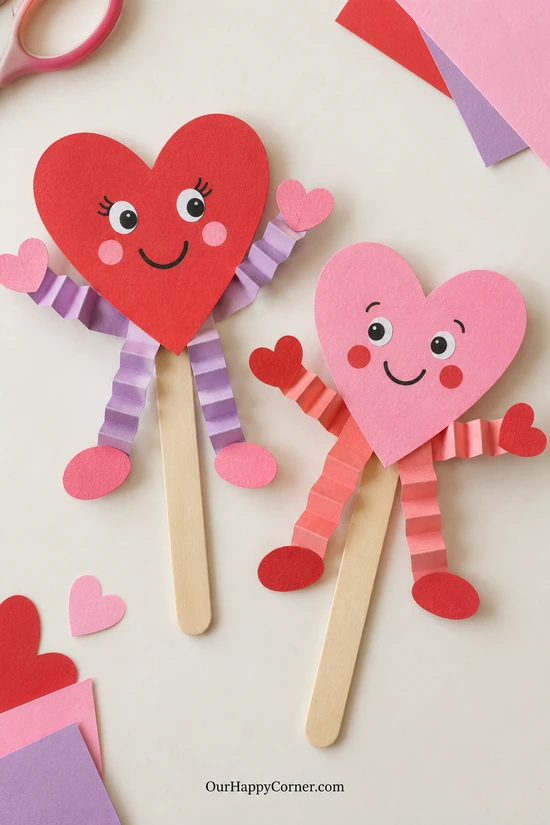
Accordion limbs make these heart puppets full of personality. The folded paper arms and legs move as children lift the craft-stick handles.
A smile and a few small heart hands complete the characters. Once the glue is dry, they are ready for a Valentine puppet show or a silly conversation between two hearts.
Materials: Sturdy colored cardstock, paper strips, craft sticks, scissors, glue, markers, and optional paper eyes.
How to make it:
- Cut a large heart for each puppet and draw its face.
- Cut four narrow paper strips. Fold each backward and forward in short, even folds to make accordion limbs.
- Glue the arms and legs behind the heart. Add little paper hearts for hands and oval feet.
- Glue a craft stick down the back of the heart, leaving a handle below the body. Let it dry flat.
Helpful tip: Shorter limbs are easier to control and less likely to tangle during play.
17. Pom-Pom Heart Collage
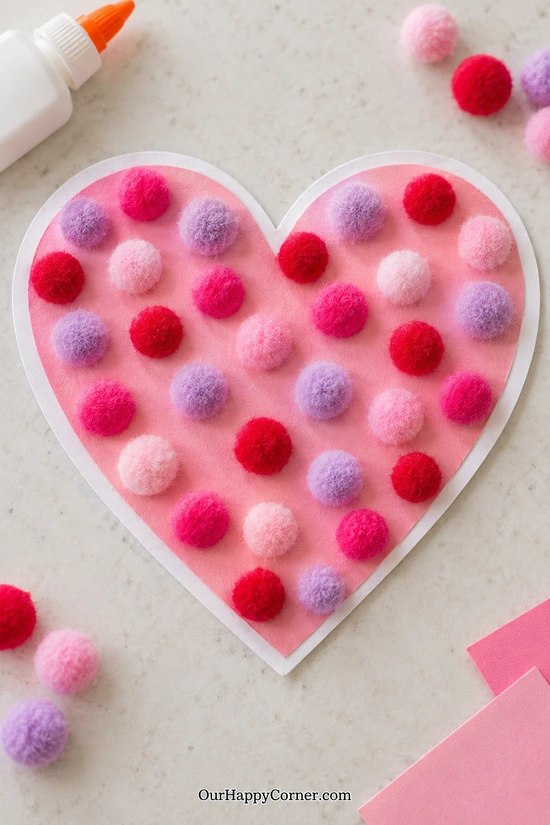
A pom-pom collage adds a soft, colorful texture to a simple paper heart. Leaving a little space between the pom-poms keeps the pink background visible.
Children can arrange a pattern or mix the colors freely. This works well for older children who enjoy choosing and placing small pieces.
Materials: Sturdy white cardstock, pink cardstock, scissors, craft glue, and small pom-poms.
How to make it:
- Cut a large pink heart and glue it onto white cardstock. Trim the white backing into a slightly larger heart if desired.
- Arrange the pom-poms across the pink area before gluing.
- Add a small dot of glue under each pom-pom and press gently into place.
- Leave the collage flat until dry before displaying it.
Helpful tip: Pom-poms are small parts. Reserve this project for children who can use them safely; crumpled tissue is an alternative.
18. Beaded Heart Decorations
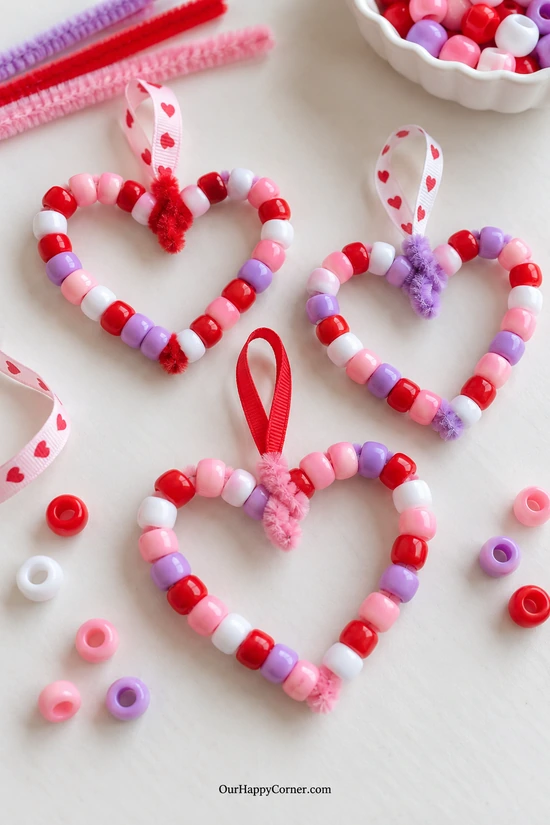
Beaded hearts make bright little Valentine decorations for older children. Pony beads slide onto chenille stems, so there is no needle or complicated knot to manage.
Alternating colors creates a clear pattern, while a mixed arrangement feels playful. Add a short ribbon loop to hang the finished heart from a hook or gift bag.
Materials: Pony beads, chenille stems, short ribbon, and adult help for securing wire ends.
How to make it:
- Choose a chenille stem long enough for your heart. Bend one end temporarily to keep the first beads from sliding off.
- Thread on beads, leaving about an inch at each end for joining.
- Bend the beaded stem into a heart with a point at the bottom and two curves at the top.
- Twist the ends together at the top cleft. Have an adult fold the wire tips inward, then tie on a short ribbon loop.
Helpful tip: Use this project for ages 6 and up with supervision, following supply age labels. Beads are not suitable for children who mouth small items.
19. Paper Heart Valentine Crown
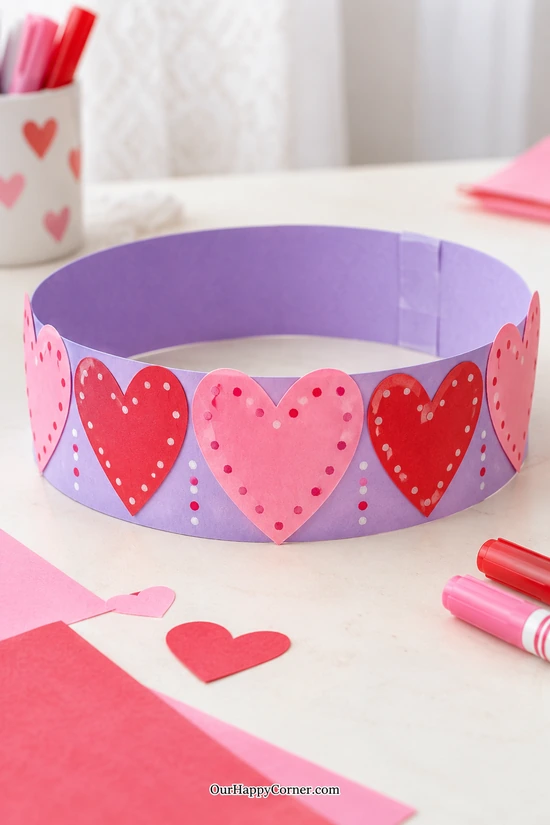
A paper heart crown is a fun way to finish a Valentine craft afternoon. The wide band gives children plenty of space for dots, names, and colorful paper hearts.
Large hearts along the front make it festive without needing extra embellishments. Fit the crown individually so it feels comfortable during a classroom party or family celebration.
Materials: Cardstock, colored paper, ruler, scissors, glue stick, washable markers, and tape.
How to make it:
- Cut cardstock into strips about 2½ inches wide. Join enough strips to wrap around the child’s head with a little overlap.
- Glue large paper hearts around the front of the band, leaving the back overlap clear.
- Decorate the band and hearts with markers, then let the glue dry.
- Check the fit and tape the overlapping ends together, leaving the crown comfortable rather than tight.
Helpful tip: Make the decorations before closing the band so children can work on a flat surface.
Final Thoughts
A handmade Valentine does not need perfect edges or matching colors to feel special. Choose a craft your child will enjoy, leave room for their own ideas, and help with the parts that need an extra pair of hands. Whether they make a card, a little decoration, or a gift for a friend, the time spent creating is part of what makes it meaningful.