This post may contain affiliate links. If you make a purchase through these links, I may earn a small commission at no extra cost to you. Thank you so much for your support.
Valentine’s Day crafts for adults are a lovely way to turn a few everyday supplies into thoughtful gifts and decorations you’ll enjoy making.
Whether you prefer paper, paint, fabric, or a little sewing, there’s something here that fits a relaxed afternoon at home.
Think glowing mason jar lanterns, a chocolate bouquet, soft fabric hearts, and small keepsakes with a personal message.
These ideas use red, pink, blush, burgundy, and white in different combinations, so you can choose a look that feels like you.
Each project includes the materials and steps you need to recreate it. Pick one for a quiet crafting session, or set out a few supplies for a Valentine craft night with friends.
Choose a Craft That Fits Your Plans
Start with what you want to make: a gift, something useful, or a decoration for your home. Love-note bottles and chocolate bouquets are especially personal gifts, while the tote, coasters, mug, and keychains can be used after February 14.
Wreaths, garlands, lanterns, and framed hearts are lovely for bringing a little seasonal color to a room.
If you want a project with minimal drying time, try a paper bouquet or felt keychain. Painted pieces, decoupage, and soap need more time before they’re ready to wrap or use.
For a group craft night, choose one project and offer several red and pink shades so everyone can make a different version.
Gather Your Valentine Craft Supplies
A useful starting kit includes red, pink, and white paper, scissors, a ruler, pencil, paper glue, ribbon, and a few brushes. Felt, cotton fabric, yarn, and thread cover the softer projects.
Add the specific base for your chosen craft, such as a jar, tote, mug, wreath form, or shadow box. You don’t need to buy everything on this list to get started.
Match the product to the surface: fabric paint for the tote, glass-compatible paint for vases, ceramic pens for the mug, and soap-safe colorant for the soap.
Check drying and curing instructions before planning when to give a finished piece. Protect your work surface, and use battery-operated lights for both the candle wraps and tissue-paper lanterns.
You May Also Like: Valentine’s Day Crafts for Kids
Valentine’s Day Crafts to Make and Give
1. Lace Heart Wreath
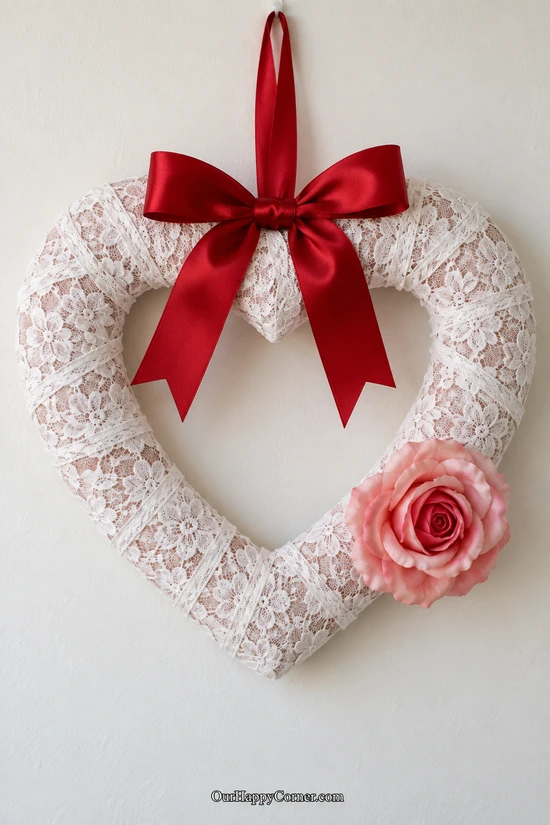
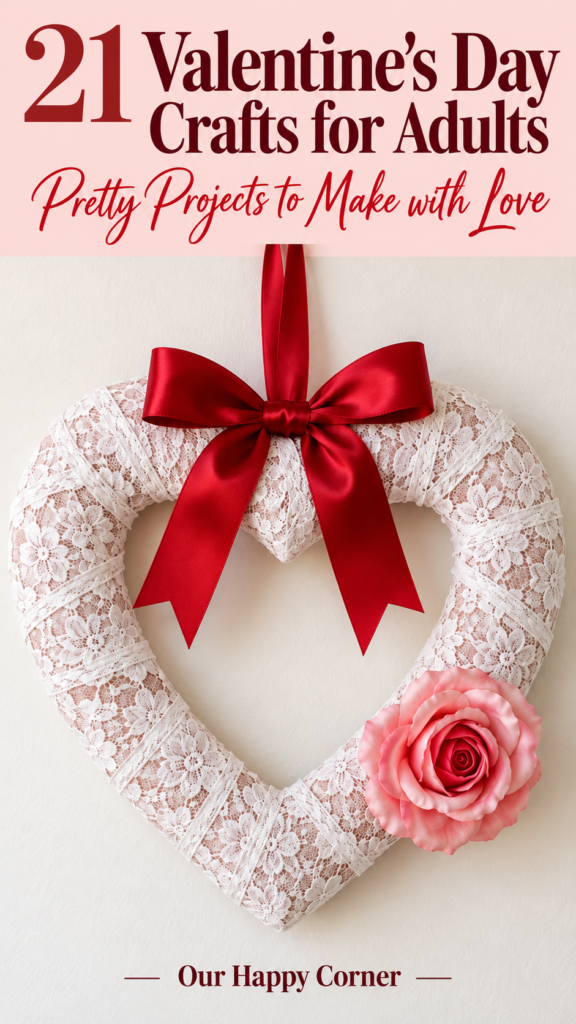
White lace gives this heart wreath a soft, romantic finish without requiring complicated embellishments. A red satin bow adds contrast, while one pink fabric rose keeps the design focused.
Choose lace wide enough to cover the wreath form comfortably. Overlap the strips slightly so the base stays hidden.
A premade flower gives you the finished look without making flowers from scratch. Hang it on an interior door, above a console, or beside a small Valentine display.
Materials: Heart-shaped foam wreath form, white lace ribbon, red satin ribbon, one premade pink fabric rose, low-temperature hot glue, scissors.
How to make it:
- Secure one end of the lace to the back of the form, then wrap it around the heart with a slight overlap.
- Glue the final end to the back and tie a red ribbon bow around the upper center.
- Attach the fabric rose near the lower right curve.
- Add a ribbon hanging loop to the back and let the glue set before hanging.
2. Heart Melt-and-Pour Soaps
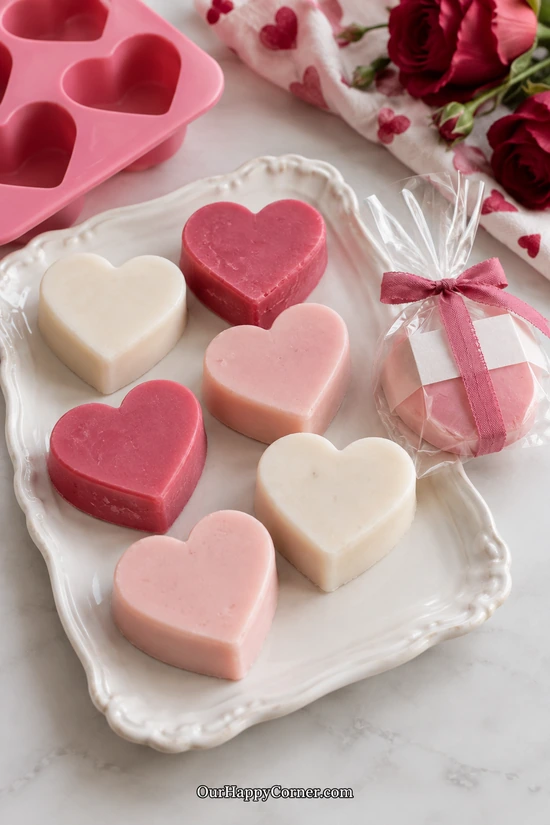
Heart-shaped soaps make a lovely little gift that feels useful as well as thoughtful. Purchased melt-and-pour base keeps this project approachable.
White, blush, and deeper pink bars look especially pretty packaged together. Use colorants intended for soap rather than food coloring or craft paint. You can leave the bars unscented, or use a soap-safe fragrance at the supplier’s recommended amount.
Finish each cooled bar with clear wrapping and a ribbon to make it ready to give.
Materials: Melt-and-pour soap base, heart-shaped silicone soap mold, soap-safe pink colorant, heat-safe pouring container, spoon, clear airtight wrapping, ribbon.
How to make it:
- Cut the soap base into small pieces and melt it according to its package instructions, avoiding overheating.
- Divide it into separate containers if making several colors; add small amounts of soap-safe colorant and stir gently.
- Pour into the molds and leave undisturbed until completely cool and firm.
- Unmold the bars and wrap promptly in airtight film suitable for soap; add a paper band or ribbon.
3. Paper Heart Bouquet
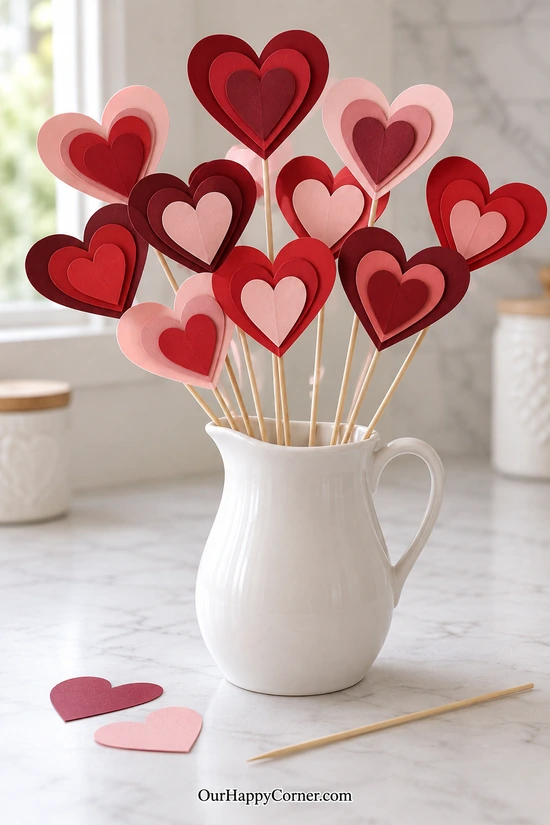
A paper-heart bouquet brings the feeling of flowers to a gift that lasts beyond the holiday. Layering three heart sizes gives the arrangement depth while keeping the cutting manageable.
Mix burgundy, red, and blush rather than making every stem identical. The straight stems keep the hearts visible and easy to arrange.
A small pitcher makes a charming holder you may already have at home. Add a personal message to the back of a few hearts for an extra thoughtful detail.
Materials: Red, burgundy, and blush cardstock, heart templates in three sizes, scissors, paper glue, bamboo skewers, tape, small pitcher.
How to make it:
- Cut large hearts and matching smaller hearts, then glue the smaller shapes onto the larger ones.
- Tape a skewer to the back of each completed heart and cover the attachment with another cardstock heart.
- Allow the glue to dry, then arrange the stems at several heights in the pitcher.
- Keep the largest hearts near the back and turn each stem so its decorated side faces outward.
4. Woven Paper Heart Baskets
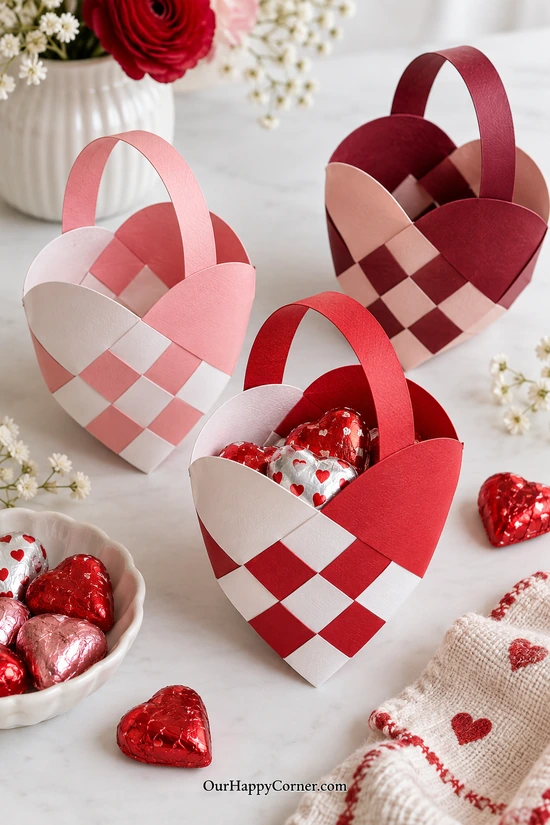
Woven heart baskets turn two colors of paper into a sweet pocket for small gifts. Their checker pattern looks detailed, but the project uses a repeated weaving motion.
Start with flexible paper rather than stiff cardstock so the loops bend easily. White paired with red gives a crisp finish, while blush and burgundy feel softer.
A narrow paper handle completes the basket without adding much weight. Fill it with a few wrapped chocolates or a folded note, keeping the contents light.
Materials: Two contrasting colors of flexible paper, ruler, pencil, scissors, glue, wrapped candy or a small note.
How to make it:
- Fold each sheet in half. On the folded edge, draw a shape 3 inches wide and about 5¼ inches tall: a 3-inch square topped with a rounded arch. Cut through both layers, keeping the bottom fold intact.
- Cut two evenly spaced slits from the folded bottom toward the arch, about 3¼ inches long, to create three loops on each piece.
- Turn the pieces at right angles. Weave the first loop through the first loop of the other color, around the second, and through the third. Reverse that pattern for the next loop, then repeat the first pattern for the last.
- Gently adjust the weave until the heart opens as a pocket. Glue a paper-strip handle inside both sides and let it dry before adding light treats.
5. Fabric Heart Garland
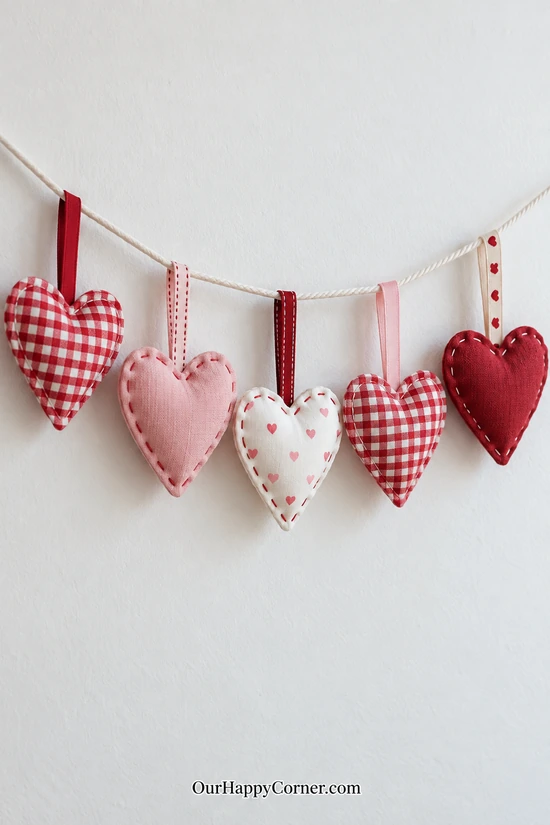
Fabric hearts add a cozy touch to a mantel, shelf, or bedroom wall. Mixing gingham, solid pink, and a small heart print creates variety without changing the color palette.
Light stuffing gives the hearts shape without making them heavy. Visible running stitches suit the handmade finish, so perfectly hidden seams are unnecessary.
Ribbon loops make the hearts easy to slide onto a cord. Space them evenly or cluster them closer together for a shorter display.
Materials: Cotton fabric in Valentine colors, heart template, scissors, needle, thread, polyester stuffing, narrow ribbon, cotton cord.
How to make it:
- Cut two matching fabric hearts for each ornament. Place them wrong sides together and position a folded ribbon loop between the layers at the top.
- Sew around the edge with a running stitch, catching both ribbon ends and leaving a small opening.
- Add a little stuffing, then stitch the opening closed.
- Thread the finished hearts onto cotton cord and hang the garland indoors.
6. Valentine LED Candle Wraps
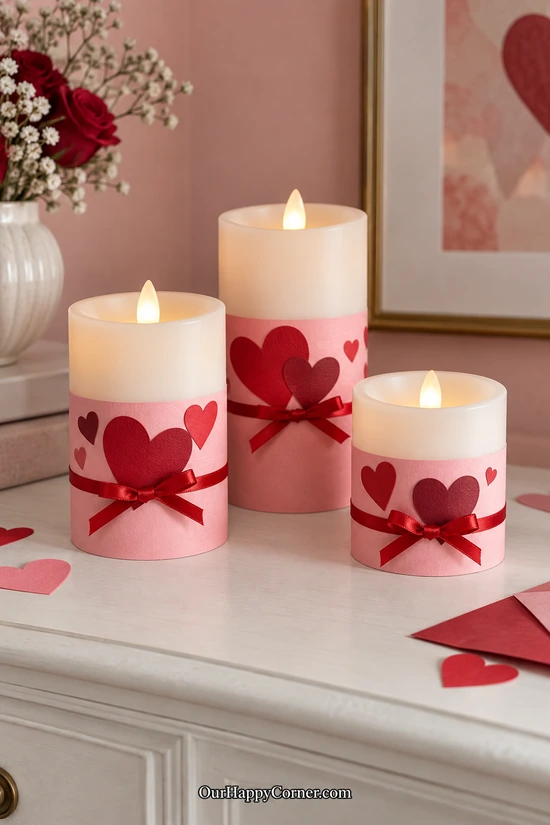
Paper wraps give plain LED candles a Valentine makeover you can remove after the holiday. Pink bands create a soft background for red and burgundy hearts.
A narrow satin bow finishes each candle without hiding the design. Different candle heights make a group of three feel balanced.
Keep the wraps below the flame tips so the lights remain clearly visible. This project is designed for battery-operated flameless candles only.
Materials: White LED pillar candles, pink cardstock, red and burgundy paper hearts, scissors, ruler, double-sided tape, red satin ribbon.
How to make it:
- Measure each candle and cut a cardstock band to fit around its lower portion with a small overlap.
- Glue paper hearts onto the bands and allow them to dry.
- Wrap each band around an LED candle and tape the paper ends together, keeping controls and battery access clear.
- Tie a narrow ribbon around each wrap and arrange the candles at different heights.
7. Painted Heart Vases
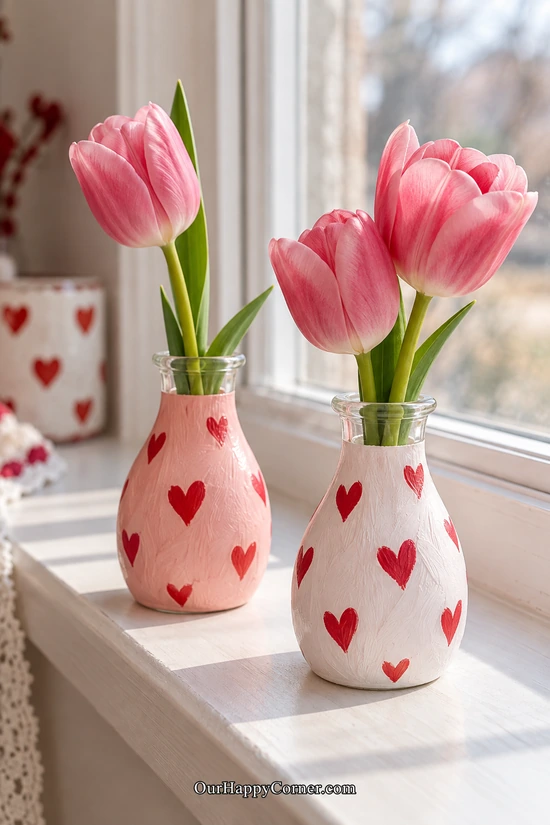
Painted bud vases are an easy way to make a few flowers feel like a complete Valentine arrangement. White and blush backgrounds help the red hearts stand out.
Small brush marks give the vases a handmade character rather than a factory finish. Use paint specifically labeled for glass, including any primer the product requires.
Leave the inside and rim unpainted so the decoration stays on the exterior. A few pink tulips are enough to finish the display.
Materials: Clean glass bud vases, glass-compatible paint in white, blush, and red, appropriate primer if required, small brushes, flowers.
How to make it:
- Wash and dry the vases, then prepare the exterior as directed by your chosen glass-paint system.
- Apply thin coats of white or blush paint, allowing the required drying time between coats.
- Paint small red hearts around the outside and let the finish cure fully according to the label.
- Add water and flowers after curing; clean the decorated exterior gently according to the paint instructions.
8. Mason Jar Heart Lanterns
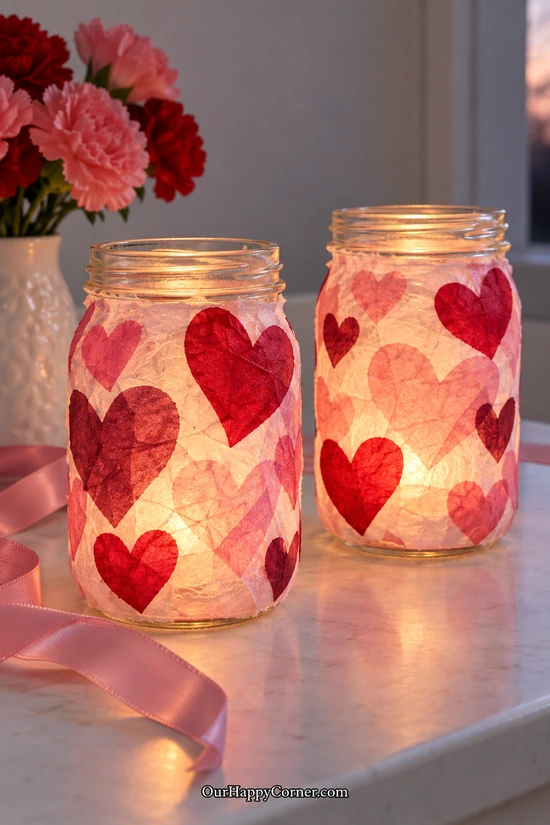
Tissue-paper hearts let these mason jar lanterns glow with soft Valentine color. A thin white tissue layer gives the jars a frosted appearance.
Red and pink hearts show through the light without needing a precise painted design. Slightly overlapping pieces create an attractive handmade texture.
Keep the paper layers light so the glow can still shine through. Use battery-operated LED votives inside the finished jars.
Materials: Clean mason jars, white, red, and pink tissue paper, decoupage medium, soft brush, scissors, LED votives.
How to make it:
- Cut white tissue into small pieces and red and pink tissue into hearts.
- Brush a thin layer of decoupage medium onto the outside of a jar and lay white tissue over it, smoothing gently.
- Add the tissue hearts and brush a light coat over the decorated surface.
- Leave the jars to dry thoroughly, then place an LED votive inside each one; do not use a real flame.
9. Heart String Art
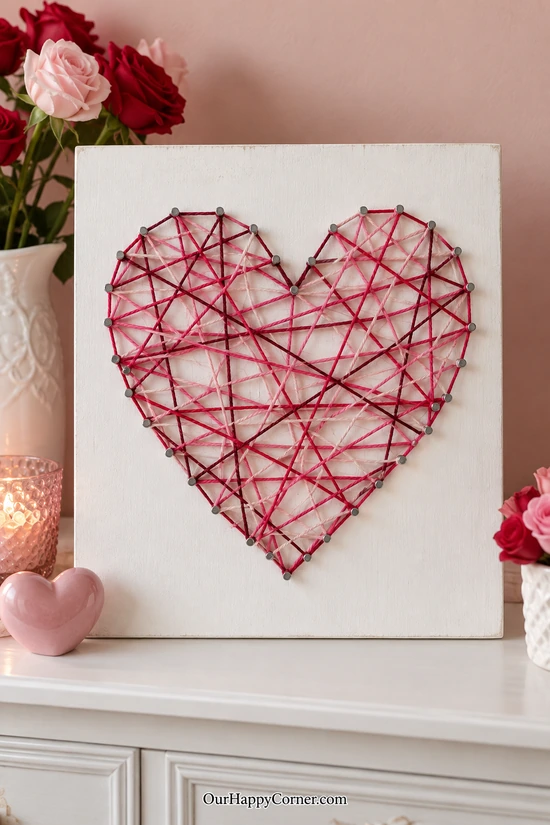
String art gives a familiar heart shape texture and depth. Red, pink, and burgundy threads make the design interesting without adding extra motifs.
A white board keeps the outline easy to see. You do not need a perfectly symmetrical web inside the heart. An even nail outline and a clearly defined edge matter more than the exact crossing pattern.
Display the finished piece on a shelf or add suitable hanging hardware to the back.
Materials: Solid wood craft board, white paint, paper heart template, small nails, hammer, embroidery thread, scissors.
How to make it:
- Paint the board and allow it to dry, then place a heart template in the center.
- Tap nails along the outline at roughly ½-inch intervals, keeping their exposed heights consistent; remove the template.
- Tie thread securely to one nail, wrap the outline, then crisscross between nails to fill the heart.
- Tie off each color neatly and trim the ends; keep the finished piece out of children’s reach because of its exposed nails.
10. Layered Paper Heart Art
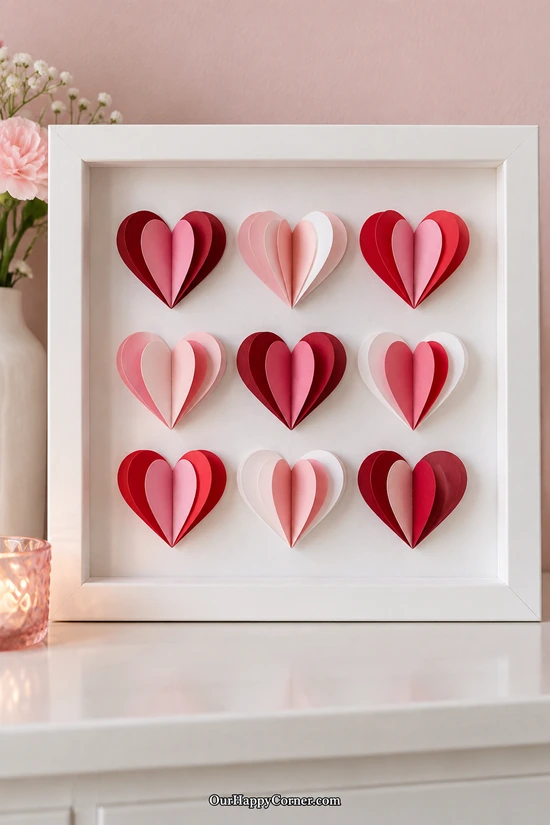
Layered paper hearts make a framed display with just enough dimension to catch the light. A three-by-three arrangement keeps the design tidy and easy to plan.
Red, blush, pink, and white give each heart its own combination. Folded edges add volume without complicated paper sculpting.
A shadow box leaves room for the raised shapes. This is a good choice when you want a polished piece made mostly from cardstock.
Materials: White shadow box, cardstock in Valentine colors, heart template, scissors, paper glue, ruler, white backing card.
How to make it:
- Cut three matching hearts for each of the nine positions, then fold each heart vertically down its center.
- Mark a three-by-three grid lightly on the backing card.
- Glue the center crease of a base heart at each position, then glue the remaining folded hearts along the same center line.
- Fan the sides apart gently, allow the glue to dry, and fit the backing inside the shadow box.
11. Sparkling Heart Magnets
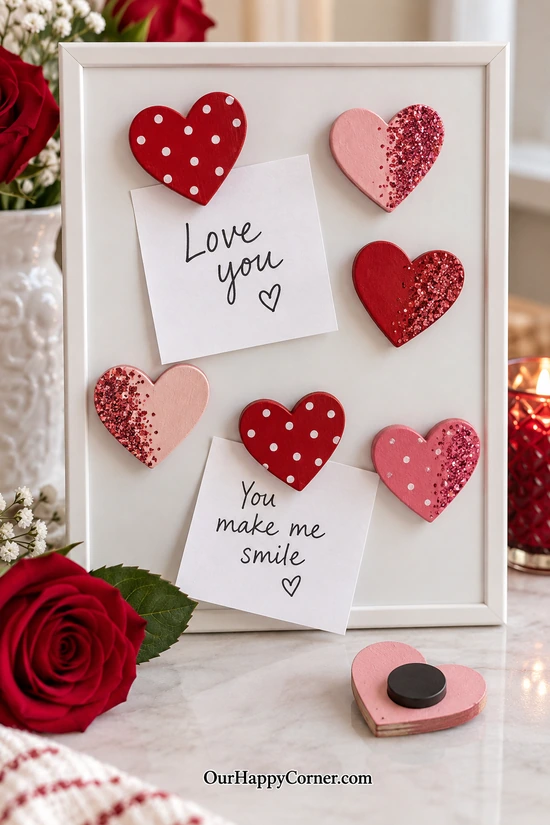
Heart magnets make a small handmade gift that can be used throughout the year. Premade wooden shapes let you focus on color and decoration.
Alternate glittered sections with white dots so the set has variety. Red and blush work well together without making every magnet identical.
Paint the edges as well as the fronts for a finished look. Pair the magnets with a few handwritten notes when giving them away.
Materials: Wooden heart cutouts, red and pink acrylic paint, brush, craft glue, fine glitter, compatible clear finish, craft magnets, suitable strong adhesive.
How to make it:
- Paint the hearts and let them dry.
- Brush glue over part of each heart, add glitter, and tap off the excess; paint white dots on others.
- Apply a compatible clear finish to help contain loose glitter and allow it to cure.
- Glue a magnet to the back of each heart using an adhesive suitable for both materials, then let it set completely; keep loose magnets away from children and pets.
12. Heart Canvas Tote
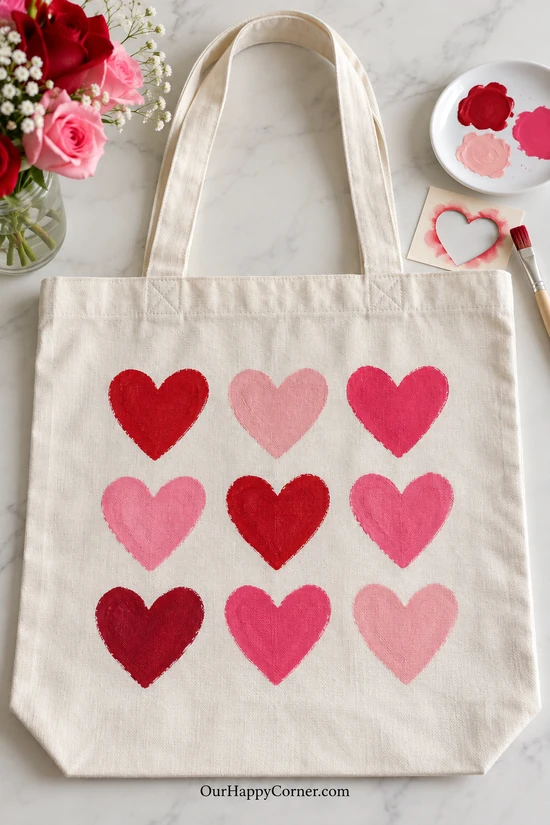
A heart-covered tote is festive enough for Valentine’s Day and useful afterward. Repeating one heart shape keeps the painting approachable.
Switching between red, hot pink, and blush adds interest to the grid. A cotton tote provides a sturdy surface with visible fabric texture.
Stencils help keep the spacing tidy without needing confident freehand drawing. Make one for yourself or fill it with a small collection of homemade gifts.
Materials: Plain cotton tote, fabric paint in red and pink shades, heart stencil, sponge brush, cardboard insert, ruler.
How to make it:
- Prepare the tote according to the fabric-paint instructions and place cardboard inside to prevent bleed-through.
- Plan a three-by-three heart arrangement with a ruler.
- Hold the stencil flat and dab on light coats of fabric paint, lifting it carefully between hearts.
- Let the paint dry and heat-set only if the label requires it; follow the product’s washing instructions.
13. Heart Cork Coasters
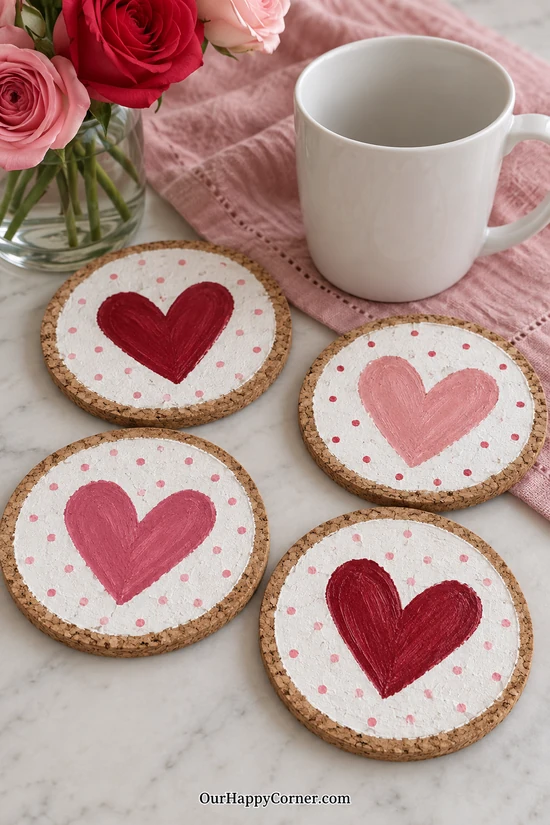
Painted cork coasters bring Valentine color to everyday coffee breaks. A white center makes each red or pink heart stand out against the natural cork edge.
Small dots finish the design without demanding detailed painting. Ready-made cork rounds keep the project consistent in size. Make four coordinating designs rather than four exact copies.
Stack the finished set and tie it with ribbon for a useful handmade gift.
Materials: Round cork coasters, white, red, and pink acrylic paint, brushes, heart stencil if desired, compatible protective finish.
How to make it:
- Paint a white circle on each coaster, leaving a narrow cork border visible.
- Add a red or pink heart to the center and small dots around it.
- Allow the paint to dry, then apply a finish labeled as suitable for the painted surface and intended coaster use.
- Let the finish cure fully before placing cups on the coasters; wipe gently and avoid soaking.
14. Love Note Bottles
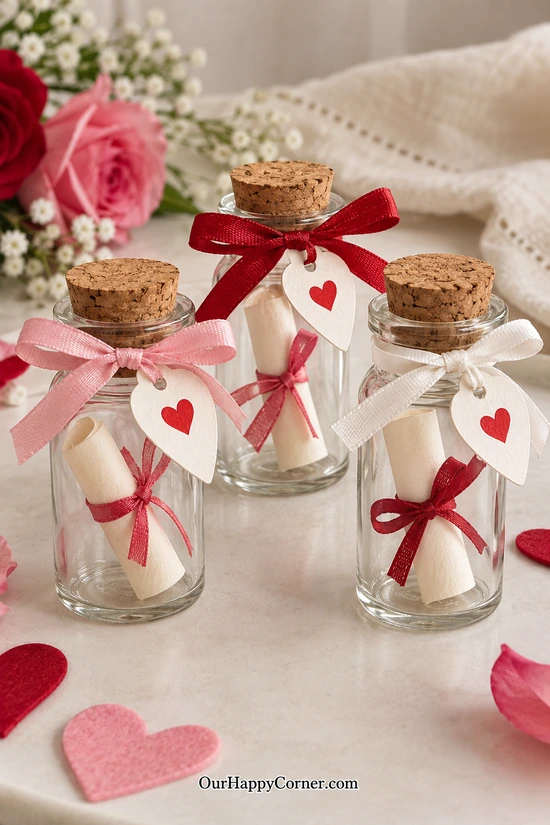
A little bottle holding a personal note makes a thoughtful keepsake. The message does most of the work, so the decoration can stay light.
Red, pink, and white ribbon give several bottles a coordinated finish. Choose a mouth wide enough for the rolled note to come out easily.
A small heart tag adds room for a name or date. These work especially well as individual gifts or place-setting surprises.
Materials: Small wide-neck glass bottles with corks, writing paper, pen, narrow ribbon, heart tags.
How to make it:
- Write a short message, memory, or reason you appreciate the recipient.
- Roll the note loosely and tie it with narrow ribbon, checking that it fits through the bottle opening without becoming stuck.
- Place the note inside and insert the cork.
- Tie a ribbon around the neck and attach a heart tag with the recipient’s name.
15. Felt Envelope Pouches
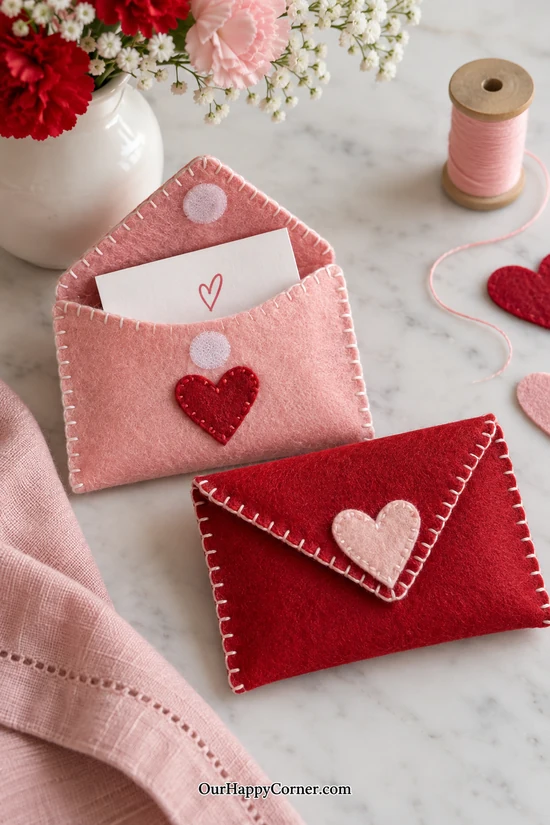
Felt envelopes make a reusable holder for a Valentine note or gift card. Contrasting white stitches give the edges a deliberate handmade finish.
Red and blush felt look lovely as a pair. The heart on the flap keeps the decoration focused and easy to sew.
A hook-and-loop closure lets the envelope open without untying anything. Size the pouch around the actual note or card you plan to give.
Materials: Red and pink felt, white thread, needle, scissors, paper pattern, sew-on hook-and-loop dots.
How to make it:
- Draw a pattern with a rectangular front, back, and triangular flap, leaving enough room for the intended card. Cut it from felt.
- Fold the front upward and blanket-stitch both side edges, keeping the opening clear.
- Stitch a contrasting felt heart onto the flap without sewing through the pouch beneath it.
- Sew matching hook-and-loop pieces to the flap and front, then add your note or gift card.
16. Valentine Chocolate Bouquet
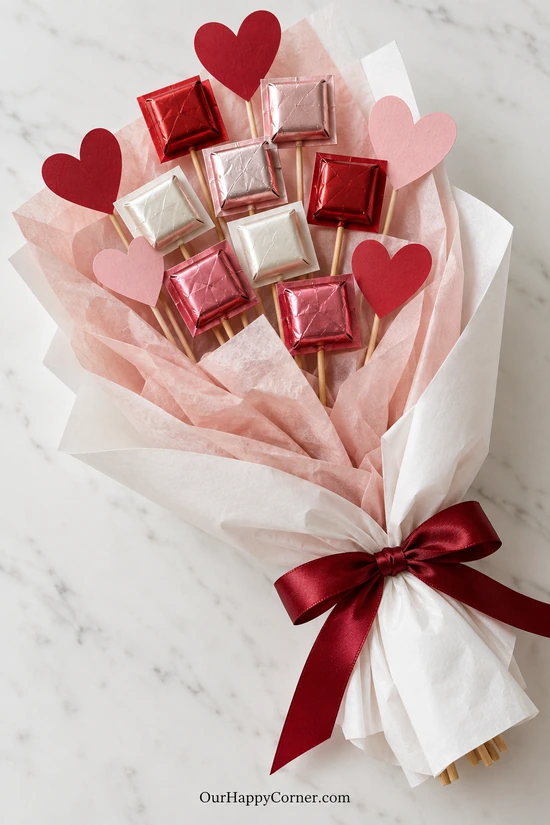
A chocolate bouquet is a sweet alternative to a traditional flower arrangement. Individually wrapped chocolates become the focal points, with paper hearts filling the gaps.
Blush tissue and white wrapping paper help the red and pink details stand out. Different stem heights make the arrangement easier to read.
A burgundy bow holds the wrapping together and gives it a finished look. Keep the chocolates sealed so the gift is ready to enjoy.
Materials: Individually wrapped chocolates, bamboo skewers, cardstock, tape, paper glue, tissue paper, white wrapping paper, ribbon.
How to make it:
- Tape a small cardstock backing to each sealed chocolate wrapper, then attach the backing to a skewer without piercing the food package.
- Cut paper hearts and attach them to separate skewers.
- Arrange the chocolate stems and hearts in a fan, then tape the stem bundle together below the visible arrangement.
- Wrap the bundle in tissue and white paper, secure it with ribbon, and cover sharp skewer ends inside the wrapping.
17. Paper Heart Mobile
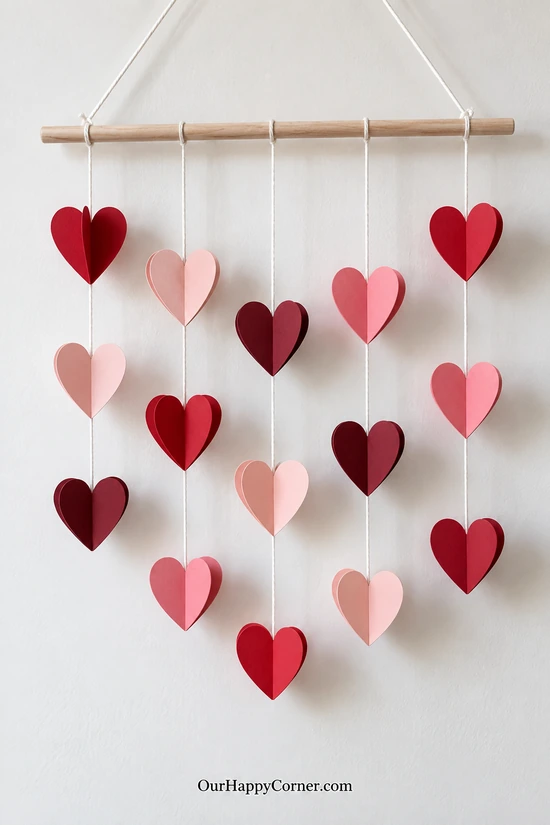
A hanging heart mobile adds movement to a quiet corner without filling it with decorations. Staggered strings create a flowing shape under the wooden dowel.
Red, blush, and burgundy hearts keep the palette varied and unmistakably Valentine-themed. Lightweight cardstock is easy to cut and hang.
A gentle center fold gives the hearts a little dimension. Keep the spacing open so each shape remains visible.
Materials: Wooden dowel, white cord and thread, red and pink cardstock, heart template, scissors, paper glue.
How to make it:
- Tie a hanging cord securely to both ends of the dowel.
- Cut paired hearts and fold them lightly down the center if you want raised edges.
- Sandwich thread between each matching pair with paper glue, spacing three hearts along each of five strings.
- Tie the strings to the dowel at staggered heights and hang indoors, away from children’s sleeping or play spaces.
18. Yarn-Wrapped LOVE Letters
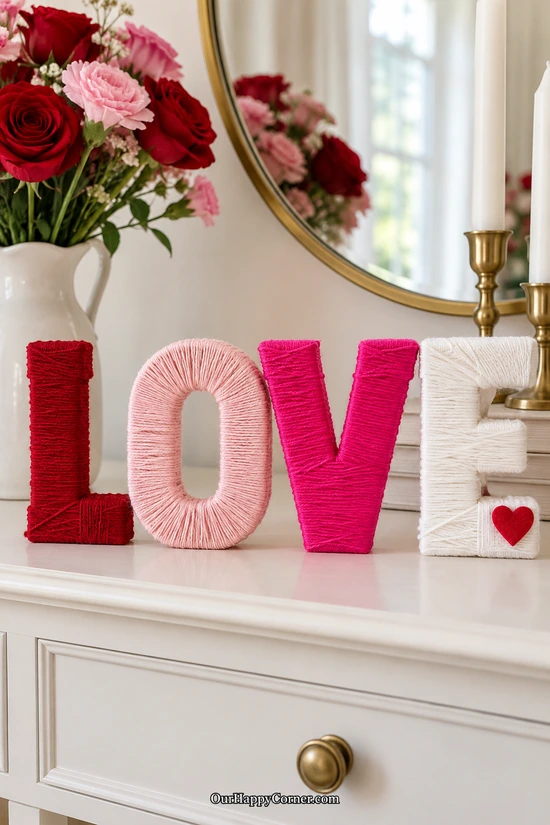
Yarn-wrapped letters make a colorful shelf display without complicated construction. Red, blush, hot pink, and white give each letter a separate identity.
Use thick block letters so the word stays easy to read after wrapping. The natural overlap of the yarn adds texture. A small red felt heart on the white letter is enough extra decoration.
Choose freestanding letters if you want to display the word without mounting it.
Materials: Freestanding craft letters spelling LOVE, yarn in Valentine colors, scissors, craft glue, small felt heart.
How to make it:
- Glue a yarn end to the back of a letter.
- Wrap the letter in close rows, securing the yarn occasionally and changing direction around curves and corners.
- Use short glued lengths to cover awkward inside edges, keeping the opening in the O clear.
- Secure the final ends at the back, add a small felt heart to the E, and let the glue dry before displaying.
19. Valentine Memory Album
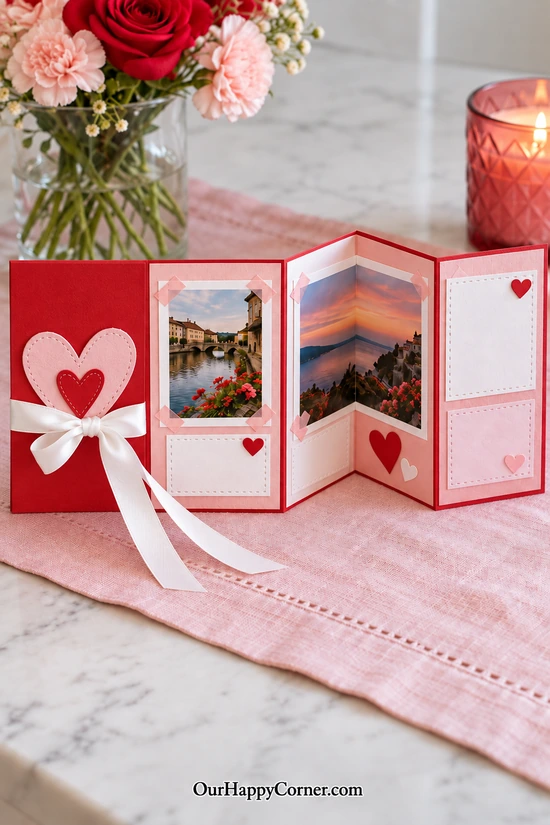
An accordion memory album turns favorite moments into a personal Valentine gift. Red covers and blush panels create a coordinated background for photos and notes.
Keep the decorations flat enough for the album to close comfortably. Small paper hearts add color without hiding the memories.
A white ribbon gives the closed album a lovely finish. Choose a few meaningful photos rather than filling every space.
Materials: Red cardstock, stiff card for two covers, blush and white paper, printed photos, paper glue or photo-safe tape, ribbon, ruler, scoring tool.
How to make it:
- Cut equal-height cardstock strips and score them into equal-width panels; join strips with narrow glued tabs if needed, then fold into an alternating accordion.
- Make two covers the same size as the folded panels. Cover them with red paper, attaching ribbon ends beneath the cover lining for a tie closure.
- Glue the first and last accordion panels to the inside covers, using one clean hinge at each end and no extra pocket or folded flap.
- Add pink mats, photos, blank note panels, and paper hearts. Let the adhesive dry, then close the album and tie the ribbon loosely.
20. Hand-Decorated Valentine Mug
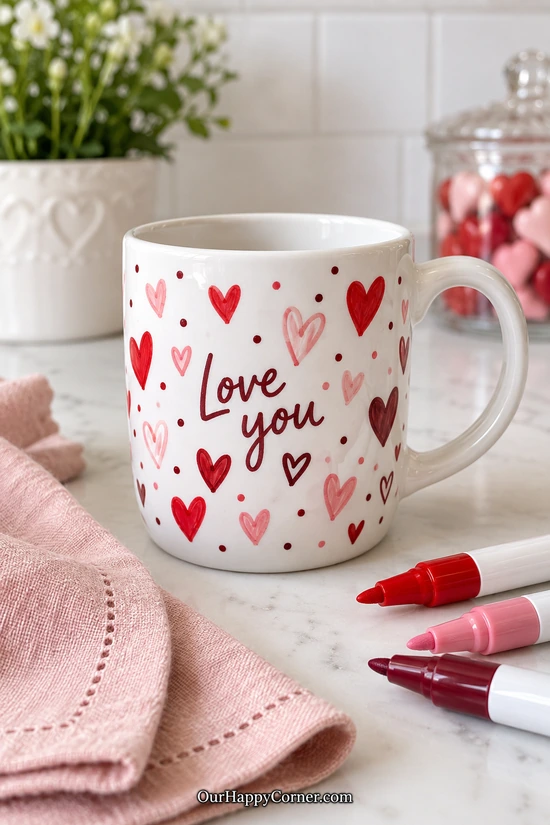
A hand-decorated mug makes a practical Valentine gift with a personal touch. Red and pink hearts are forgiving shapes to draw with ceramic markers.
Small dots fill the spaces without making the design crowded. Write a short message first so it has room to stand out. Use markers intended for glazed ceramics rather than ordinary permanent markers.
Keep the artwork on the outside, away from the drinking rim and interior.
Materials: Plain glazed ceramic mug, ceramic decorating pens in red and pink, cleaning supplies specified by the pens, pencil and paper for planning.
How to make it:
- Clean and dry the mug according to the ceramic-pen instructions.
- Write a short message on the outside, then add hearts in different sizes and a few small dots.
- Allow the design to dry and cure or heat-set exactly as the pen manufacturer directs; use only an oven-safe mug if baking is required.
- Let the mug cool completely if heated and follow the pens’ care guidance; hand-washing gently can help protect the decoration.
21. Felt Heart Keychains
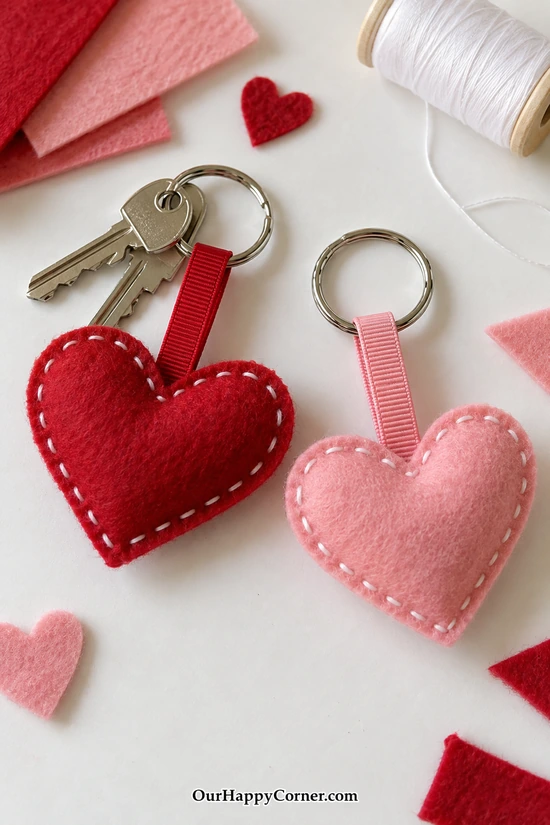
Felt-heart keychains are small enough to make in pairs and personal enough to give individually. Red and blush felt create a coordinated set without extra embellishment.
White running stitches highlight the heart shape. A little stuffing gives each piece a soft, rounded feel. A ribbon loop connects the heart to a normal split keyring.
Sew that attachment securely so the keychain is ready for everyday handling.
Materials: Red and blush felt, heart template, white thread, needle, scissors, polyester stuffing, grosgrain ribbon, split keyrings.
How to make it:
- Cut two matching felt hearts for each keychain.
- Pass a short piece of ribbon through the split ring, fold it in half, and place both ends between the felt layers at the top of the heart.
- Sew around the edge with a running stitch, reinforcing the ribbon attachment and leaving a small opening.
- Add a little stuffing, stitch the opening closed, and tug gently on the ribbon to check that it is secure.
Final Thoughts
A handmade Valentine doesn’t need to be complicated to feel special. Choose a craft you’ll enjoy, use a few favorite red and pink shades, and add a detail that makes it personal. A handwritten note, meaningful photo, or gift made in someone’s favorite style can turn a small project into something worth keeping.