This post may contain affiliate links. If you make a purchase through these links, I may earn a small commission at no extra cost to you. Thank you so much for your support.
Winter animal crafts for kids are a lovely way to turn a chilly afternoon into a little table full of bears, birds, and woodland friends.
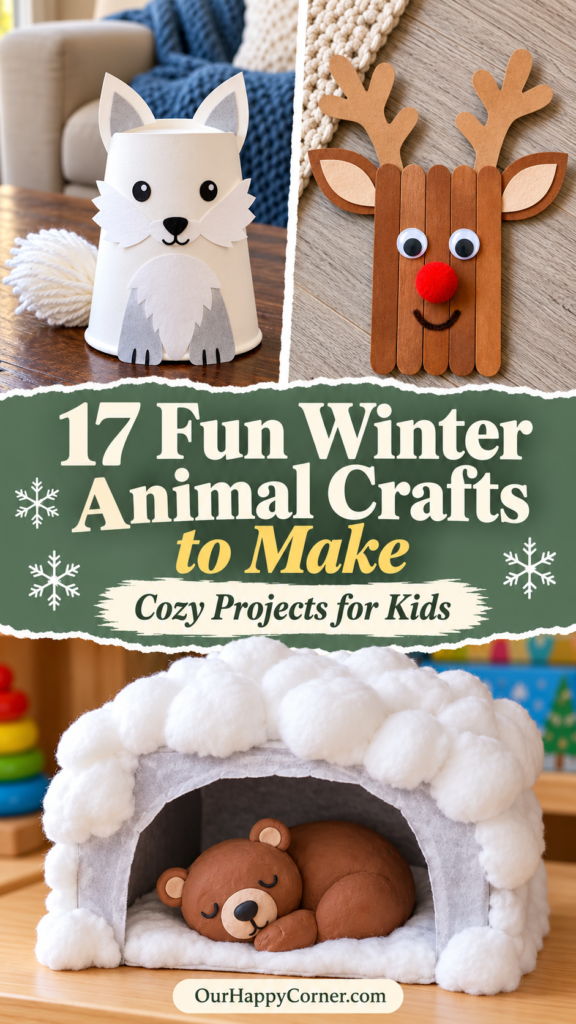
A paper plate can become a fluffy polar bear, a cardboard tube can turn into a scarf-wearing penguin, and a spare sock can become a soft white hare.
I like having a mix of quick cut-and-glue ideas and a few projects that take a little longer. That way, you can choose something that suits your child’s mood and the supplies you already have.
These ideas include a supplies list, four short steps, and a helpful tip for each craft. Children can choose their own colors and expressions, so there is plenty of room to make each animal feel like theirs.
If you would like a quieter activity while paint dries, keep a few free printable winter coloring pages nearby.
Gather Your Winter Animal Craft Supplies
Most of these winter animal crafts for kids begin with paper, thin cardboard, washable paint, white school glue, and child-friendly scissors. A few clean paper cups, cardboard tubes, cotton balls, felt scraps, and short lengths of yarn will cover many of the ideas below.
Protect the work surface and set out only what you need for the animal you are making. An old tray is handy for keeping small paper shapes together while the glue dries.
An adult should handle thick cardboard cutting, prepare mask eye holes and lacing holes, and help with tight knots.
Choose age-appropriate supplies, supervise small pieces, and use drawn or paper eyes when loose embellishments are not suitable.
Choose a Craft That Fits Your Afternoon
For a short session, try the polar bear plate, penguin tube, walrus bowl, or paper bag raccoon. The yarn robin, sock hare, and sleeping bear cave work better when you can help with shaping and allow extra drying time.
Keep flat artwork on the table until dry. For standing animals, build and test the base before decorating.
A puppet or mask can lie flat between play sessions; it does not need to stand up on its own.
If your children enjoy several kinds of making, our winter crafts for kids collection has more seasonal projects to try alongside these animals.
Winter Animal Crafts for Kids
1. Cotton Ball Paper Plate Polar Bear
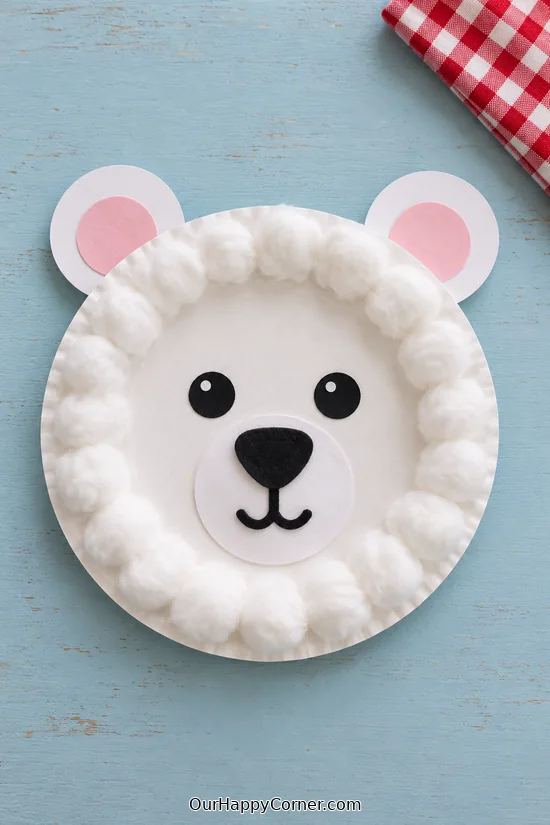
A fluffy polar bear is a lovely place to start when your child wants to make something straight away. The cotton border gives an ordinary paper plate a soft, snowy look.
I like that the face stays simple. Two eyes, a round nose, and a little smile are enough to give this bear plenty of character.
Let your child pull the cotton into smaller tufts and choose where each piece goes. There is no need to make a perfectly even circle.
Keep the plate flat while the glue dries. You can display it on a wall afterward or leave it on a shelf, leaning securely against the back.
Supplies: White paper plate, cotton balls, white and black cardstock, black marker, child-friendly scissors, white school glue.
How to make it:
- Cut two round white ears with small tabs and glue the tabs behind the top of the plate.
- Spread a thin line of glue around the rim. Press on small cotton tufts, leaving the center clear.
- Add black paper eyes and a nose. Draw a short line and a curved smile beneath the nose.
- Leave the bear face-up on the table until the cotton and ears are firmly attached.
Helpful tip: Try a glue brush for the rim so little hands can spread the glue without soaking the cotton.
2. Cardboard Tube Penguin
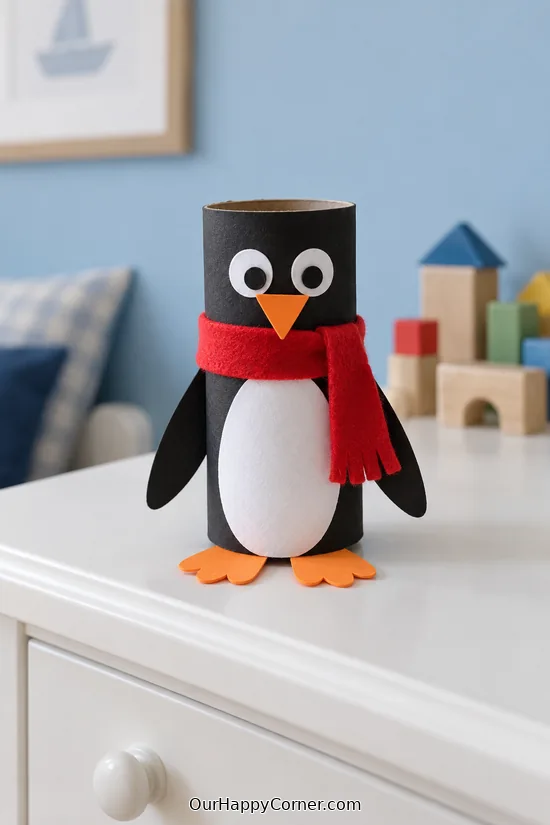
This little penguin looks ready to waddle across the windowsill in its bright red scarf. A clean cardboard tube makes the body, so you already have the main shape.
The orange feet do more than finish the look. Made from sturdy card, they give the tube a wider, steadier base.
If you are choosing winter animal crafts for kids who enjoy pretend play, this one can become a character in a snowy story.
Use paper eyes or draw them on, then let your child decide whether their penguin needs a long scarf or a short one.
Supplies: Clean cardboard tube, black and white paper, orange cardstock, red felt, paper eyes, glue, scissors.
How to make it:
- Wrap the tube in black paper, keeping its bottom edge level. Glue a white oval belly to the front.
- Cut two connected orange feet with a wide center section. Glue the bottom rim of the tube onto that section.
- Add a small folded orange beak, eyes, and black paper flippers attached at the sides.
- Wrap a narrow felt scarf around the upper tube and glue the ends in place. Let the base dry before playing.
Helpful tip: An empty gift-wrap tube cut into short sections works well too; an adult can do the cutting.
3. Paper Cup Arctic Fox
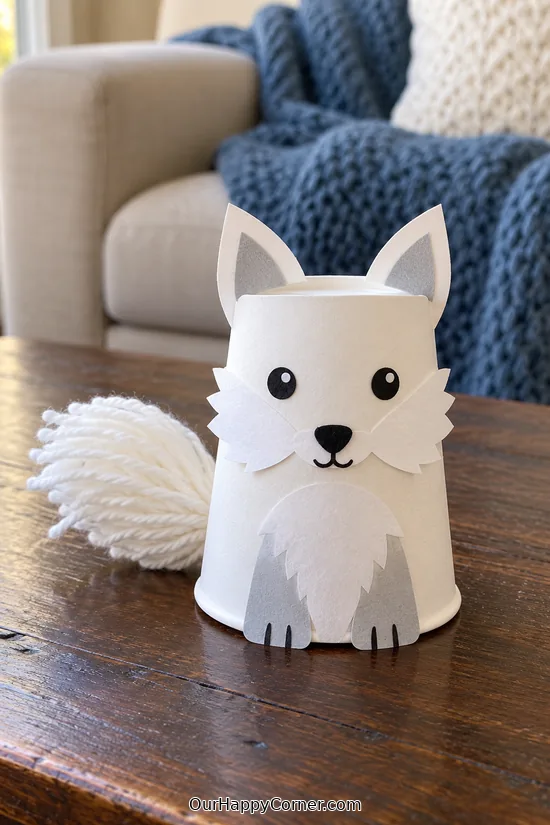
An upside-down paper cup gives this arctic fox a body that can stand by itself. Pointed ears and a sweeping tail turn it into a recognizable little animal.
The pale colors suit a winter fox, while a tiny black nose keeps the face easy to read.
Your child can make the cheeks from simple paper triangles rather than trying to paint tiny details on the cup.
This is a sweet choice for a small animal display. Give the fox room around its tail so it does not get bent when the animals are moved.
Supplies: White paper cup, white cardstock, pale pink paper, white yarn, black marker, glue, scissors.
How to make it:
- Set the cup upside down. Cut two triangular ears with folded tabs and glue them onto the top.
- Glue two white paper cheek shapes to the front. Add a black nose and draw eyes.
- Cut a curved tail from sturdy cardstock. Cover it with short strands of white yarn and let it dry flat.
- Fold a tab at the tail base and glue it to the back of the cup, allowing the tail to rest on the table for support.
Helpful tip: Make the tail backing first and keep the yarn layer light so the cup stays balanced.
4. Pinecone Snowy Owl
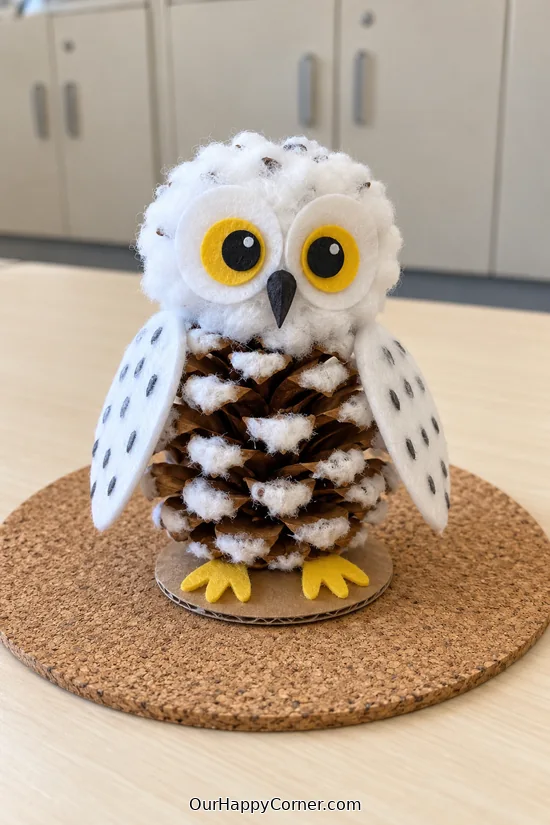
A pinecone already has so much texture that this owl needs only a few extra pieces. Cotton tucked between the scales suggests soft winter feathers.
Big yellow eyes make it playful without asking your child to work on lots of tiny details.
These winter animal crafts for kids are a nice excuse to explore different textures. This one combines a rough pinecone, fluffy cotton, and smooth felt.
The little card base matters here. It helps the owl sit securely instead of balancing on a pointed or uneven pinecone.
Supplies: Clean dry pinecone, cotton balls, yellow and black cardstock, white felt, orange paper, stiff cardboard base, craft glue.
How to make it:
- An adult checks the pinecone for sharp points. Glue its widest stable end to a small stiff cardboard base.
- Pull cotton into little tufts and press a few between the scales with small dabs of glue.
- Cut two white felt wings and glue them to the sides, leaving the lower pinecone visible.
- Add large yellow-and-black paper eyes and an orange triangular beak. Let everything dry on its base.
Helpful tip: Choose a squat pinecone and test how it sits before gluing; a tall narrow one is harder to balance.
5. Paper Bowl Walrus
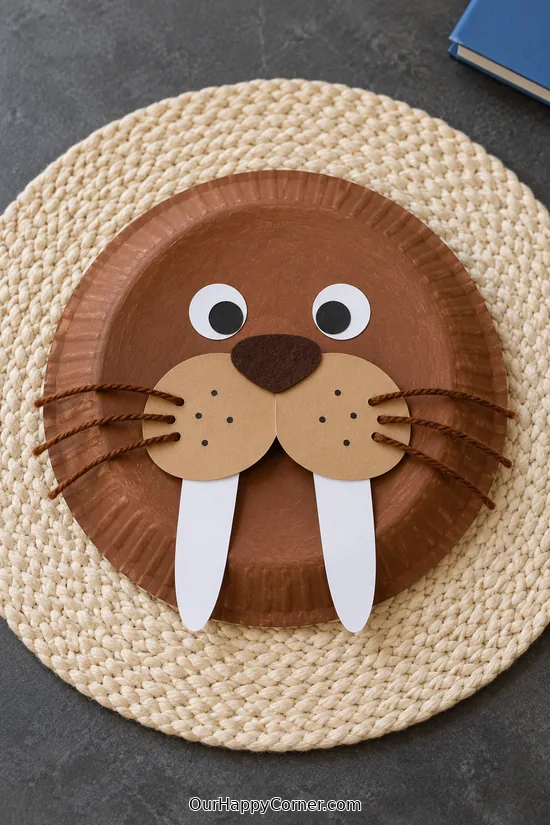
The walrus is the one I would choose for a child who likes funny animal faces. Those long white tusks make it different from the usual winter bear or penguin.
A shallow paper bowl gives the face a gentle curve, but the decorating is mostly simple cutting and gluing.
Keep the whiskers drawn on rather than adding lots of separate strands. It is quicker, and the face still has plenty of personality.
Lay the finished walrus flat on its back while it dries. The tusks are decorations, so they should never be expected to hold the craft upright.
Supplies: Shallow paper bowl, brown washable paint, paintbrush, tan and white cardstock, black paper or marker, glue, scissors.
How to make it:
- Paint the outside of a shallow paper bowl brown and let it dry fully.
- Cut a tan muzzle and two broad white tusks with rounded tips. Glue the tusks behind the lower edge of the muzzle.
- Attach the muzzle to the bowl. Add eyes and a dark nose, then draw short whisker lines.
- Place the bowl decorated-side up and let the paper pieces dry without bending the tusks.
Helpful tip: Thick white card holds the tusks better than printer paper, especially if you plan to display the face.
6. No-Sew White Sock Hare
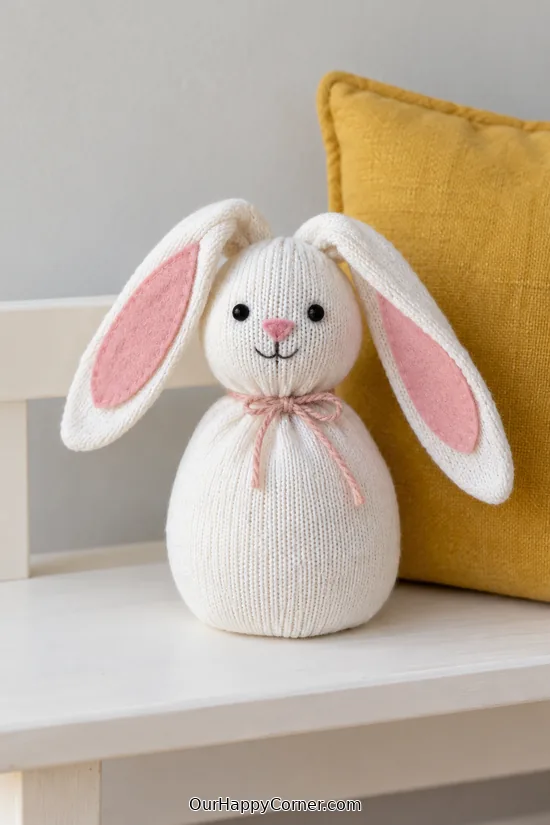
A spare white sock can become a soft winter hare with long floppy ears. There is no sewing involved, although younger children will need help tying it securely.
The rounded body is meant to sit down. Keeping it low and softly filled makes that pose much easier to achieve.
Choose this from the winter animal crafts for kids when you have time for a little adult help with the shaping.
A pink felt nose and ear centers are enough decoration. You can use flat felt eyes too, keeping the whole face soft.
Supplies: Clean white sock, polyester toy stuffing, strong yarn, white thread or yarn for ties, pink and black felt, fabric glue, scissors.
How to make it:
- Push stuffing into the toe and lower sock to form a broad rounded body. Tie firmly above it with strong yarn.
- Add a smaller amount of stuffing above the tie for the head, then secure another tie above the head.
- Flatten the remaining sock cuff and cut down its middle to make two ears. Trim them into rounded shapes.
- Glue on felt features and pink ear centers. Shape the base with your hands so the hare sits steadily while drying.
Helpful tip: Use stuffing rather than loose rice, and save this project for children who will not pull apart or mouth the finished craft.
7. Craft Stick Reindeer Plaque
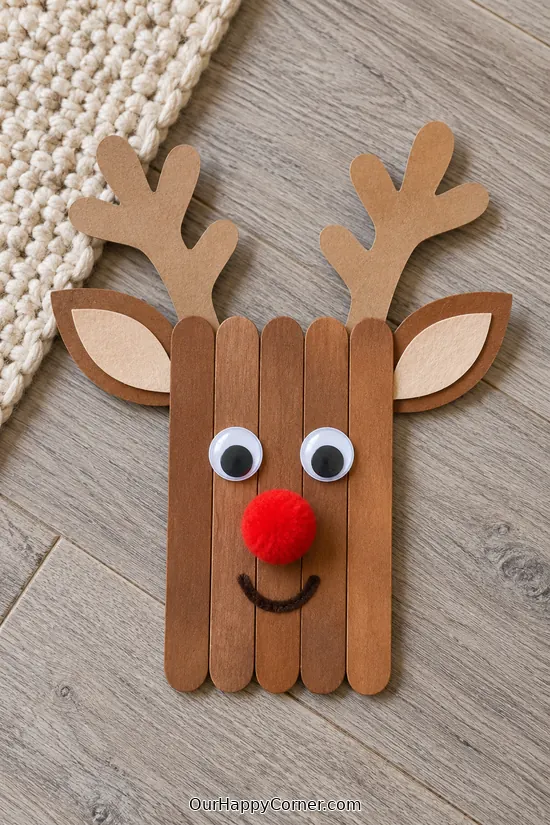
A bright red nose makes this reindeer feel cheerful before you have added anything else. The stick body is a small, manageable painting project.
Cardstock antlers keep the shape simple. Children can cut their own chunky branches, or you can prepare the antlers ahead of time.
You can keep the finished piece as a flat decoration or add a hanging loop once all the joins are dry.
It is a good choice for using up a few craft sticks, and each reindeer can have a slightly different expression.
Supplies: Five wide craft sticks, two short backing sticks or cardboard strips, brown paint, brown cardstock, paper eyes, red pom-pom, glue.
How to make it:
- Lay five craft sticks side by side. Glue two short strips across the back to hold them together, then let dry.
- Paint the front brown and allow it to dry before adding the face.
- Cut two chunky card antlers and two ears. Glue their lower ends securely to the back of the plaque.
- Add eyes and a red pom-pom nose. Leave the reindeer flat until all the pieces are secure.
Helpful tip: If you want to hang it, glue the loop across both backing strips rather than onto one antler.
8. Painted Pebble Seal
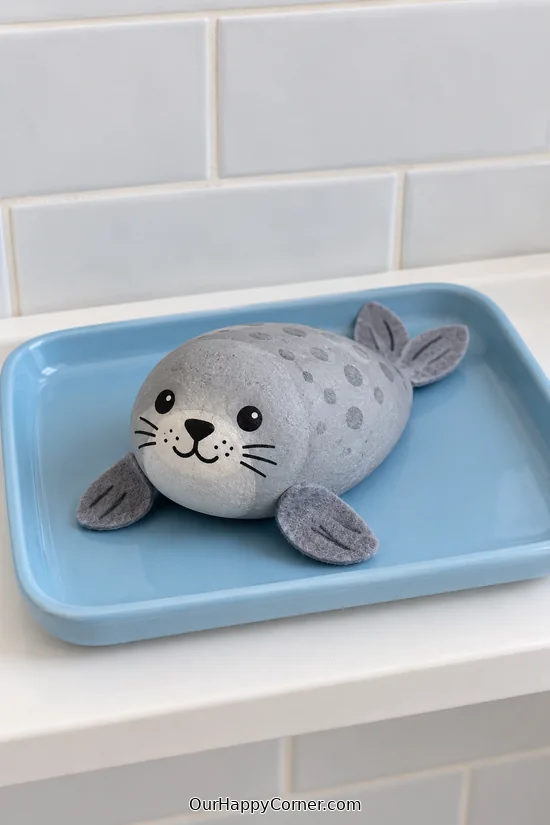
A smooth oval stone is almost a seal already. A coat of gray paint, a simple face, and a few felt pieces finish the transformation.
This is one of those winter animal crafts for kids that works well when you want a small project with very few parts.
Let your child try the face on paper first if they would like. Wide-set eyes and a rounded muzzle are easier than tiny realistic features.
Use the seal as a little shelf decoration once it is dry. It is a stone craft, so it belongs on a sturdy surface where it cannot roll off.
Supplies: Smooth palm-sized oval pebble, gray child-suitable paint, paintbrush, gray felt, white and black paint pens or markers suitable for the painted surface, craft glue.
How to make it:
- Wash the pebble, let it dry, and check that it has a broad side that rests securely.
- Paint the top and sides gray. Let the paint dry completely.
- Cut two small front flippers and a rear tail shape from felt. Glue their inner ends under the stone.
- Draw or paint a simple face on one end, then leave the seal on its flat side until the glue dries.
Helpful tip: Choose a stone large enough for your child to handle easily, with no sharp edges or flaky surface.
9. Handprint Cardinal Collage
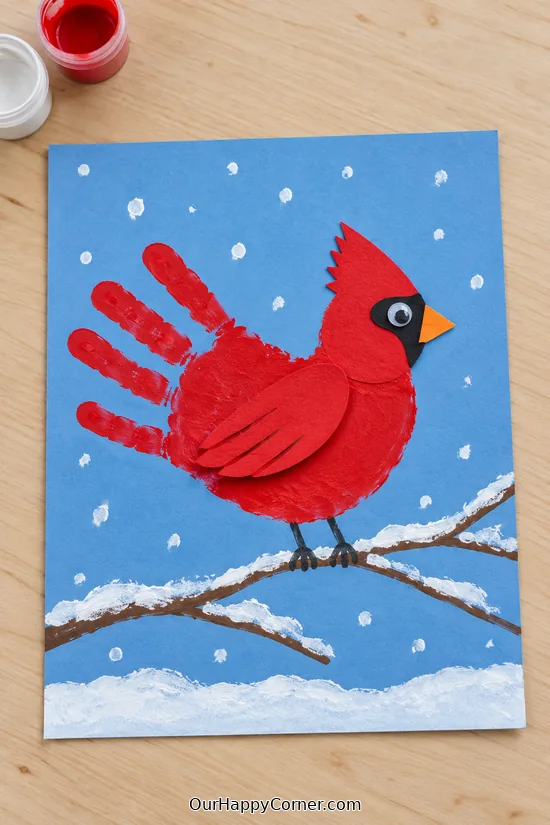
A red cardinal brings a welcome burst of color to a winter craft afternoon. The handprint shape makes the bird feel personal without needing a complicated drawing.
Spread fingers become a feathery tail, while a simple round head helps the shape read clearly as a bird.
I would keep a little extra red paper nearby so children can add a crest or adjust the body after cutting.
The finished picture is meant to stay flat. Set it on a table to dry, then display it with your other winter artwork.
Supplies: Blue cardstock, red paper, brown and orange paper, black marker, white washable paint, glue stick, scissors.
How to make it:
- Trace a hand on red paper with the fingers comfortably spread, then cut it out.
- Turn the handprint sideways with the fingers pointing back. Glue it to blue card as the bird body and tail.
- Add a red circle head and a small crest at the wrist end. Attach an orange beak and draw a black face patch and eye.
- Glue a brown paper branch beneath the bird and dab a few white snow dots around the background.
Helpful tip: Position the handprint and head before gluing so the tail and branch fit comfortably inside the backing card.
10. Felt Squirrel with a Yarn Tail
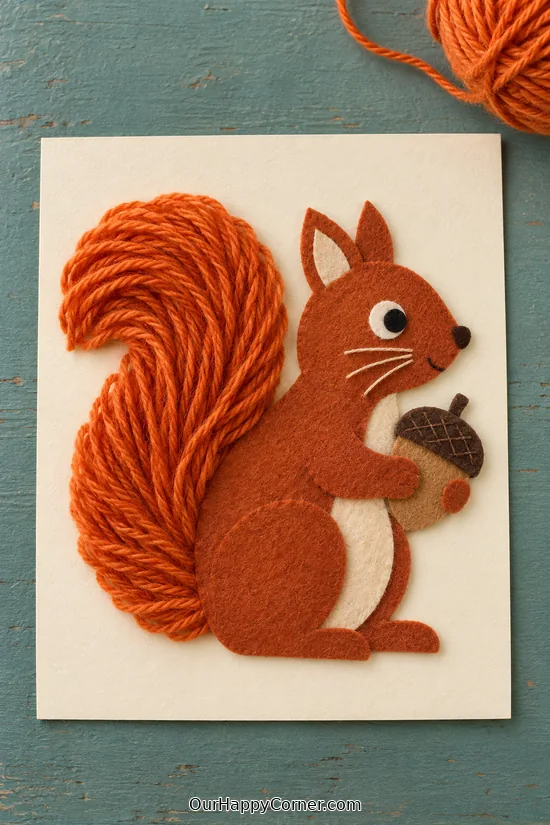
A squirrel with a fluffy curled tail feels right at home in a winter woodland collection. Rust felt gives the body a warm color against the pale backing.
The tail is where children can enjoy adding texture. Short yarn pieces are easier to control than one long strand.
If your child prefers winter animal crafts for kids with plenty of sticking, this collage offers a satisfying little area to fill.
Keep the acorn large and simple. A two-piece paper shape looks lovely tucked between the paws.
Supplies: Cream cardstock, rust felt, orange or brown yarn, brown paper, black marker or felt, scissors, white school glue or suitable craft glue.
How to make it:
- Cut a simple felt squirrel body, round head, ears, and paws. Arrange them on cream card before gluing.
- Draw a broad curled tail shape beside the body and spread glue inside the outline.
- Lay short yarn pieces close together within the tail, pressing gently so the glue catches them.
- Add a paper acorn between the paws and finish with a nose and eye. Dry the collage flat.
Helpful tip: An adult can cut the felt shapes ahead of time if the fabric is frustrating for little scissors.
11. Yarn Hedgehog Winter Picture
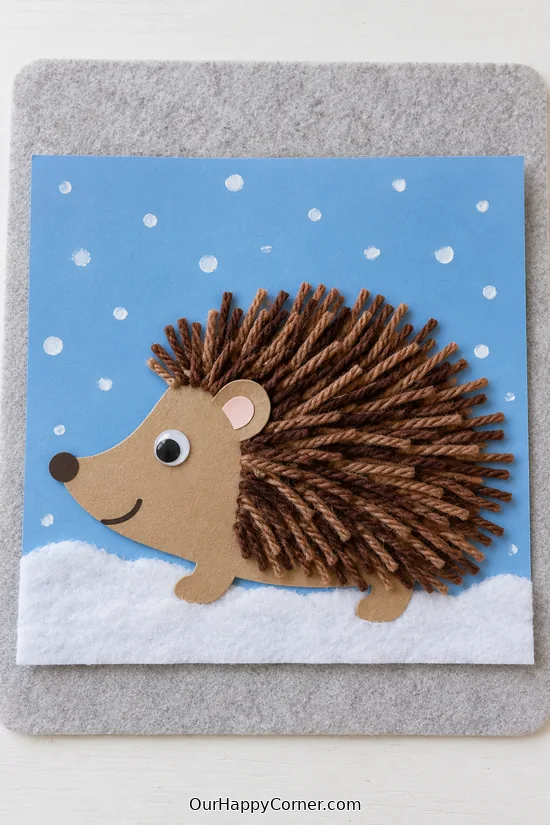
This little hedgehog swaps prickly spines for soft strands of yarn. It is a cozy picture to make while talking about animals that sleep through the coldest months.
The body is just one rounded cardboard shape with a pointed face. That leaves the yarn arranging as the main activity.
Brown, tan, and cream yarn can all go into the same hedgehog. A slightly mixed finish gives the back more texture.
A few torn white paper pieces suggest snow without covering the animal. Leave a clear space around its nose so the shape stays recognizable.
Supplies: Blue cardstock, thin cardboard, brown and tan yarn, white paper, black marker, glue, scissors.
How to make it:
- Cut a rounded hedgehog body with a short pointed snout from thin cardboard. Glue it to blue card.
- Cut yarn into short lengths and spread a thin layer of glue over the rounded back, leaving the face clear.
- Press the strands onto the back, overlapping them slightly and pointing some toward the outer edge.
- Draw a nose and eye. Add torn white paper below the hedgehog for snow, then leave the picture flat to dry.
Helpful tip: Cut the yarn into a small shallow dish first so your child can concentrate on arranging the spines.
12. Sleeping Bear Tissue-Box Cave
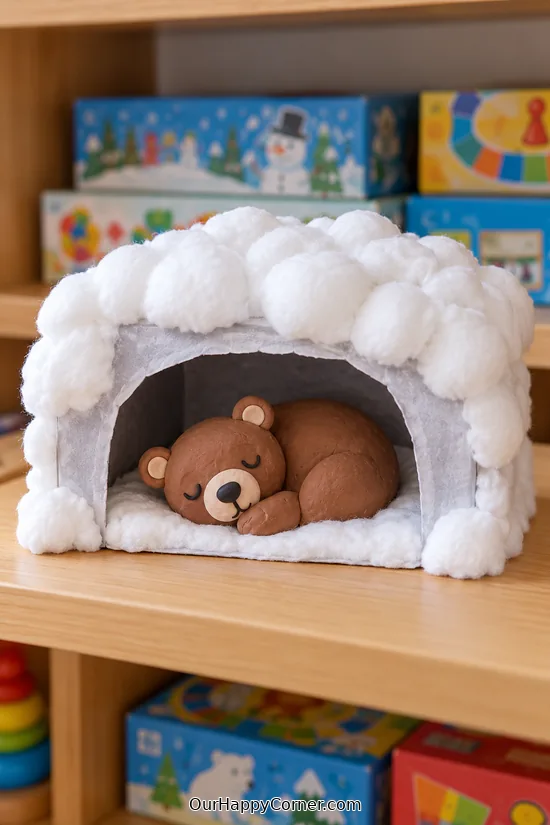
A little bear tucked into a snowy cave makes a lovely change from an animal face. The tissue box provides a real structure for the scene.
The bear can be made from a few rounded pieces of air-dry clay. It does not need separate legs or a detailed pose to look comfortably asleep.
This is one of the winter animal crafts for kids that needs a little more drying time, so I would spread it over two short sessions.
Leave the cave entrance wide enough to see the bear. The cotton belongs around the opening, rather than packed across its face.
Supplies: Rectangular tissue box, scrap cardboard, brown paper or washable paint, cotton balls, brown and tan air-dry clay, black marker, glue, tape, and scissors. An adult needs a craft knife.
How to make it:
- Prepare the cave. Rest the box on a broad side. An adult cuts a rounded entrance in the front, leaving a sturdy border and the bottom intact. Cover the original tissue opening with cardboard and tape.
- Add the snowy covering. Paint the box brown or cover it with brown paper. Fold loose paper edges inside and glue them down. Once dry, glue cotton around the roof and entrance. Keep the opening clear.
- Shape the bear. Make an oval clay body, a smaller round head, two ears, and a tan muzzle. Join the pieces while soft, following the clay’s directions. Rest the head against the body for a sleeping pose. Check that the bear fits through the entrance.
- Finish the scene. Let the bear dry fully according to the clay’s directions. Draw closed eyes, a nose, and a mouth. Place it inside the cave with its face visible. Add a cardboard floor insert if the box’s interior is uneven.
Helpful tip: Build the bear on a small cardboard piece that fits inside the cave. Slide it out for drying, then return it without handling the bear.
13. Gray Wolf Handheld Mask
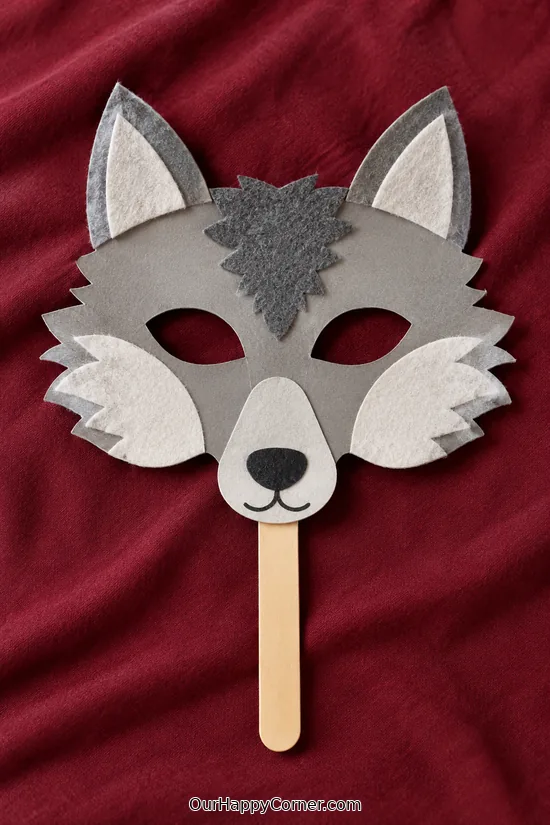
Pointed ears and shaggy paper cheeks give this gray wolf a strong shape. It feels lively without needing a lot of decoration.
A handheld mask lets children move it away from their faces whenever they like. There are no ties or elastic to fuss with.
The eye openings need adult attention. Cut them after checking their position against the child who will use the mask.
Between games, lay the wolf flat so the ears and handle stay in good condition. It can join a winter animal storytelling basket too.
Supplies: Gray, white, and black cardstock, wide wooden craft stick, glue, tape, scissors.
How to make it:
- Cut a broad gray wolf face with two pointed ears. An adult marks and cuts eye openings in a comfortable position.
- Add lighter inner ears and white cheek shapes with a few broad points along the outer edges.
- Glue on a black nose and darker forehead detail, keeping the eye openings completely clear.
- Glue a wide craft stick behind the lower edge as a handle, reinforce the join with tape, and let dry flat.
Helpful tip: Hold the paper shape in place before decorating to check that your child can see clearly through both openings.
14. Wooden Spoon Moose Puppet
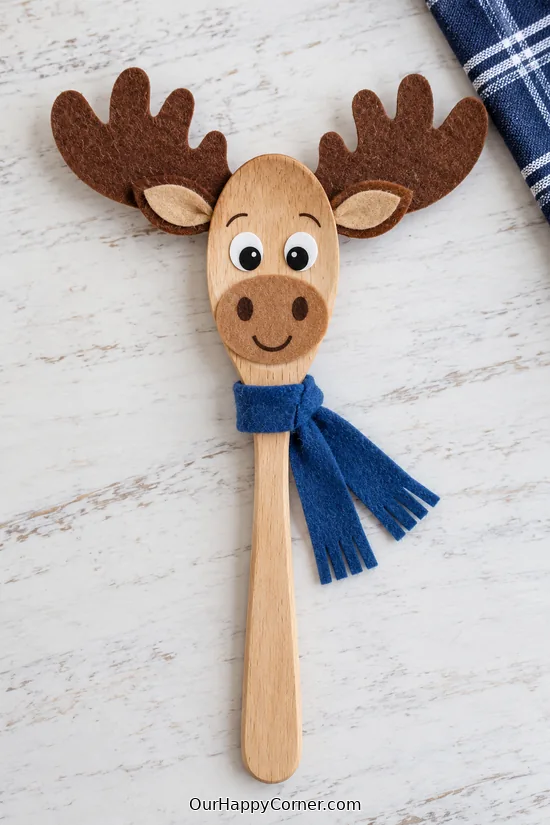
A wooden spoon makes a charming long-faced moose. The handle is already there, ready for a little puppet show once the glue dries.
Felt antlers keep the top soft and lightweight. Cut them with wide branches so there are fewer delicate parts to bend.
For winter animal crafts for kids who enjoy making characters, a scarf is an easy way to give this moose its own style.
Rest the puppet flat while decorating and drying. Later, your child can hold the handle to bring it to life.
Supplies: Clean wooden spoon, brown and tan felt, blue felt strip, paper eyes, black marker, fabric or craft glue, scissors.
How to make it:
- Cut two broad felt antlers and small ears. Glue their lower ends behind the spoon bowl.
- Add a tan oval muzzle to the front of the bowl, leaving space above for the eyes.
- Attach eyes and draw two nostrils and a simple smile on the muzzle.
- Wrap a narrow felt scarf around the top of the handle and glue it in place. Let the puppet dry flat.
Helpful tip: If the felt antlers flop too much, glue a slightly smaller cardstock shape behind each one.
15. Bubble-Wrap Narwhal Collage
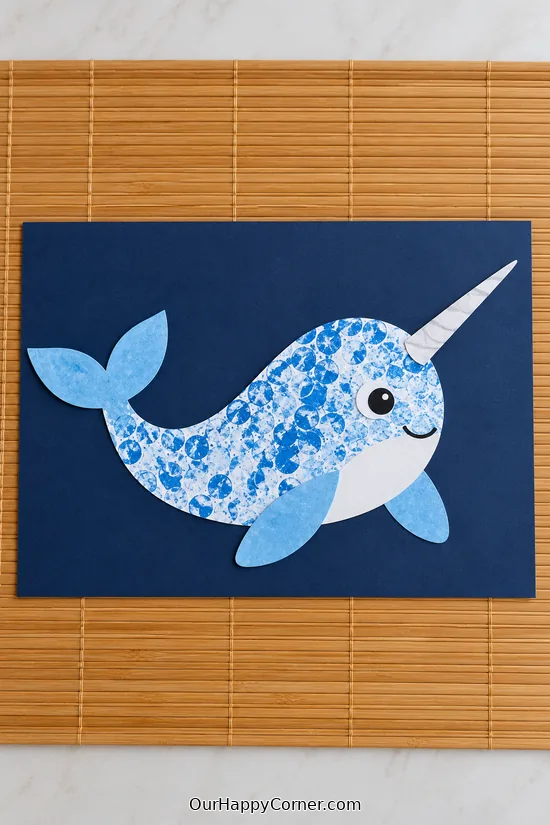
A bubble-wrap print gives this narwhal a playful blue texture. It is a fun option when your child wants painting and cutting in the same project.
The print does not need to be even. Patchy areas and overlapping circles help it look like handmade artwork.
This is one of the winter animal crafts for kids that makes good use of packaging you might already have at home.
A navy backing sets off the light body, while one long paper tusk keeps the finished animal easy to recognize.
Supplies: Clean bubble wrap, white paper, light and dark blue washable paint, brush, navy cardstock, white cardstock, black paper or marker, glue, scissors.
How to make it:
- Brush a thin layer of blue paint onto the raised side of bubble wrap. Press white paper onto it, lift, and let the print dry.
- Cut a large rounded narwhal body from the printed paper, along with a tail and two flippers.
- Arrange and glue the pieces to navy card. Add one long tapered white cardstock tusk at the front of the head.
- Add an eye, white belly detail, and a small smile. Leave the collage flat until the glue dries.
Helpful tip: Print a spare sheet before cleaning up so there is extra patterned paper for the tail and flippers.
16. Paper Bag Raccoon Puppet
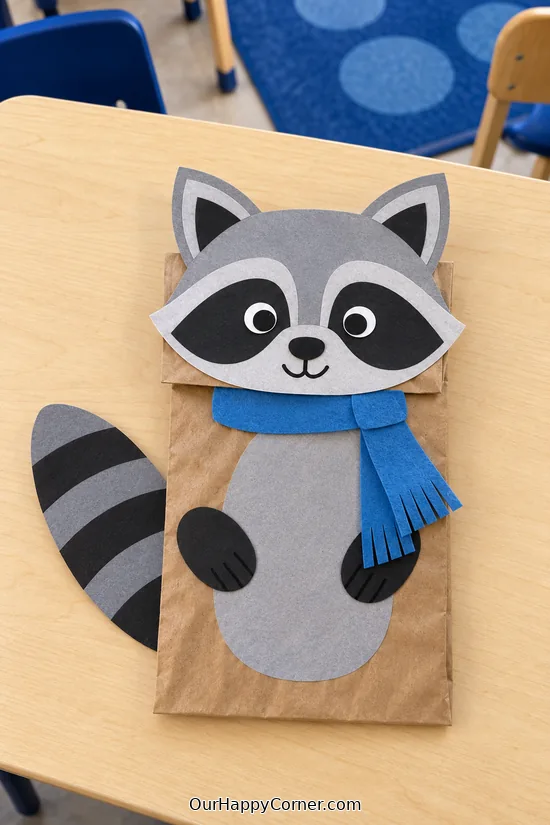
A paper bag raccoon has plenty of personality with just a striped tail and dark eye patches. A bright blue scarf gives it a winter touch.
The bag fold becomes the moving puppet face. Keep that fold free so the mouth can still open when a hand goes inside.
These winter animal crafts for kids can lead straight into pretend play. Make up a story about the raccoon looking for a warm place to rest.
Lay the puppet on the table while adding the decorations. It will look its best when the glue dries without the paper pieces sliding.
Supplies: Kraft paper lunch bag, gray and black paper, white paper, blue paper or felt, marker, glue stick, scissors.
How to make it:
- Lay the empty bag flat with its bottom flap facing up. Glue a gray raccoon face onto that flap without sealing its lower edge.
- Add triangular ears, black eye patches, white-and-black eyes, a nose, and a smile.
- Glue a gray belly below the flap. Add a gray tail with black stripes to one side and paws to the front.
- Attach a blue scarf below the face, keeping the bag opening and movable fold clear. Dry flat before using as a puppet.
Helpful tip: Slide a hand inside the plain bag first so you can see which fold must remain free to move.
17. Cardboard Hare Lacing Craft
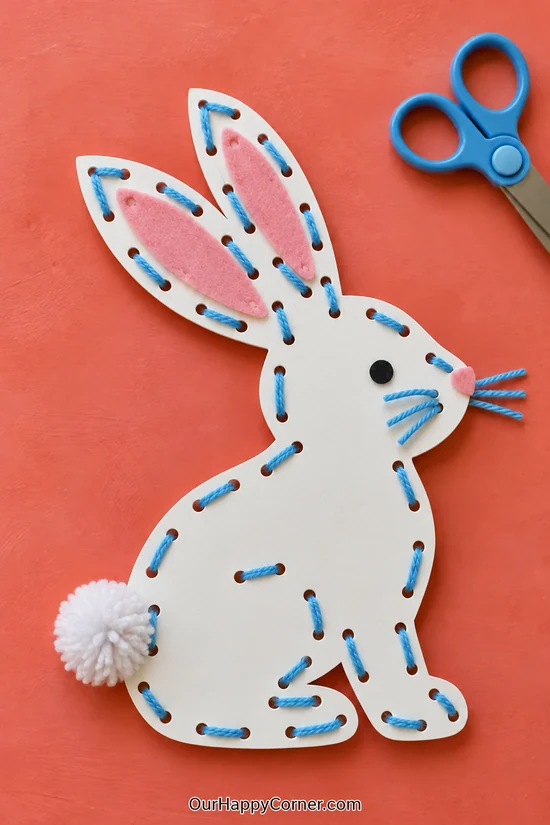
Blue yarn around a white hare turns a simple cutout into a lovely lacing activity. The contrast makes each stitch easy to see.
An adult can prepare the shape and holes, leaving the threading and decorating for the child.
Choose this from the winter animal crafts for kids when you want a quieter table activity with plenty of time to take turns.
There is no need for perfectly even stitching. The yarn outline and fluffy tail give the finished hare its charm.
Supplies: Thin stiff white cardboard, blue yarn, hole punch, pink felt or paper, white pom-pom, black marker, tape, glue, scissors.
How to make it:
- An adult cuts a simple seated hare silhouette with two long ears, broad feet, and a rounded body.
- Punch holes around the edge, leaving enough card between each hole and the outside to resist tearing.
- Tape one end of a manageable length of yarn behind the card. Wrap tape around the other end and lace through the holes.
- Secure the yarn on the back. Add pink ear centers, an eye, a nose, short yarn whiskers, and a pom-pom tail.
Helpful tip: Use a short yarn length at a time and join a new piece on the back if the thread becomes tangled.
ll pieces.
Final Thoughts
The best winter animal crafts for kids leave room for little choices: a crooked smile, an extra-long scarf, or a tail made from a favorite yarn color. Pick one animal, make a little space, and enjoy seeing what your child adds to it.
You do not need to finish the whole collection. A single happy penguin or fluffy polar bear is plenty for one cozy afternoon.