This post may contain affiliate links. If you make a purchase through these links, I may earn a small commission at no extra cost to you. Thank you so much for your support.
Winter paper crafts are a lovely way to spend a quiet afternoon making something pretty, useful, or a little unexpected.
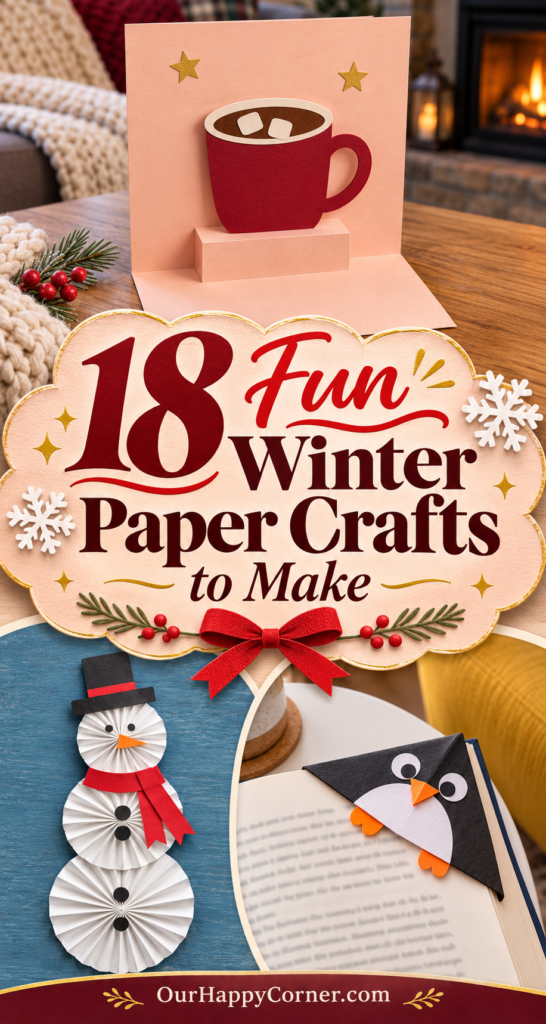
A few sheets of card can become lace-up ice skates, a glowing winter lantern, a tiny cottage, or a penguin that keeps your place in a book. There is plenty of variety without needing a cupboard full of specialist supplies.
I like a collection that gives you a choice of pace. Some projects are simple cutting and gluing, while others invite you to settle in with a ruler, a few careful folds, and time for the joins to dry.
All 18 ideas keep paper at the heart of the project, from flat cutouts and layered pictures to little structures you can display around the house.
These projects suit older children with help where needed, teens, and adults who enjoy making things by hand. Each includes a supplies list, clear construction steps, and a practical tip, with the measurements and construction details explained right here in the article.
Choose the Right Paper Before You Begin
Lightweight paper works well for folded pockets, spirals, and rosettes. Cardstock is better for upright houses, card bases, and pieces that need to hold a shape. Keep scraps of white, navy, teal, and a warm accent color nearby so small details are easy to add.
For these winter paper crafts, a ruler and a scoring tool are useful companions to scissors and glue. A blunt scoring tool helps you crease thicker card without cutting through it. Use an adult-handled craft knife on a cutting mat for tight interior openings.
Read the whole project before cutting. Test fitted or moving structures in scrap card first, and allow glue to set before adding weight or hanging anything. Use battery LED lights in paper lanterns; never put a flame inside paper decorations.
Plan Your Crafting Session
All the instructions for these winter paper crafts are below each image. Draw the pieces using the measurements in the steps; no separate pattern download is needed.
The suggested sizes give you a practical starting point, and you can scale a whole project together if you prefer a larger decoration.
Try the ice skates, geometric mountain picture, or corner bookmark if you want a shorter session. Save the shadow box, lantern, fitted box, and cottage for a day when you can work in stages. The paper hat garland is an easy choice when you would rather focus on color and simple cutting.
If younger children want to join in, choose a simpler activity from our winter crafts for kids. A few free printable winter coloring pages also make a lovely companion activity while paint or glue dries.
Winter Paper Crafts
1. Lace-Up Paper Ice Skates

A pair of paper ice skates brings a lovely little winter detail to the craft table. The contrast between the soft boot colors and silver blades makes them feel special without needing lots of decoration.
The laces are the enjoyable part here. Punched holes give the yarn a real path through the card, so the finished skates have more texture than a drawn-on pattern.
I would choose firm cardstock for these winter paper crafts. It holds the boot shape while you thread the laces and gives the narrow blade supports a better chance of staying straight.
Keep the finished pair flat or mount them on an art board. They are decorative cutouts, so the paper blades are not meant to hold them upright.
Supplies: Blush, cream, charcoal, and silver cardstock, burgundy yarn, small hole punch, pencil, scrap paper, scissors, glue, clear tape.
How to make it:
- Draw a side-view boot about 14 cm long and 11 cm high on scrap paper: a short upright ankle, a curved heel, and a rounded toe pointing right. Cut it out and trace it onto blush and cream cardstock to make two boots.
- Trace the lower boot edge onto charcoal card. Draw a second line 7 mm below it and cut out this curved sole. Glue one sole along each boot bottom.
- Draw a silver blade 15 cm long and 1 cm deep, with rounded ends and two 1 cm-wide supports extending 1.5 cm upward. Cut it as one piece. Glue the support tops behind the sole, leaving open space between sole and blade.
- Mark six holes in a gently sloping line from the front ankle toward the toe, at least 7 mm from the edge. Punch them with a small hole punch.
- Cut about 45 cm of burgundy yarn per skate. Knot one end behind the lowest hole. Pass the yarn to the front, then in and out through successive holes. Keep the short diagonal stitches on the front and the connecting lengths behind the card.
- At the upper hole, bring the yarn to the front and tie a separate small yarn bow around it. Tape the yarn ends on the back. Let the skates dry flat and display them flat, as pictured.
Helpful tip: Do the hole punching before threading, with the boot resting flat rather than held in the air.
2. Pop-Up Hot Cocoa Card
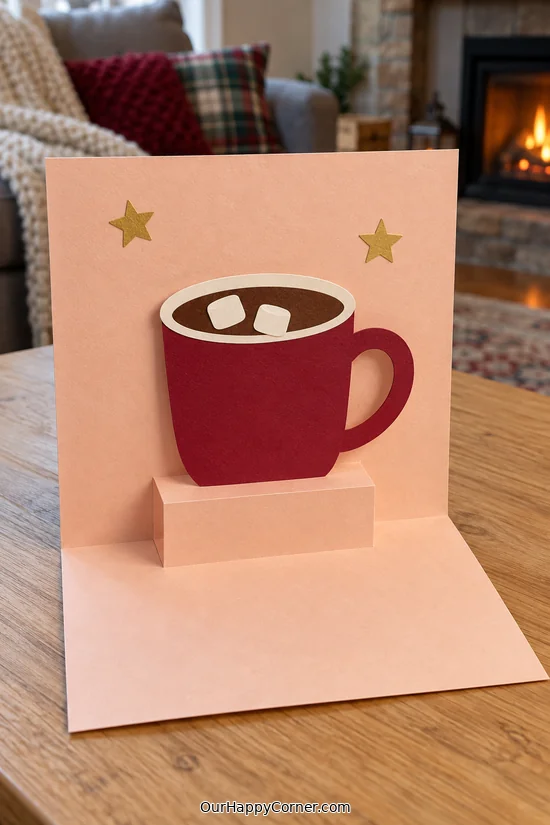
A bright cocoa mug inside a card feels like a small invitation to slow down. The paper marshmallows and gold stars add just enough detail to make it cheerful.
The mug is a flat paper shape, even though its rounded top suggests a cup of cocoa. A folded box-step behind it provides the movement when the card opens.
This is one of the winter paper crafts where the support needs attention before the decorating. Test the plain step several times so you know it folds smoothly.
Leave plenty of clear space around the mug. It should fit entirely inside the card when closed, with no handle or marshmallow catching on the edges.
Supplies: Two sheets of peach cardstock, burgundy, cream, brown, and gold paper, ruler, pencil, scoring tool, scissors, glue.
How to make it:
- Cut two peach card rectangles, each 20 × 28 cm. Fold each in half to make a 20 cm-wide, 14 cm-high card. One is the insert; the other will hide the cutout behind it.
- Keep the insert folded. On its folded edge, mark points 6.5 cm and 13.5 cm from the left. Cut 3 cm inward from each mark, perpendicular to the fold. Join the cut ends with a scored line.
- Fold the cut section both ways along that score. Open the card and push the section inward. With the card open at a right angle, it should form a 7 cm-wide step with a 3 cm-high front and a 3 cm-deep top.
- Glue the insert inside the outer card. Apply glue only to the flat areas; leave the step and the space behind it completely free.
- Draw a burgundy mug body 8 cm wide and 8 cm tall, with a rounded bottom. Add a handle projecting 2 cm to the right and cut out its middle. Glue a cream oval rim across the top, a smaller brown cocoa oval inside it, and two cream marshmallow shapes on the cocoa.
- Hold the card open at 90 degrees. Glue the bottom 2 cm of the mug back to the step’s upright front, centering the mug and keeping its bottom 1 cm above the card floor. The remaining mug rises freely above the step.
- Close the card slowly before the glue sets. Check that the mug folds down and stays inside all edges. Reposition if needed, then glue two small gold stars onto the back panel, clear of the moving mug.
Helpful tip: Make and test the moving step from scrap card before cutting your final colors.
3. Accordion Winter Village
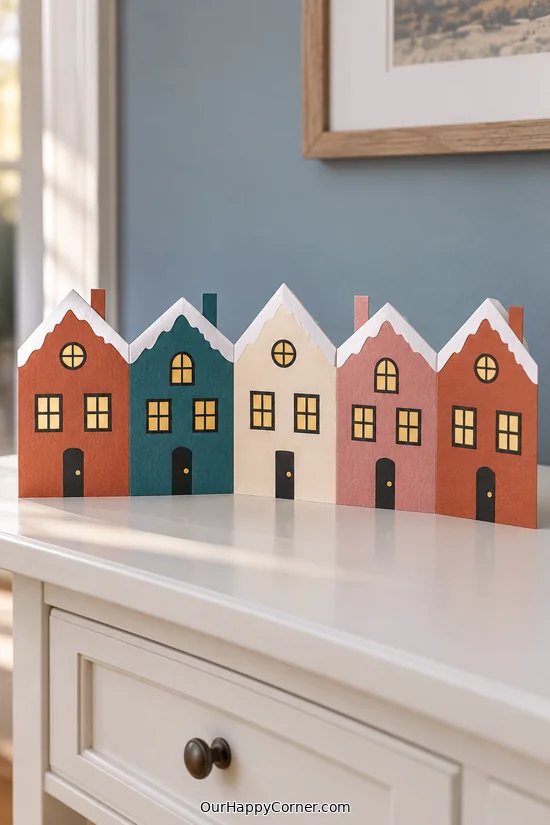
A folded village makes a lovely shelf decoration after the holiday decorations come down. Warm house colors and snowy rooflines keep it cheerful through the rest of winter.
The houses are connected flat panels, rather than five separate little buildings. Their alternating folds are what allow the row to stand.
You can decorate each house differently while keeping the same roof shape. A mixture of round and rectangular windows gives the street personality without changing the construction.
For these winter paper crafts, I would build the plain accordion first. Once it stands comfortably, the colored facades and snowy roof pieces are easy to add.
Supplies: Stiff cardstock, colored paper, white and yellow paper, black marker, ruler, pencil, scoring tool, scissors, glue stick.
How to make it:
- Cut a stiff card strip 35 × 13 cm. Mark vertical lines every 7 cm to make five connected panels. Score those four lines without cutting through them.
- On each panel, mark a roof peak at the top center. Mark both side eaves 10 cm above the bottom. Draw diagonal lines from each peak to its eaves, then cut away the card above the rooflines. Leave the walls connected below the eaves.
- Fold the panel boundaries alternately forward and backward. Stand the strip in a shallow zigzag to check its balance, then flatten it for decorating.
- Trace each house face onto a different colored paper. Cut each facade slightly inside its panel edges and glue it on without covering the crease between houses.
- Cut small yellow squares and circles for windows. Glue them in place, then draw dark outlines and crossbars. Add narrow dark doors and tiny paper or drawn doorknobs.
- Cut white strips with an uneven lower edge for roof snow. Glue one along each sloping roof edge. Let dry, then open the folds into a shallow zigzag so the connected houses support one another.
Helpful tip: Keep at least a 2 cm-wide connection between neighboring rooflines so the village does not split at the folds.
4. Layered Winter Forest Shadow Box
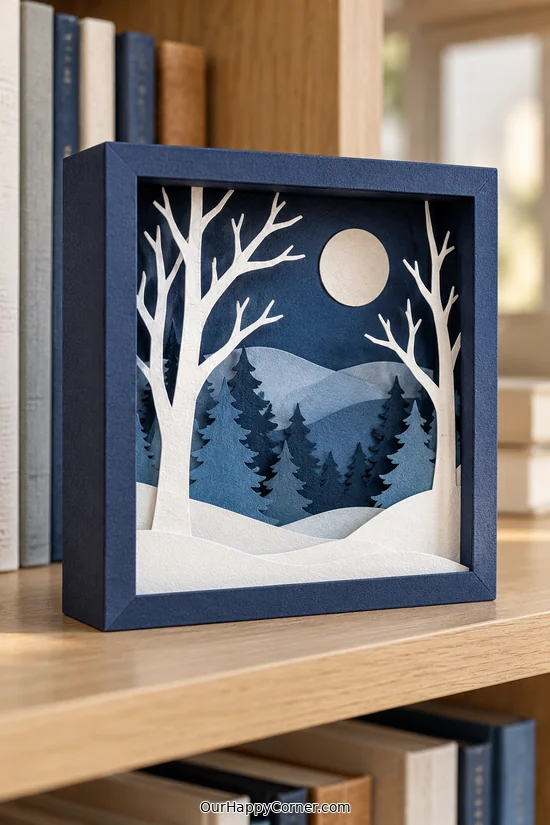
A layered forest is a good choice when you want one winter picture to become a lasting decoration. The shadows between the paper layers create the depth.
Blue evergreens sit behind white snowbanks, while the pale moon keeps the background simple. The cut trees do not need dozens of little branches to suggest a forest.
This is a more patient project than a quick collage. Cut and arrange the layers before reaching for glue so you can see how the whole scene will fit.
A deep display frame gives the finished work proper support. Keep each cut layer joined to its outer border so it can be supported inside the frame.
Supplies: Deep display frame, navy, blue, white, and cream cardstock, pencil, ruler, scissors, 3 mm foam tape, glue; optional adult-handled craft knife and cutting mat.
How to make it:
- Choose a deep frame with an opening about 18 × 23 cm and at least 2 cm of usable depth. Measure its actual backing; cut all panels to fit that backing, with a little clearance at the sides.
- Cut a navy background rectangle. Glue a cream moon near its upper right. Add two overlapping blue mountain shapes across the lower half, lighter mountains behind darker ones.
- Cut two more blue rectangles to the same outside size. Draw a 1 cm outer border on each. Across the bottom, draw a curved snowbank joined to the side borders. Draw evergreen trees rising from that bank, using a central trunk and broad pointed branch tiers.
- Cut away the open sky above each bank and between the trees. Keep each tree joined at its base to its bank, and keep the outside border intact. Make the rear forest lighter blue and the front forest darker blue. An adult should handle any craft-knife cuts.
- For the white front layer, cut a matching rectangle with a 1 cm border and low curved snowbank. Cut two separate white bare trees, each with a broad trunk and several forked branches. Glue the lower 2 cm of each trunk behind the snowbank, one on either side.
- Dry-fit the layers from navy background to mountains, rear forest, front forest, and white foreground. Trim any branches that hide too much of the scene.
- Put 3 mm foam tape around the concealed outer borders between layers. Stack the layers squarely, then secure them inside the frame. Use glazing only if it clears the raised paper.
Helpful tip: Sketch the branches before cutting, and leave every branch joined to a sturdy trunk. Wider branches are easier to handle.
5. Snow-Globe Shaker Card
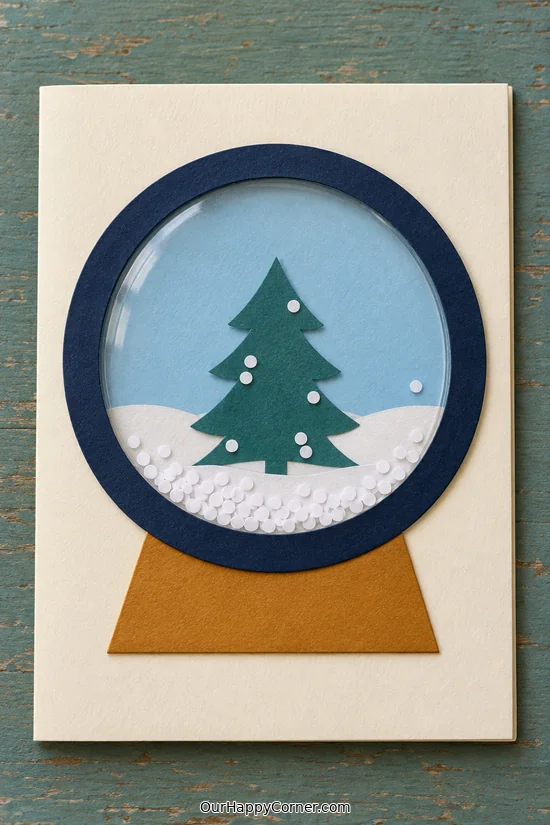
A shaker card brings a little movement to a winter scene. Tip it gently and the loose paper snow gathers along the bottom of the globe.
The window is a flat acetate sheet, not a glass dome. A narrow foam-tape wall creates the space behind it and keeps the confetti inside.
I like this among winter paper crafts because one simple tree is enough. Keeping the scene uncluttered makes the moving snow easier to notice.
Give the seal time to set before testing the card. Any small gap in the foam ring can become an escape route for the paper snow.
Supplies: Cream, navy, teal, pale blue, white, and ochre cardstock, craft acetate, 2–3 mm foam tape, double-sided tape, circle cutter or scissors, hole punch, glue.
How to make it:
- Fold cream cardstock into an 18 × 21 cm card. Cut a pale blue circle 14 cm across for the globe background.
- Cut a teal evergreen about 8 cm tall and a low white curved snowbank. Glue both onto the blue circle, keeping the outer 1.5 cm clear for the seal. Let the glue dry fully.
- Cut a navy ring with a 14 cm outside diameter and an 11 cm opening. Cut a 13 cm acetate circle and tape it behind the opening, securing the acetate all the way around.
- Apply a continuous 2–3 mm-thick foam-tape ring to the back of the navy border. Keep it inside the outer edge. Butt every tape joint tightly together so there are no escape gaps.
- Place a small pinch of tiny white paper circles in the center of the blue background. Keep all loose pieces away from the sealing area. Remove the foam tape’s liner and press the window onto the blue circle, matching their outside edges.
- Press firmly around the whole border. Tilt the sealed globe over a tray to check that the circles move and none escape; seal any gaps before mounting it.
- Glue the globe onto the card. Cut an ochre trapezoid about 7 cm wide at the top, 9 cm at the bottom, and 3 cm high. Glue it beneath the globe, tucking its upper edge behind the navy ring.
Helpful tip: Use only a small pinch of paper snow. Too much fills the pocket and hides the tree.
6. Woven Paper Mitten Card
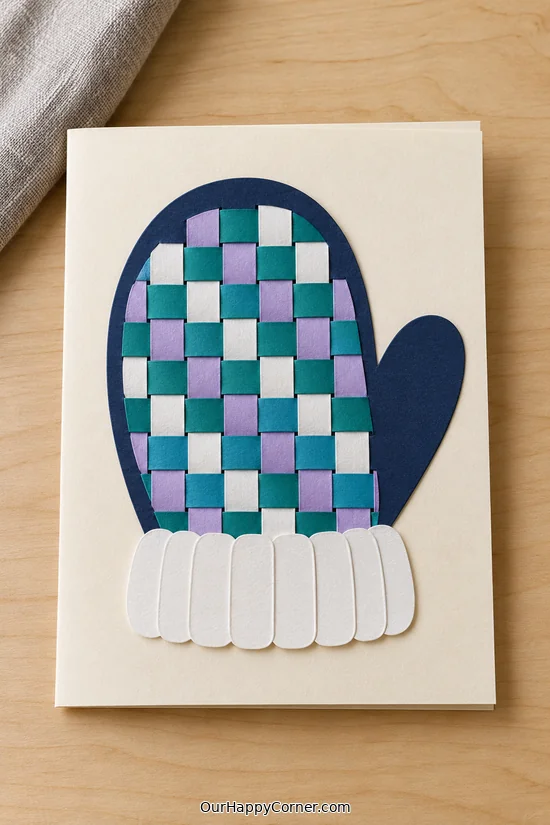
A woven mitten has the cozy look of patterned knitwear, made entirely from paper. Teal, lilac, and white give the checkerboard a lovely winter palette.
The weaving is built as a rectangular panel first. A mitten-shaped border hides the trimmed ends and gives it a clean outline.
You can keep the thumb plain so the woven part stays manageable. The white cuff is another layer of paper, with rounded strips suggesting a ribbed edge.
This is a satisfying project for someone who enjoys repeating a small action. Alternate each row carefully and the over-and-under pattern soon becomes easier to follow.
Supplies: Cream and navy cardstock, teal, lilac, and white paper, ruler, pencil, scissors, glue stick, removable tape.
How to make it:
- Fold cream cardstock into a card about 15 × 20 cm. Draw a navy mitten 11 cm high and 9 cm wide including its thumb. Cut two matching copies.
- In one copy, cut a rounded opening through the main hand area, leaving a 7 mm border. Leave the thumb solid. Keep the second mitten whole as the backing.
- Cut paper strips 1 cm wide in teal, lilac, and white. Lay enough vertical strips side by side to cover the opening with at least 1 cm extra on every side. Tape their top ends temporarily to scrap paper.
- Weave a horizontal strip over one vertical strip and under the next. Weave the next row in the opposite order. Continue until the panel covers the opening; slide the rows together without buckling them.
- Glue the outer strip ends together. Place the navy window mitten over the weave, adjust the colors, and glue its border to the panel. Trim off paper projecting beyond the mitten outline.
- Glue this piece onto the whole navy backing, then mount it on the card. Cut a white cuff about 7 × 2.5 cm. Cover it with narrow white strips with rounded ends, overlapping slightly, and glue it across the wrist.
Helpful tip: Keep the weave a little loose until every row is in place; tightening too early makes the last strips harder to thread.
7. Winter Tree Paper Lantern
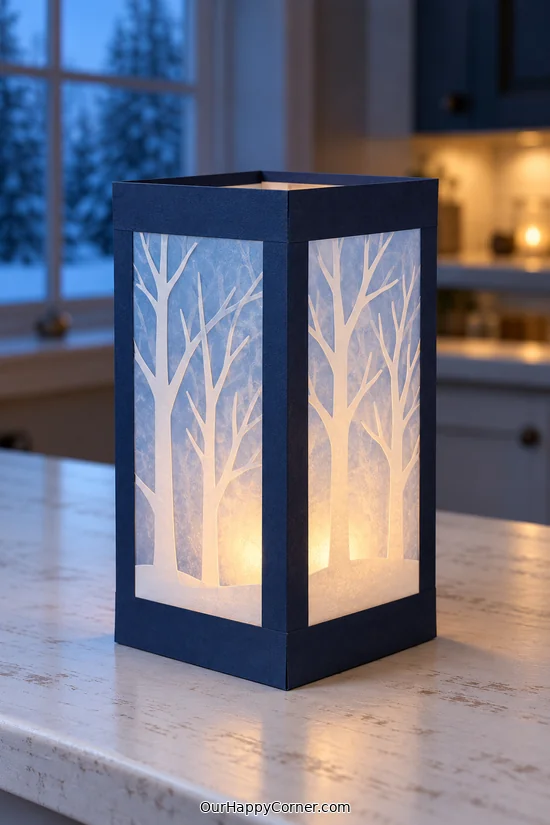
A soft glow behind paper trees makes this lantern feel especially cozy on a winter shelf. Navy borders give the pale vellum panels a lovely contrast.
The shape is a four-sided box with an open top. A proper folded floor supports the battery light, while the paper frame protects the vellum edges.
These winter paper crafts look more involved than a flat card, but the construction repeats the same panel four times. Matching wall widths and straight score lines keep the corners consistent.
Use a small battery-operated LED light only. The paper and vellum are decorative materials and must stay well away from candles or other heat sources.
Supplies: Navy cardstock, pale blue vellum, white paper, ruler, pencil, scoring tool, scissors, double-sided tape, glue, small battery LED tealight.
How to make it:
- Cut two navy card strips, each 13 × 18 cm. Across each strip, score at 6 cm and 12 cm to make two 6 cm panels and a 1 cm joining tab. Score a horizontal line 3 cm above the bottom for the floor flaps.
- In each 6 × 15 cm wall panel, draw a window leaving 1 cm borders at the sides and top and 2 cm above the floor line. Cut out the four windows while the strips are flat. An adult should make any craft-knife cuts.
- Cut four pale blue vellum rectangles slightly larger than the openings. Tape them inside the panels, with all tape hidden under the navy borders.
- Cut white tree silhouettes with a solid trunk and simple forked branches. Make them about 11 cm high. Glue their backs lightly to the outside of the vellum, keeping their bases behind the lower navy border.
- Cut up the floor section at each wall division, stopping at the horizontal score. Remove the small floor piece beneath each 1 cm joining tab.
- Glue one joining tab behind the other strip’s first panel. Fold the four walls into a square tube and glue the final tab inside the first panel.
- Fold the floor flaps inward and glue their overlaps. Glue a 5.8 cm navy square inside over them to level the floor. Let dry square, then place a small battery LED tealight inside through the open top. Never use a real candle.
Helpful tip: Use narrow double-sided tape on vellum borders to avoid wet-glue wrinkles showing through the windows.
8. Accordion Rosette Snowman

Paper rosettes give this snowman texture without needing a rounded sculpture. The pleats catch the light and make a simple white shape feel more decorative.
Three different circle sizes create the familiar snowman outline. A black hat and red scarf finish it without covering too much of the folded paper.
This is a lovely option for winter paper crafts when you enjoy folding but want a playful result. Make one rosette first so you feel comfortable with the movement.
The finished snowman needs a flat backing. Display it on an art board or hang it from a reinforced loop after all the joins have dried.
Supplies: White lightweight paper, scrap card, black, orange, and red paper, ruler, glue, scissors, optional hanging cord and tape.
How to make it:
- Cut white paper strips 4, 6, and 8 cm wide for the head, middle, and bottom rosettes. Join strips end to end to make lengths of about 32, 48, and 64 cm respectively; overlap each join by 1 cm.
- Mark each strip every 1 cm. Fold backward and forward at the marks to make even accordion pleats. Glue each strip’s short ends together to make a pleated ring.
- Stand a ring on its lower edge. Gently bring its upper edge inward and downward until it flattens into a circle. Glue a small card disk over the center on the back, then another on the front. Hold flat until set. Repeat for all three sizes.
- Cut a narrow white backing strip long enough to sit behind the stacked circles without showing. Glue the largest rosette at the bottom, the medium above it, and the smallest at the top, overlapping their edges slightly.
- Cut a black top hat with a brim. Glue on a thin red band and attach the hat above the head. Add black paper eyes, an orange triangular nose, and black buttons down the two lower circles.
- Cut a red scarf band and two narrow tails with notched ends. Glue the band below the head and the tails down one side. Dry face-up. Display flat or tape a reinforced hanging loop to the backing; the snowman does not stand by itself.
Helpful tip: If a ring resists flattening, add more pleated paper length rather than forcing the center and tearing the folds.
9. Geometric Winter Mountain Collage
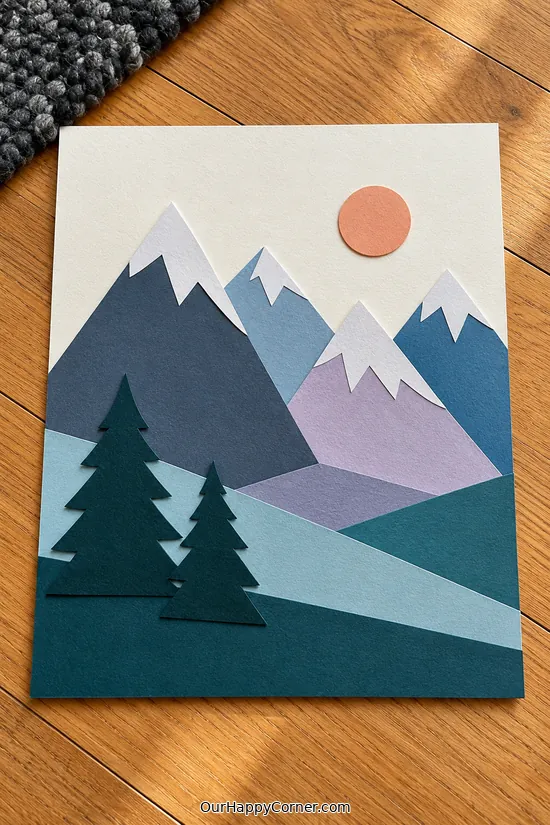
Layered triangles are enough to create a striking winter landscape. The white snowcaps make the mountain shapes clear, while a peach sun adds warmth.
A limited palette keeps the picture calm even with several overlapping pieces. Slate, blue, teal, and lilac work beautifully together.
There is plenty of room to make this your own. Move the tallest mountain to one side, change the foreground slopes, or choose a different sky color.
Arrange everything loose before gluing. It is much easier to find a balanced scene when you can still slide the peaks and hills around.
Supplies: Cream backing card, slate, blue, teal, lilac, peach, white, and dark green paper, pencil, ruler, scissors, glue stick.
How to make it:
- Cut a cream backing rectangle about 18 × 24 cm. Cut five mountain triangles from slate, blue, teal, and lilac paper, ranging from 7 to 16 cm tall.
- Arrange the triangles with smaller distant peaks behind larger foreground peaks. Leave space near the upper right for a peach sun. Photograph or mark the arrangement before lifting the pieces.
- For each mountain, trace its upper tip onto white paper. Draw a jagged lower snow line between the traced sides, then cut out the snowcap and glue it onto that mountain.
- Cut a peach circle about 3 cm across. Glue it to the sky first. Glue the mountains from the back of the scene toward the front, preserving the overlaps.
- Cut three broad angular hill shapes from pale blue, teal, and dark teal paper. Layer them across the lower third, trimming their outside edges flush with the backing.
- Cut two dark green evergreen silhouettes with wide triangular branch tiers, one taller than the other. Glue them at the lower left. Press under clean scrap paper while the glue sets.
Helpful tip: Trace the mountain tip onto white paper before cutting a snowcap so its two upper edges fit neatly.
10. Folded Paper Evergreen Trio
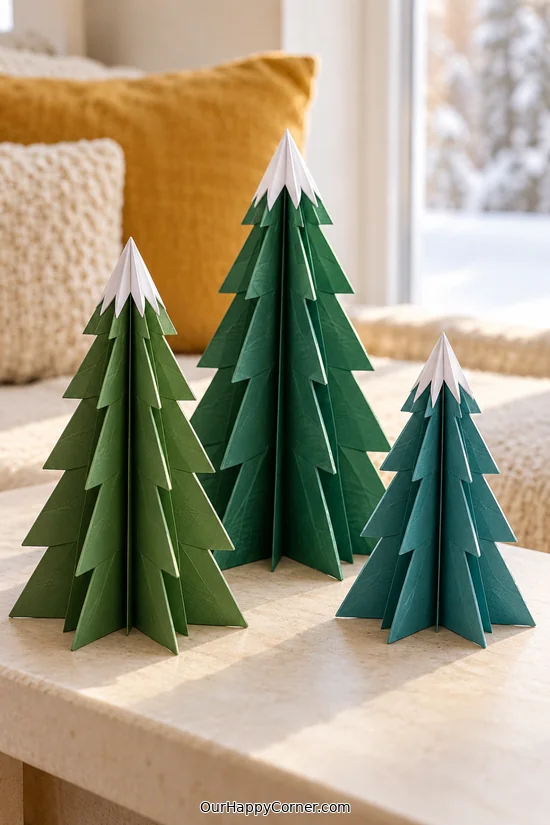
A group of paper evergreens makes a lovely little winter display. Different heights and shades of green give the group variety without adding tiny decorations.
These are repeated tree cutouts folded and glued together, rather than a complicated single-sheet origami model. The evenly spaced paper panels form their own base.
For these winter paper crafts, accurate matching outlines matter more than intricate cutting. Use one pattern for every panel in a tree so the tips and lower edges line up.
A small white cap gives each tree its snowy finish. Keep the lower edges bare and level so the trees stand comfortably on a shelf or table.
Supplies: Green and teal cardstock, white paper, scrap paper, pencil, ruler, scoring tool, scissors, glue.
How to make it:
- Draw a symmetrical evergreen on folded scrap paper: half a pointed tip, three or four broad branch tiers, and a flat bottom. Cut and open it. Make three versions about 12, 17, and 22 cm high, with widths roughly half their heights.
- For each tree, trace its outline six times onto one shade of green cardstock. Cut all six pieces accurately, keeping their lower edges level.
- Score each tree vertically from tip to base. Fold along this center line. Glue the right half of one tree to the left half of the next, aligning their tips, center folds, and bottom edges.
- Continue joining all six pieces. Glue the last free half to the first free half to close the shape. Spread the six fins evenly around the center and check that every bottom edge touches the table.
- Trace the top 2–3 cm of the same tree shape onto white paper six times. Give each piece a small jagged lower edge. Cut them out, fold their centers, and glue one cap over each green panel tip, matching the center folds.
- Repeat for the other two heights. Dry upright on a flat surface. Trim a tiny amount from any uneven bottom edge once dry so each tree stands securely.
Helpful tip: Trim a tiny amount from any uneven base edge only after the tree is assembled and the glue is dry.
11. Spiral Winter Paper Mobile

Paper spirals make a lovely moving decoration near a bright window. Their widening curls feel wintry in white and pale blue without needing a complicated cutout.
Each spiral begins as a flat circle. Hanging it from the center allows the outer strip to drop naturally into a loose helix.
Keep the curls broad and the mobile short enough to handle easily. The visible threads and simple dowel make the support straightforward.
This is a good project for someone who enjoys careful cutting. The interesting result comes from one continuous cut, rather than lots of separate pieces joined together.
Supplies: White and pale blue lightweight paper, plate or compass, pencil, scissors, cotton thread, clear tape, small wooden dowel.
How to make it:
- Draw three circles, each about 20 cm across, on white or pale blue lightweight paper. Draw a continuous spiral inside each, keeping the strip about 2 cm wide and leaving a solid center disk about 3 cm across.
- Cut along the spiral from the outer edge toward the center. Stop at the disk; do not separate it from the strip. Erase visible pencil marks gently.
- Reinforce the center disk with a small piece of clear tape. Pierce its center and tie a cotton thread through it. Lift by the thread and let the cut strip drop into a spiral without pulling it.
- Tie the three threads to a 35–40 cm wooden dowel, spacing them evenly. Adjust the lengths so the middle spiral hangs lower than the two outside spirals.
- Tie a separate hanging cord to both ends of the dowel. Suspend and balance it before trimming any thread. Hang securely away from heaters, vents, and young children’s reach.
Helpful tip: Use light paper and avoid stretching the spiral by pulling on its outer end. The curl should open under its own weight.
12. Paper Bobble-Hat Garland
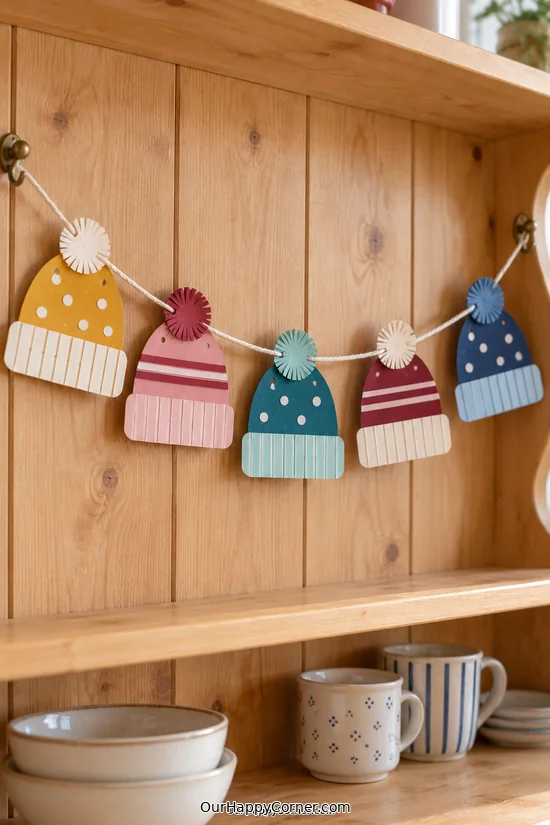
A row of little paper hats makes a cheerful winter garland without needing a single stitch. Mustard, blush, teal, burgundy, and navy give it a lovely mix of warm and cool colors.
The cuffs are separate pieces of cardstock. Lightly scored vertical lines suggest ribbing, while a fringed paper circle makes each flat bobble feel a little more playful.
I like these winter paper crafts for using up small scraps. Punch dots from cream paper or cut a few narrow stripes, then mix the patterns instead of making every hat identical.
Keep the hats flat and lightweight. The hanging cord attaches behind each bobble, so the paper shapes sit neatly against a dresser, wall, or shelf back.
Supplies: Mustard, blush, teal, burgundy, navy, and cream cardstock, 1.2 m cotton cord, scissors, ruler, scoring tool, hole punch, glue, tape, two hooks.
How to make it:
- Draw a hat body about 9 cm wide and 9 cm high, with a rounded dome and a flat bottom. Cut five copies from mustard, blush, teal, burgundy, and navy cardstock.
- Cut five contrasting cuffs about 10 × 3 cm, rounding their corners. Score shallow vertical lines 5 mm apart to suggest ribbing, without cutting through the card. Glue one cuff across each hat bottom.
- Punch cream paper dots and cut narrow contrasting stripes. Glue dots onto three hats and stripes onto two, keeping the decorations above the cuffs.
- Cut five paper circles about 3 cm across. Snip a fringe around each edge, leaving an uncut center about 1.5 cm across. Glue the lower half of each circle onto its hat top, leaving the upper half projecting as the bobble.
- Let dry, then lay the hats face down in the order you want. Space them about 6 cm apart. Run a 1.2 m cotton cord across the backs of the bobble centers.
- Tape the cord securely to each solid bobble center. Tie loops at the two cord ends and hang from two hooks with a gentle dip. Adjust the spacing before pressing the tape firmly.
Helpful tip: Cut the fringe into the paper circles only; leave their centers solid so the cord has a strong attachment point.
13. Fringed Paper Winter Wreath
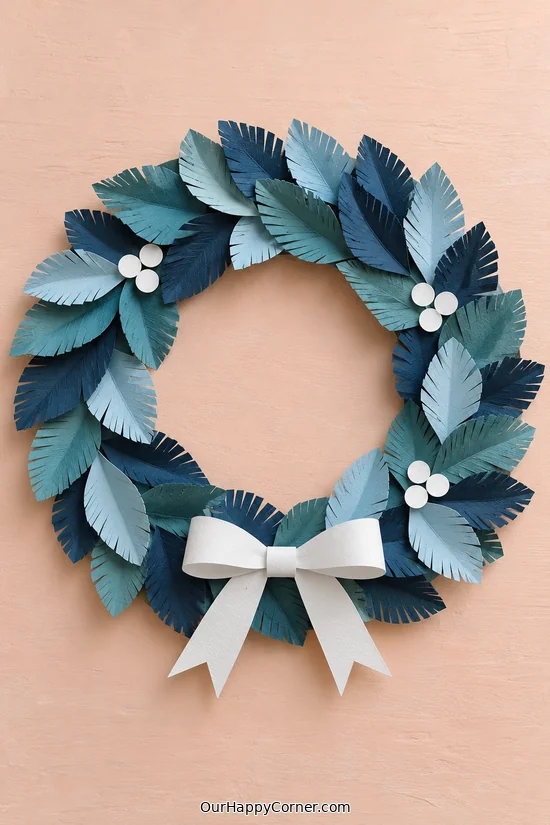
A paper wreath is a lovely way to use a few shades from the same color family. The layered leaves make it feel full without needing real greenery.
Short fringe cuts give each leaf texture. A gentle center fold helps the leaves lift slightly instead of sitting completely flat.
Among these winter paper crafts, this one is especially easy to adjust to your own taste. Choose cool blues, deeper greens, or a mixture of both.
Keep the berries and bow simple so the paper foliage remains the main feature. A sturdy cardboard ring underneath holds the whole arrangement together.
Supplies: Cardboard, navy, teal, pale blue, and white paper, pencil, ruler, scissors, glue, cord and tape for hanging.
How to make it:
- Cut a cardboard ring 22 cm across with a 13 cm center opening. Cover its front with dark blue paper so no cardboard will show between the leaves.
- Cut about 40 pointed oval leaves, 6–8 cm long and 2–3 cm wide, from navy, teal, and pale blue paper. Fold each lengthwise, then snip closely spaced fringe cuts along both edges, stopping at least 5 mm from the center fold.
- Arrange loose groups of three leaves around the ring to plan the color distribution. Point the leaves in the same direction, with some angled toward the outside and others toward the opening.
- Glue only the bottom 1–2 cm of each leaf. Work around the ring so each new group hides the previous group’s bases. Tuck the last group beneath the first. Leave the tips slightly raised.
- Cut twelve small white paper circles. Glue them in four clusters of three around the wreath, as pictured.
- For the bow, cut a white strip 18 × 2.5 cm. Curve both ends to meet at the back center and glue them there, forming two loops. Wrap a narrow strip around the center. Glue two notched paper tails behind the bow, then attach it at the wreath bottom.
- Tape a hanging loop to the back of the cardboard ring. Let the wreath dry flat before hanging indoors.
Helpful tip: Lay a few groups around the ring first so you can judge spacing before gluing the whole wreath.
14. Paper-Strip Cardinal
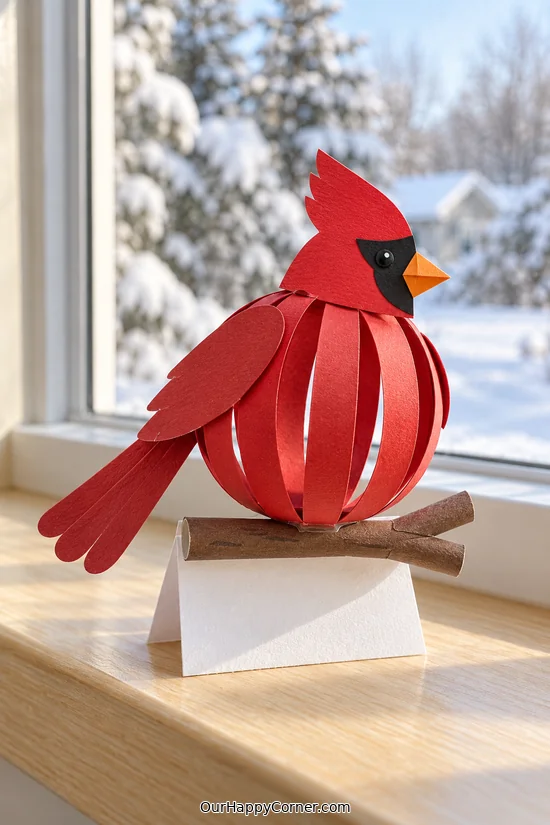
A red cardinal gives this winter collection a bright little character. The open paper-strip body is the interesting part, with gaps that show how it is built.
The head, wings, and tail stay flat, which keeps the extra pieces lightweight. Their folded glue tabs are tucked against the strip body.
The branch needs its own support. A small tent-shaped card stand underneath keeps the bird from relying on a narrow rolled-paper tube for balance.
Take your time with the first two body strips. Once their top and bottom joins are aligned, the remaining strips are much easier to arrange evenly.
Supplies: Red cardstock, black and orange paper, brown paper, stiff white card, pencil, ruler, scoring tool, scissors, glue.
How to make it:
- Cut six red cardstock strips, each 1.5 × 20 cm, and two red disks about 2 cm across. Glue one end of each strip around the lower disk, spacing them evenly.
- Curve each strip upward in a loose bow. Glue its other end to the upper disk, creating a rounded hollow body about 7 cm tall. Hold the disks aligned while the joins set; the strips must curve rather than crease.
- Draw a side-facing red head about 5 cm high with a pointed crest and a 1 cm tab below the neck. Cut it out. Fold the tab and glue it across the upper body disk, with the head facing right.
- Glue a small black face patch onto the head, then add an orange triangular beak and a tiny eye. Cut two red wings about 5 cm long and a three-pointed tail about 7 cm long. Leave a 1 cm glue tab at the base of each piece.
- Glue the wing tabs across two adjacent body strips on each side. Glue the tail tab across two strips at the rear, letting the tail slope downward to the left. Keep the tabs behind the visible pieces.
- Roll an 8 × 6 cm brown paper rectangle into a narrow tube and glue its seam. Pinch a short crease along its underside to give it a flat resting edge.
- Score an 8 × 12 cm piece of stiff white card across its length at 1, 6, and 11 cm. Fold it into a tent with two 5 cm sloping faces and two 1 cm feet. Glue the feet onto an 8 × 6 cm card base to prevent spreading.
- Glue the brown tube along the tent ridge. Once dry, glue the bird’s lower disk onto the tube. Support the bird gently until the glue sets; the white stand remains visible beneath the branch.
Helpful tip: Keep the tail light and glue its tab across more than one body strip so it does not pull a single strip sideways.
15. Penguin Corner Bookmark
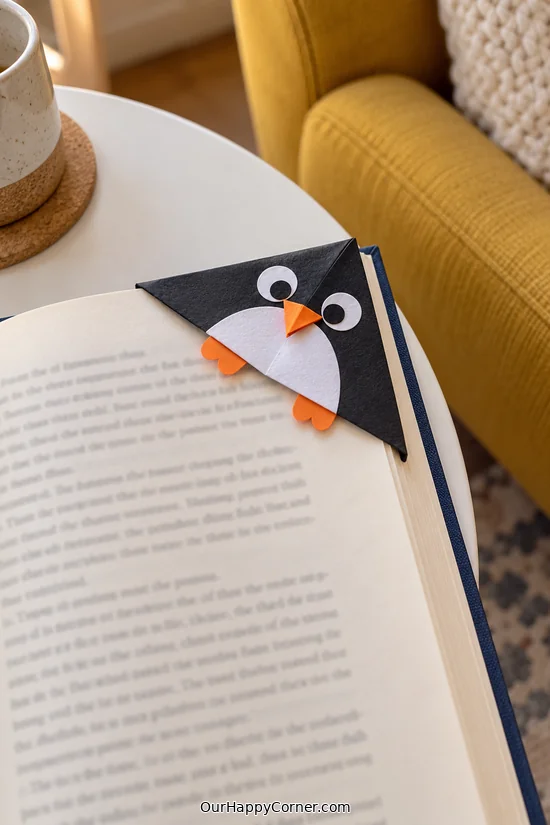
A penguin bookmark is a sweet little project that can be used straight away. The folded pocket slips over a page corner, so the character becomes part of reading time.
Black paper makes the basic shape, with a white belly and orange details added afterward. Keep those decorations flat so the book can close comfortably.
This is one of the winter paper crafts I would choose when you want to practice a useful fold. Make the plain pocket first and test it on a spare page before adding the face.
The eyes and feet can be slightly different on every penguin. Just keep the pocket opening clear so the bookmark can slide on and off without catching.
Supplies: 15 × 15 cm black lightweight paper, white and orange paper, black paper or marker, scissors, glue stick.
How to make it:
- Cut a 15 × 15 cm square of black lightweight paper. Fold it diagonally to make a triangle. Place the long folded edge at the bottom and the right-angle point at the top.
- Fold the left and right lower corners up to the top point. Crease, then unfold these two folds.
- Fold only the front layer of the top point down to the middle of the bottom edge. The back layer stays upright; the lowered triangle makes the pocket opening.
- Fold the left corner up again, then tuck its tip down behind the lowered front triangle. Repeat with the right corner. Flatten both tucked flaps to make a square corner pocket.
- Turn the pocket so its closed corner is at the top and its opening faces downward. Cut a white semicircular belly to fit the lower front. Glue it only to the outside face, trimming it clear of the pocket opening.
- Add two white eyes with black pupils, a small orange beak, and two orange feet along the belly edge. Keep all glue outside the pocket. Let dry, then slide the opening over a page corner, as pictured.
Helpful tip: Use lightweight paper for the folded pocket. Thick card makes the tucked layers bulky and harder to close.
16. Rolled-Paper Birch Picture
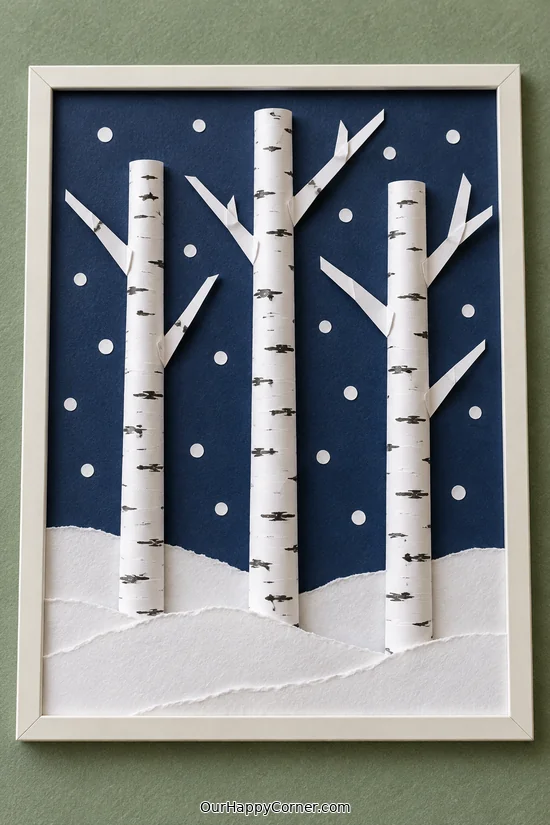
Rolled paper gives these birch trees a raised shape without turning the whole picture into a deep scene. The small bark marks make the white trunks recognizable.
A navy background helps the pale trees and snow stand out. Keep the branch shapes broad enough to cut comfortably by hand.
You can vary the trunk heights and lean them slightly to create your own arrangement. A few punched paper snow dots finish the picture without making it busy.
Use a frame deep enough for the tubes, or display the picture without glazing. Pressing glass directly onto the trunks would flatten the detail you have made.
Supplies: Navy backing card, white paper, black marker, scissors, pencil for rolling, glue, hole punch, optional deep frame.
How to make it:
- Cut a navy backing rectangle about 18 × 24 cm. Cut three white paper rectangles, each about 4 cm wide, with lengths of 16, 19, and 21 cm.
- Roll each rectangle lengthwise around a pencil to make a narrow trunk. Remove the pencil and glue the overlapping long edge. Let the tubes dry before drawing short broken black bark marks.
- Arrange the trunks on the backing at different heights. Glue their seams against the card so the rounded sides face forward.
- Cut narrow white branch strips tapering from about 7 mm at the base to a point. Add short forked pieces. Draw a few black bark marks on these too.
- Tuck each branch base behind a trunk edge and glue its remaining length flat onto the background. Angle the branches upward and outward, keeping them inside the backing edges.
- Tear three white paper strips into uneven snowbanks. Layer them across the bottom to cover the trunk ends. Glue small punched white circles into the sky.
- Dry flat. Mount in a deep frame, leaving enough room that the glazing cannot press on the rolled trunks, or use the frame without glazing.
Helpful tip: Use a light hand with the bark marks. Short broken lines look more convincing than thick stripes all the way around.
17. Snowflake Paper Gift Box
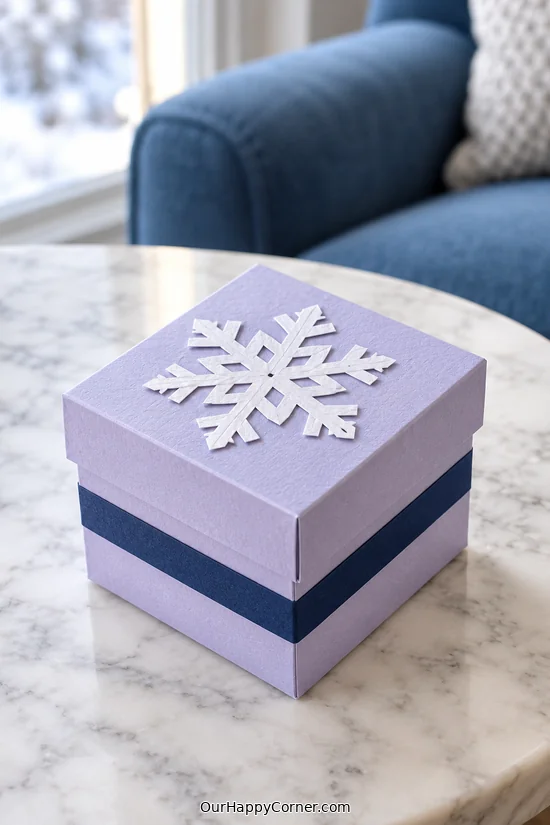
A handmade gift box is a lovely way to turn paper crafting into something useful. Lavender card and a dark band give this one a calm winter look.
The lid is a separate shallow tray. Making its inside slightly wider than the base allows it to slide on without forcing the corners.
For these winter paper crafts, scoring is worth the extra minute. Straight, clean folds make the difference between a tidy box and one that twists out of shape.
The snowflake on top can be a simple hand-cut decoration. Keep the box for lightweight treats or small gifts, rather than anything that needs a heavy-duty container.
Supplies: Lavender cardstock, navy and white paper, ruler, pencil, scoring tool, scissors, glue.
How to make it:
- Cut a 16 cm square of lavender cardstock for the base. Score lines 4 cm in from all four edges, leaving an 8 × 8 cm center square.
- Place the square flat. From the top edge, cut down along the two vertical score lines only until the first horizontal score. Make matching cuts upward from the bottom edge. This creates four corner tabs without removing any card.
- Fold all score lines. Raise the top and bottom walls; bend their corner tabs inward. Glue the left and right walls outside those tabs, keeping the corners square. Hold until set.
- For the lid, cut a 12.4 cm lavender square. Score 2 cm in from each edge to leave an 8.4 cm center. Make the same four slits and glue the corners into a shallow tray. Let both pieces dry, then test the fit.
- Cut navy paper into a 1 cm-wide strip long enough to wrap around the base with a 1 cm overlap; join two strips if needed. Glue the band level around the middle of the base, below the lid’s lower edge. Keep glue away from the lid.
- Draw an 8 cm-wide snowflake on white paper: cross three straight lines at their centers to make six equally spaced arms. Give each arm a 4 mm-wide stem and two pairs of short diagonal branches. Join the outlines at the center and cut the complete shape as one connected piece.
- Glue the flat snowflake to the lid. Use the finished box for lightweight wrapped gifts. If adding food, keep it in food-safe wrapping rather than against the craft card.
Helpful tip: Test the fit before decorating. Card thickness varies, so make the lid a little larger if your first trial feels tight.
18. Snowy Paper Cottage
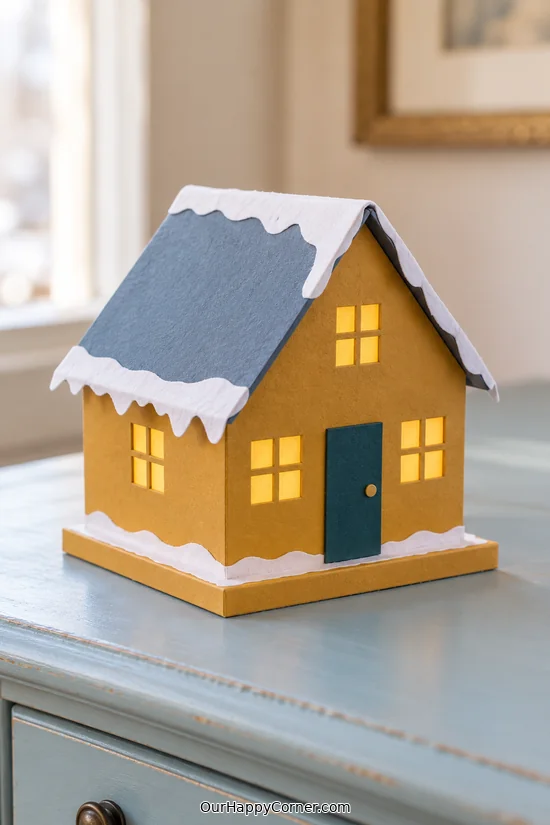
A little paper cottage makes a lovely winter shelf decoration. Ochre walls and a dark roof give it warmth, while the white paper snow keeps the details simple.
The house is a scored card shell with a separate folded roof. Yellow backing behind the windows creates the warm appearance without needing a light inside.
These winter paper crafts need a little patience at the corners. Let the walls hold their shape before adding the roof so you are not trying to support everything at once.
A flat card base finishes the cottage and makes it easier to move. Carry the finished house from underneath rather than lifting it by the roof.
Supplies: Ochre cardstock, slate, white, yellow, and teal paper, ruler, pencil, scoring tool, scissors, glue.
How to make it:
- Cut an ochre cardstock strip 25 × 11 cm. Along its long edge, mark vertical lines at 6, 12, 18, and 24 cm. The first four sections are the walls; the last 1 cm is the joining tab.
- Draw a horizontal line 6 cm above the strip’s bottom edge for the eaves. In the first and third wall panels, draw a roof peak at the panel center, 10 cm above the bottom. Join each peak to its two eaves corners. Cut along those gables. Trim the second and fourth panels to the 6 cm eaves line, and trim the joining tab to the same height.
- Score the four vertical lines. On the first gabled panel, add two square yellow windows below the eaves, one smaller window above them, and a teal rectangular door between the lower windows. Add yellow windows to both side walls. Use thin ochre strips over the yellow squares for crossbars; the pictured warm windows do not need an electric light.
- Fold the walls into a square shell. Glue the 1 cm tab behind the first wall and let it set. Glue small folded card tabs inside the wall bottoms, then glue these onto a 9 × 9 cm ochre card base.
- Cut an 8 × 12 cm slate roof. Score across the 12 cm length at 6 cm to make two 8 × 6 cm slopes. Check that the fold sits above the two gable peaks with an even overhang on all sides.
- Cut four small card hinge tabs. Fold them lengthwise and glue one half inside each sloping gable edge. When set, spread glue on the projecting halves and lower the roof onto them. Hold without crushing the walls.
- Cut white paper strips with irregular, rounded lower edges for snow. Glue them along the roof ridge and both lower eaves. Add torn white snow strips around the house at the base and a tiny paper dot for the doorknob.
- Let dry on a level surface. Lift the finished cottage by its base, not its roof.
Helpful tip: Keep the roof ridge centered over the two gables, with equal overhang on both sides.
Final Thoughts
The lovely thing about winter paper crafts is how much you can make from a small stack of supplies. Choose a project that suits the time you have, build the plain structure first, and enjoy adding the details that make it yours.
Whether you finish a tiny bookmark, a snowy cottage, or a cheerful paper garland, one handmade project is plenty for a satisfying winter afternoon.