This post may contain affiliate links. If you make a purchase through these links, I may earn a small commission at no extra cost to you. Thank you so much for your support.
Valentine wood crafts can turn a plain wooden blank into a thoughtful gift, a pretty home accessory, or something special for your next craft-market table.
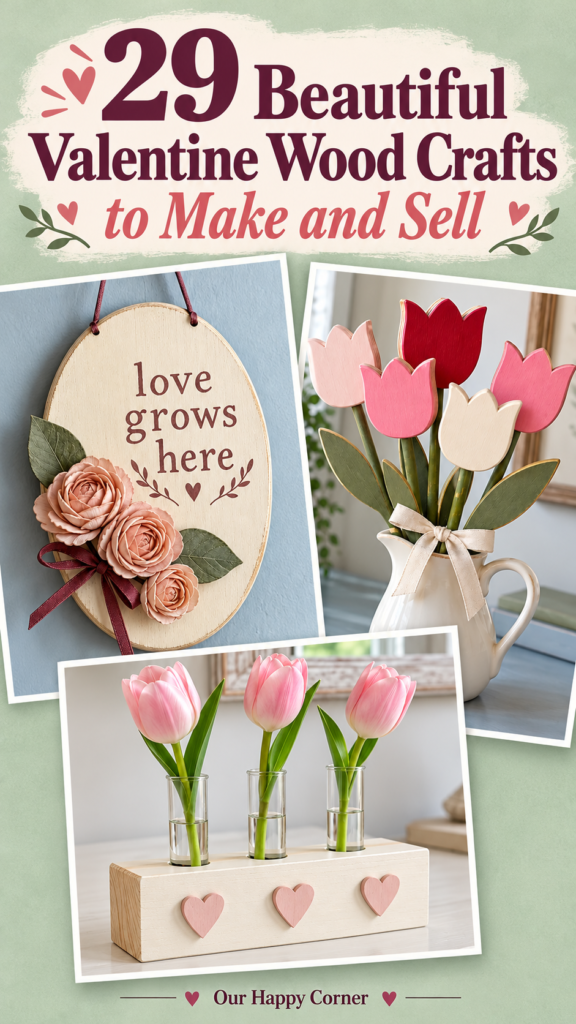
A painted heart is a lovely starting point, but there are plenty of ways to take the idea further.
Think floral keepsake boxes, wooden earrings, useful trays, tiny mailboxes, and personalized gifts that feel worth keeping after February 14.
These projects include simple painting ideas and a few small builds, so you can choose what suits your tools and time.
Each one includes supplies, instructions, and a practical way to offer the finished piece for sale.
Gather Your Wood Craft Supplies
Start with the blank for your chosen project: a wooden heart, small box, tray, plaque, wood ring, or thin cutout.
Craft stores and online US wood-craft suppliers carry many of these shapes, while home-improvement stores are useful for boards, dowels, and hardware.
Keep fine-grit sandpaper, a dust cloth, acrylic craft paint, a flat brush, a small round brush, painter’s tape, and a pencil nearby. Add a wood-compatible primer when your paint or surface calls for one, plus stencils or transfer paper for lettering.
Use wood glue for clean, bare wood-to-wood joints, and choose a suitable adhesive for metal, cork, magnets, or fabric. Leave the joining areas unpainted so the bond attaches to the wood itself.
A drill, clamps, and a small saw are needed for some builds, but many projects work with precut blanks. Clamp the work before cutting or drilling and wear eye protection; smooth the finished edges before decorating.
Choose a protective finish that suits the object’s use, then follow its drying and curing instructions. A decoration, a handled keychain, and a coaster do not all need the same finish, and dry-to-touch does not mean ready to wrap.
Choose Valentine Wood Crafts That Fit Your Selling Plans
For a first batch, pick two or three projects that share supplies. Heart keychains, earrings, and magnets can use the same paint palette, while boxes and trays offer room for larger designs and gift sets.
Offer a finished design first, then add a manageable personalization option such as a name, initial, or date. Set clear limits for wording and let buyers know how long their order will take.
Work out your price from materials, your time, packaging, selling fees, and any shipping you cover. Include sanding, finishing, assembling hardware, and packing in your labor estimate, not just the time spent painting.
Small sets can make a thoughtful gift feel complete: four coasters, a pair of earrings, or a box with date-night tokens. State exactly what is included, especially when styling props, plants, flowers, or treats are sold separately.
If you want to offer other materials alongside your wooden pieces, our Valentine’s Day crafts for adults include more handmade gift and decorating ideas.
Valentine Wood Crafts
1. Floral Heart Door Hanger
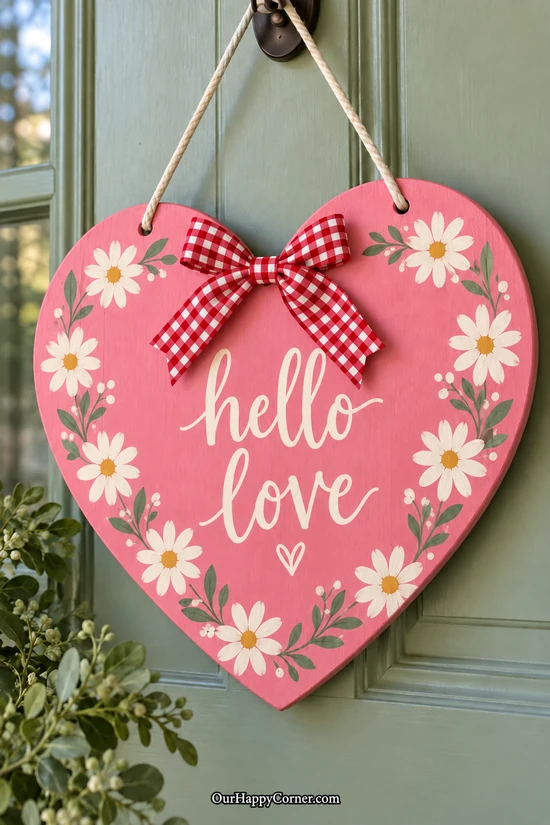
A floral heart door hanger gives a front door a welcoming Valentine touch without covering it in decorations. Bright pink paint, ivory daisies, and a gingham bow make the piece feel soft and cheerful.
Use a flat heart blank around 12 inches wide so there is room for the flowers and lettering. Keep the middle open and place the larger daisies around the curves rather than squeezing them beside the words.
Offer this design as a seasonal hanger or personalize the greeting for a customer. For a covered exterior door, choose paint and a finish labeled for that setting and include the hanging cord with the sale.
Supplies: Plywood heart blank, bright pink, ivory, mustard, and sage acrylic paints, small brushes, lettering stencil or transfer paper, drill, cotton cord, red-and-white gingham ribbon, suitable clear finish.
How to make it:
1. Drill two hanging holes near the upper curves, leaving enough wood around each hole, then smooth the edges and paint the heart bright pink.
2. Transfer the words ‘hello love’ into the center and paint them ivory. Mark several flower centers around the outer edge.
3. Paint broad ivory petals around mustard centers, then add a few sage leaves and small ivory dots between the flowers.
4. Apply the chosen finish once the paint is dry, let it cure, and thread the cord through the holes. Secure the gingham bow above the lettering.
2. Conversation Heart Shelf Sitters
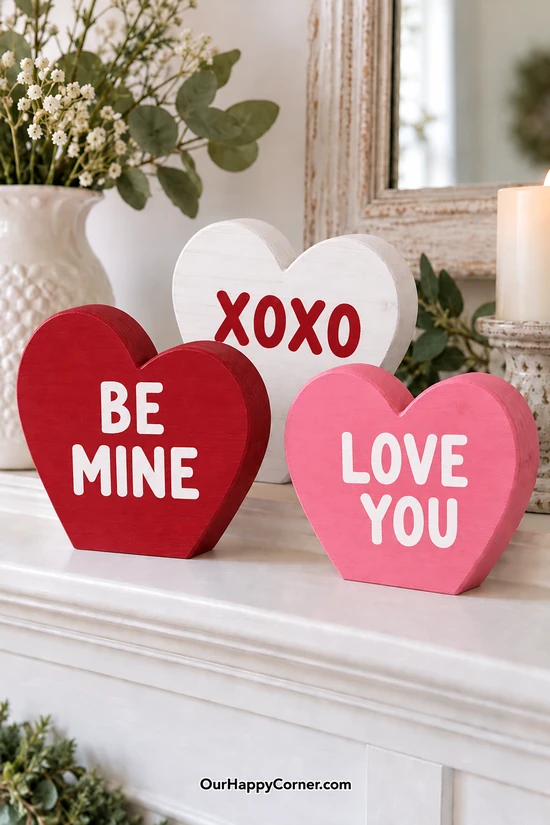
Chunky conversation hearts bring the familiar candy-box look to a shelf or mantel. Cherry red, candy pink, and white give the set variety while the short messages keep it easy to read.
Choose thick wooden hearts with a flattened bottom so they stand without an easel. Painted lettering is enough to create the effect, so there is no need to carve the words into the wood.
Sell the hearts individually or as a coordinated trio with the same style of lettering. Keep the phrases short and offer a small selection of colors so custom orders stay manageable.
Supplies: Three thick freestanding wood heart blanks, cherry red, candy pink, and white acrylic paints, letter stencils, stencil brush, sandpaper, matte clear finish.
How to make it:
1. Check that each heart stands steadily on its flat base, smooth any rough spots, and paint the fronts and edges in the three Valentine shades.
2. Center the phrases ‘BE MINE,’ ‘XOXO,’ and ‘LOVE YOU’ on the hearts, dividing longer phrases over two lines.
3. Stencil the words with contrasting white or red paint using light layers to keep the letter edges clean.
4. Touch up the edges, apply a compatible matte finish, and let the pieces cure before stacking or wrapping them.
3. Personalized Heart Keychains
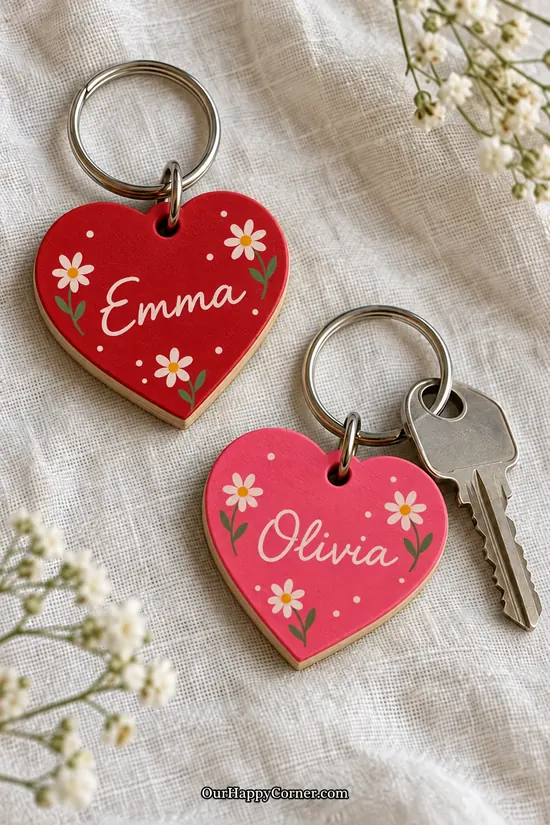
A name turns a little painted heart into a gift chosen especially for someone. Small daisies add detail without hiding the lettering or making the keychain bulky.
Start with smooth, drilled heart blanks about 2 inches wide. Keep the decorative flowers near the sides so even a slightly longer name has room in the center.
These are convenient individual gifts to package on a simple display card. Offer a few lettering styles and make sure the ring and connecting hardware are included in the finished price.
Supplies: Drilled wooden heart blanks, cherry red, strawberry pink, ivory, mustard, and sage paint, fine brush or paint pen, suitable clear finish, silver jump rings, split keyrings, two jewelry pliers.
How to make it:
1. Smooth the heart edges and the hanging hole, then paint one heart cherry red and the other strawberry pink, covering both sides in thin coats.
2. Add the name in the center and paint two or three small daisies around it. Use tiny sage strokes for the leaves.
3. Protect both faces and edges with a finish suitable for handled craft items, keeping the hole clear, and allow the full cure time.
4. Use pliers to connect a sturdy jump ring through the hole and attach the split keyring. Close the jump ring completely and check the connection before packaging.
4. Decoupage Floral Keepsake Box
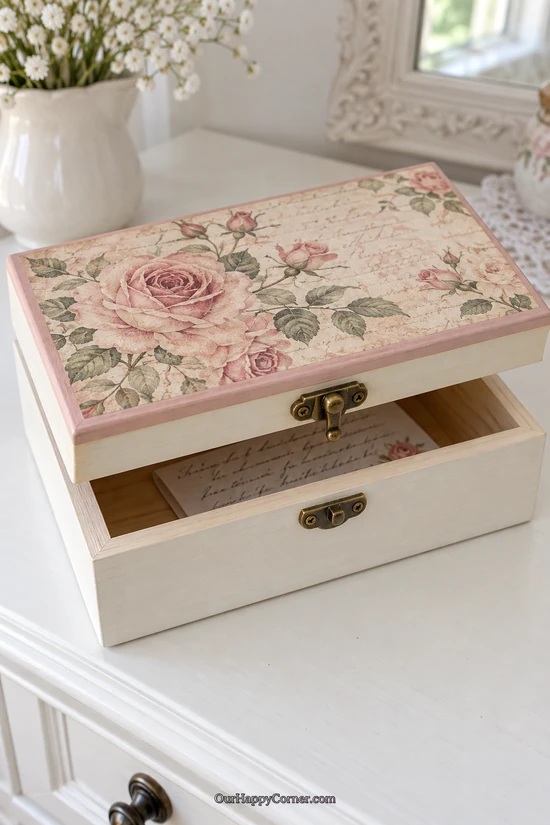
A floral keepsake box gives letters, tiny mementos, and special notes a home of their own. Vintage rose paper creates a detailed lid without asking you to hand-paint every petal.
Choose a box with a flat lid and working hinges so the paper can lie smoothly. Ivory sides and a narrow pink border help the floral design feel finished rather than pasted on as an afterthought.
Offer it as an empty keepsake box or add a small note card for the buyer to personalize. Our jewelry box painting ideas are also useful if you want to create painted designs alongside the decoupage version.
Supplies: Unfinished hinged wood box, ivory and dusty pink paint, floral decoupage paper, decoupage medium, flat brush, scissors, painter’s tape, compatible protective finish if needed.
How to make it:
1. Protect the hardware and smooth the exterior, then paint the sides ivory. Keep paint away from the contact edges where the lid closes.
2. Cut the floral paper to fit the flat lid, leaving a narrow border, and brush a thin layer of decoupage medium onto the wood.
3. Lay down the paper carefully, smooth from the center outward, and add the top layers specified by the medium’s directions after the first layer dries.
4. Paint the exposed border dusty pink and finish as directed by your products. Leave the box open while the finish cures so the lid does not stick shut.
5. Heart Coaster Gift Set
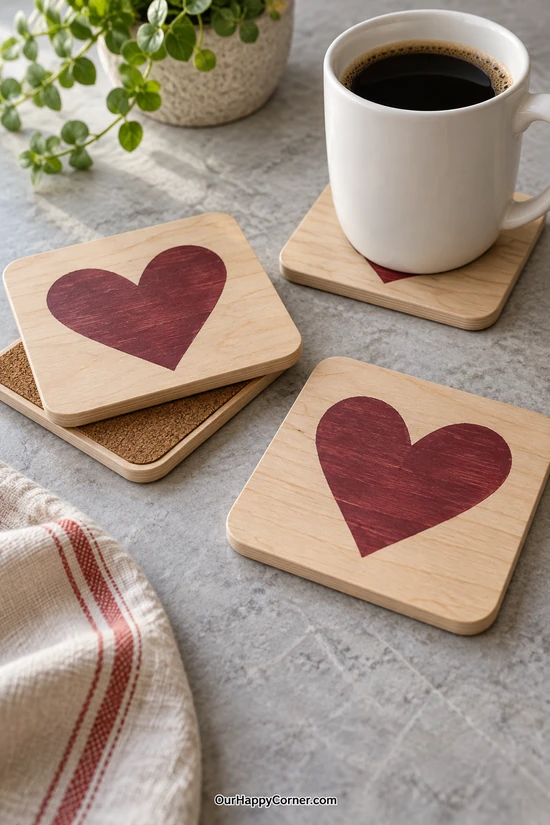
A single burgundy heart gives plain wood coasters a Valentine look that still suits an everyday coffee table. Leaving most of the grain exposed keeps the design warm and uncluttered.
Use flat coaster blanks around 4 inches square with smooth, rounded corners. Cork backing adds a useful finishing detail and separates the wood from the furniture underneath.
A set of four tied with ribbon makes a tidy gift for a host, friend, or couple. Include care instructions suited to your chosen finish, and do not package the coasters until that finish has fully cured.
Supplies: Four wood coaster blanks, burgundy acrylic paint, heart template, brush, clear topcoat labeled for the intended coaster use, thin cork sheet, suitable adhesive.
How to make it:
1. Smooth the blanks and trace one centered heart on each coaster, keeping the size consistent across the set.
2. Paint the hearts burgundy and erase any remaining pencil marks once the paint is dry.
3. Apply the selected moisture- and heat-suitable topcoat according to its label, covering the faces and edges, and allow its full cure time.
4. Cut cork slightly smaller than each coaster and attach it underneath with the appropriate adhesive. Press flat until set, then package the four together.
6. Wooden Heart Bead Garland
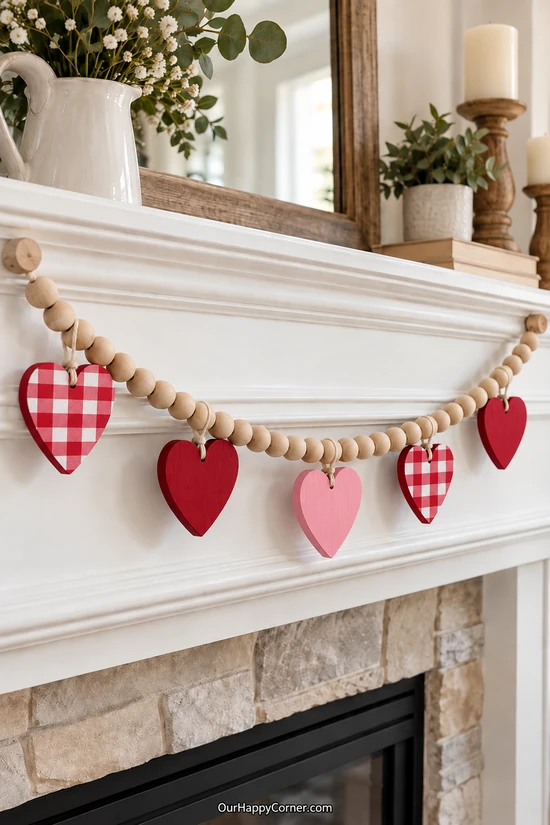
Wood beads give a heart garland more texture than a simple row of hanging shapes. Mixing red-and-white gingham hearts with solid red and pink ones creates a pattern that is easy to repeat.
Keep the hearts lightweight so the cord drapes naturally across a mantel. Small gaps between the pendants make the individual shapes easier to appreciate and keep them from bunching together.
Sell the garland by its finished length and show buyers how much hanging cord is left at each end. A simple indoor display option makes this a useful add-on beside larger Valentine wood decor.
Supplies: Natural wooden beads, five drilled flat heart blanks, sturdy cotton cord, narrow cord for pendants, pink, white, and cherry red paint, painter’s tape, brushes, clear finish.
How to make it:
1. Paint two hearts with a red-and-white gingham pattern, two hearts cherry red, and one heart pink, then finish and cure them before assembly.
2. Thread the beads onto the main cord, leaving generous ties at both ends and spacing out five positions for the hearts.
3. Loop a short cord through each heart’s hole and knot it securely around the main strand between beads.
4. Adjust the spacing, secure the end beads with knots, and measure the completed garland. Add end loops if you want customers to hang it from hooks.
7. Mini Love Note Mailbox
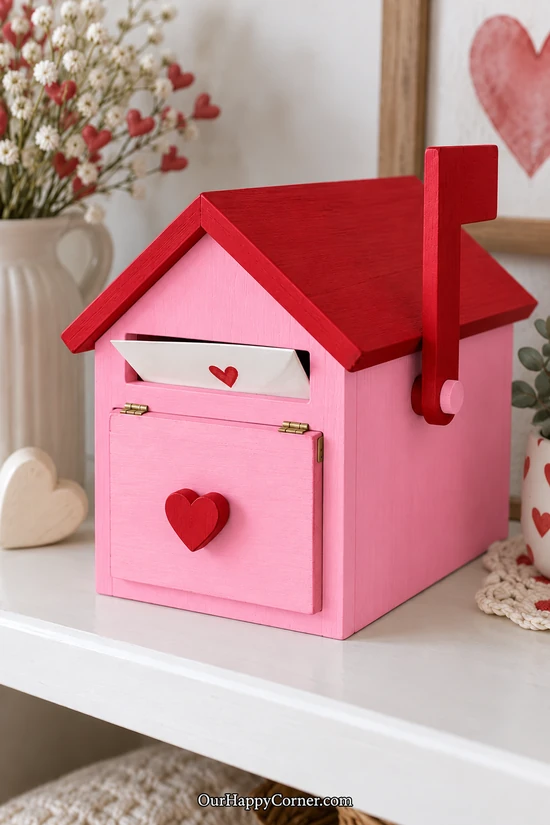
A tabletop mailbox makes exchanging little notes feel like a Valentine tradition. The heart knob and red side flag give a simple wooden box a playful purpose.
A ready-to-decorate wooden mailbox is the easiest starting point when you want to make several. For a handmade version, use a small plywood box construction with a pitched roof, a note slot, and a hinged access door.
Keep it compact enough for a shelf while making the opening wide enough for small envelopes. Sell it with a few blank note cards, and check that both the door and flag move freely before packing.
Supplies: Unfinished wooden mailbox blank or a small plywood mailbox build, candy pink and red paint, wood heart knob, suitable adhesive, small hinges and screws if assembling, wooden side flag and pivot screw, clear finish, note cards.
How to make it:
1. Begin with a mailbox around 7 inches long and test it with your chosen note cards. If building the shell, fit the base and walls with wood glue and small brads, leaving the front opening for an access door.
2. Fit a front panel with a horizontal note slot above the door, then attach two pitched roof panels. Mount the access flap on small hinges and attach the side flag with a pivot screw that lets it rotate.
3. Paint the body candy pink and the roof and flag red, protecting the hinges and moving contact surfaces. Paint a small wood heart red and attach it as the door knob.
4. Apply the appropriate finish and let it cure, then check the slot, flap, and flag again. Bundle the mailbox with blank cards that fit comfortably inside.
8. Heart Bud Vase Block
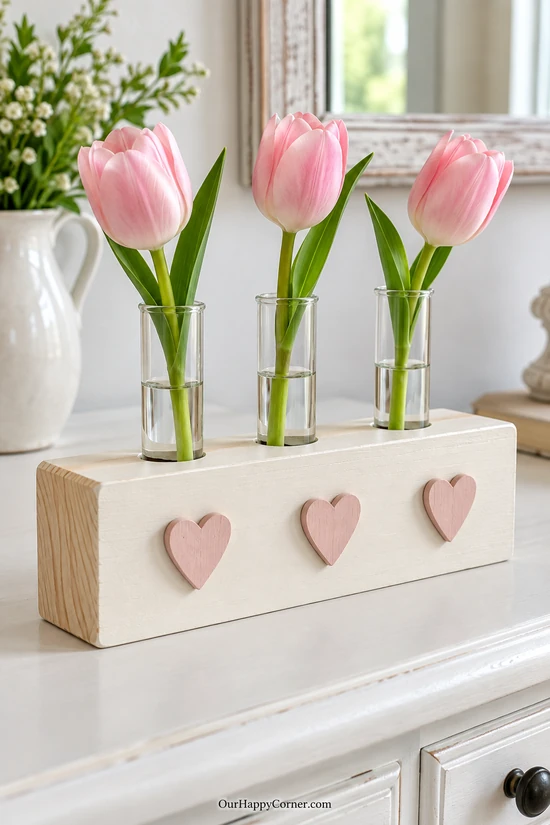
Three slim flower stems can feel just as thoughtful as a large bouquet when they have a pretty holder. A wooden block with removable glass tubes keeps the arrangement compact and easy to refresh.
Use a solid block with enough depth to support the tubes rather than a narrow strip that may tip. Small raised hearts on the front provide the Valentine detail without competing with the flowers.
Offer the holder with its glass tubes and state whether fresh flowers are included. Wrap the tubes separately for shipping so the customer can assemble the piece safely at home.
Supplies: Solid wood block around 8 inches long and 2 inches deep, three matching glass bud-vase tubes, drill and correctly sized bit, clamps, ivory and blush paint, three small wood hearts, wood glue, clear finish.
How to make it:
1. Mark three evenly spaced holes along the top, leaving wood around each one, and clamp the block securely. Drill straight, flat-bottomed holes deep enough to support the tubes without breaking through the base.
2. Test the empty tubes for a snug but removable fit, then smooth the block and paint the front ivory while leaving the top and ends natural if desired.
3. Paint three small hearts blush and glue them to clean, unpainted attachment spots on the front. Finish the wood and allow the glue and finish to cure.
4. Insert the tubes, add water directly to the glass, and place one short stem in each. Remove the tubes for filling and cleaning to keep water away from the wood.
9. Valentine Photo Clip Stand
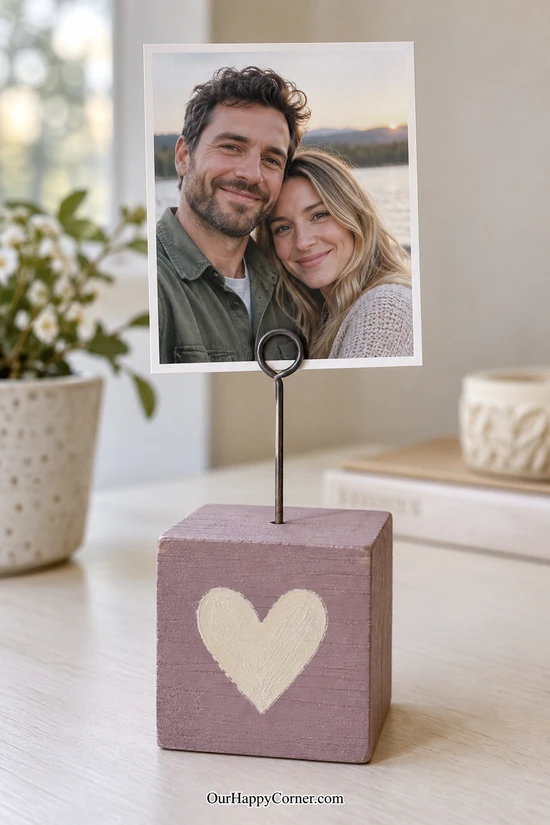
A small photo stand is a personal gift that does not take much room on a desk. Mauve paint and an ivory heart give the base a finished look while the photo remains the focus.
Use a solid block rather than a thin cutout so it can balance the upright holder. A purchased double-loop photo wire keeps the construction simple and grips the print more securely than a loose decorative loop.
Sell the stand by itself or offer photo printing as a clearly priced extra. Choose a clip height that suits a small print so the finished piece stays steady rather than top-heavy.
Supplies: Solid wood block around 3 inches across, purchased metal photo-holder wire, drill, mauve and ivory paint, small heart template, adhesive suitable for metal and wood, clear finish.
How to make it:
1. Check that the block sits flat, then drill a centered hole to fit the holder’s stem without going through the bottom.
2. Paint the block mauve and add an ivory heart to the front using a template or stencil.
3. Finish the painted block and allow it to cure, then anchor the wire stem in the hole with the appropriate adhesive.
4. Once the bond has set, insert a small photo into the double-loop clip and test the balance. Use a shorter stem or smaller print if the stand feels unstable.
10. Heart Tic-Tac-Toe Gift
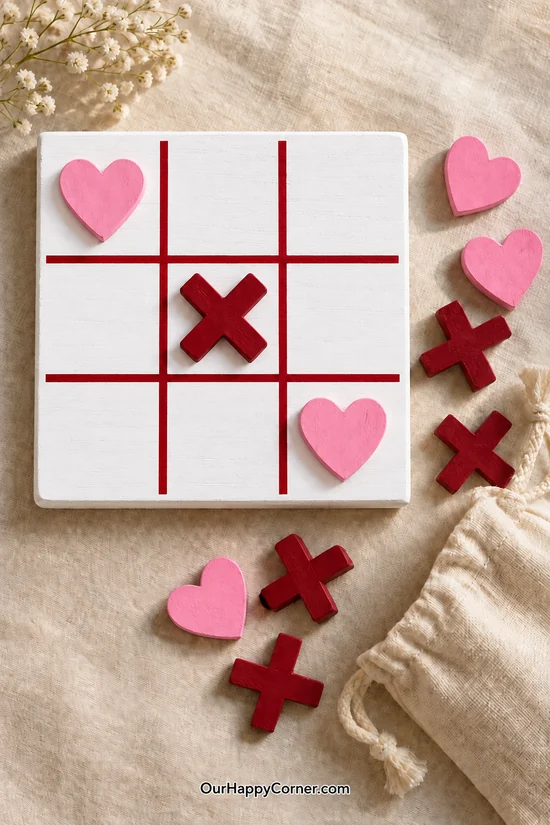
A little wooden game makes a Valentine gift that invites two people to spend time together. Pink hearts replace the usual O pieces while cherry red X shapes keep the board easy to follow.
A 7-inch square board gives small cutouts enough room to fit inside the nine spaces. Keep the surface flat and the grid simple so the game feels comfortable to use.
Package five hearts and five X pieces with a small drawstring storage bag. Present it as an adult gift, and note that the loose pieces should be kept away from young children.
Supplies: Square wood board, five small wooden heart cutouts, five wooden X cutouts, white, candy pink, and cherry red paint, ruler, painter’s tape, clear finish, cotton drawstring bag.
How to make it:
1. Paint the board white, then use a ruler to divide it into three equal rows and three equal columns.
2. Tape and paint two vertical and two horizontal cherry red lines, stopping slightly inside the board’s outer edges.
3. Paint all five hearts candy pink and all five X pieces cherry red, making sure each piece fits comfortably inside one square.
4. Finish and cure the board and pieces, then count the complete ten-piece set. Pack the loose pieces in the drawstring bag beside the board.
11. Wooden Tulip Bouquet
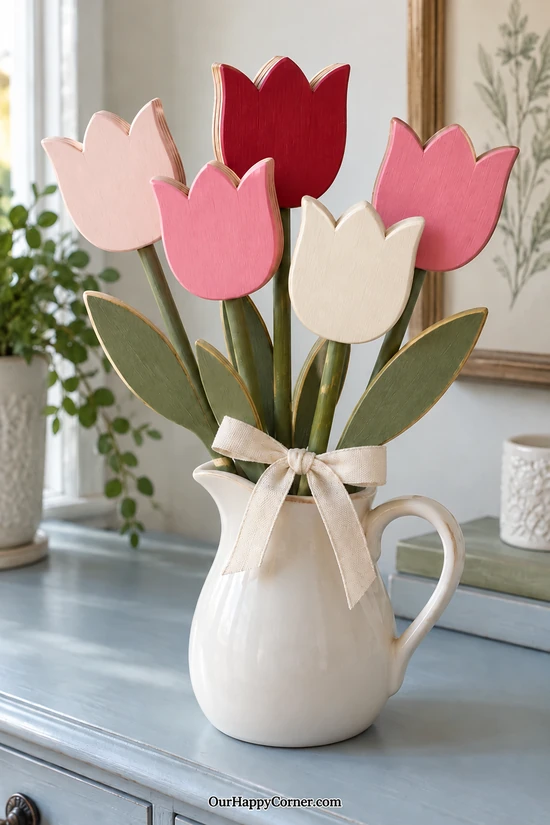
A wooden tulip bouquet gives the feeling of flowers in a gift that can be displayed again each year. Broad painted flower shapes and simple leaves make it approachable without losing its charm.
Use five stems at slightly different heights so the flower heads do not hide one another. Flat wood strips suit the handmade look and give the tulips a larger surface for secure attachment.
Sell the bouquet tied with ribbon, with a vase offered separately if you wish. A coordinating color mix makes the set feel intentional, and individual replacement stems give you another useful selling option.
Supplies: Five plywood tulip cutouts, flat wooden stem strips, wooden leaf cutouts, cherry red, candy pink, blush, creamy white, and sage paint, wood glue, clamps, clear finish, ivory ribbon, pitcher or vase for display.
How to make it:
1. Smooth the flower heads, leaves, and stems, then paint the tulips in the four flower colors and the stems and leaves sage. Leave the joining spots bare.
2. Glue each flower head onto the upper end of a flat stem, allowing a generous overlap on the back, and clamp until set.
3. Attach a leaf to each stem where it will remain visible, then finish the assembled pieces and allow the bonds and finish to cure.
4. Arrange five stems at different heights and tie them with ivory ribbon below the leaves. Place them in a holder that keeps the bouquet upright without crowding the flowers.
12. Heart Ring Dish
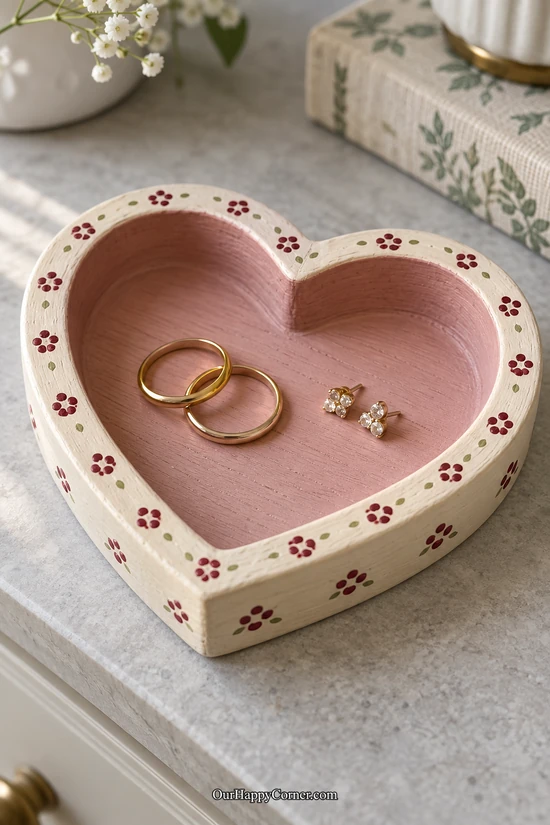
A little ring dish gives everyday jewelry a place to land beside the bed or sink. A raised heart-shaped rim keeps the design useful as well as pretty.
Begin with a shallow wooden tray blank instead of trying to hollow out a solid heart. Tiny dot flowers around the rim add detail while leaving the center clear for rings and earrings.
This is a lovely small gift to sell on its own or beside a matching keepsake box. Include a soft protective base and describe it as a dry jewelry holder rather than a container for water.
Supplies: Shallow heart-shaped wood tray, ivory, dusty pink, burgundy, and sage acrylic paint, fine brush, dotting tool, compatible clear finish, adhesive felt for the underside.
How to make it:
1. Smooth the tray and check the inside corners, then paint the outside and rim ivory and the inner base dusty pink.
2. Use burgundy dots to make small flower clusters around the rim, adding an occasional sage dot or short leaf stroke.
3. Apply thin coats of a compatible clear finish, paying attention to the inner corners so excess finish does not collect there, and let it cure.
4. Cut a felt pad slightly smaller than the underside and attach it securely. Package the dish without jewelry unless you are deliberately selling a combined gift.
13. Heart Napkin Rings
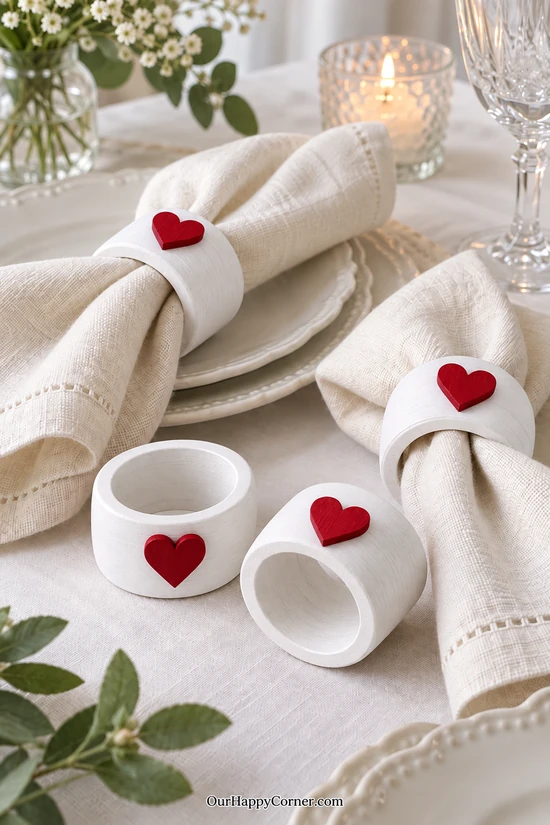
Wooden napkin rings bring a handmade detail to a Valentine dinner without needing a large centerpiece. White rings and cherry red hearts stand out against simple ivory napkins.
Choose ring blanks with an opening large enough for a folded cloth napkin. A small heart attached to the front keeps the decoration light and leaves the opening unobstructed.
Offer sets of two for a couple or four for a small table. Wrap the rings together and state the inner diameter so buyers can judge whether their napkins will fit.
Supplies: Four unfinished wooden napkin rings with roughly 1½-inch inner openings, four small flat wood hearts, white and cherry red paint, wood glue, small clamps, clear finish.
How to make it:
1. Smooth the inside and outside of each ring, then mark a small bare attachment area on the front and leave the matching back of each heart unpainted.
2. Paint the rings white and the hearts cherry red, keeping heavy paint away from the ring openings.
3. Glue each heart to its ring at the bare joining spots and hold the pieces securely until the glue sets.
4. Finish and cure the assembled rings, then test them with a folded cloth napkin. Pack the matching set together, with napkins listed separately if they are only props.
14. Valentine Wooden Earrings
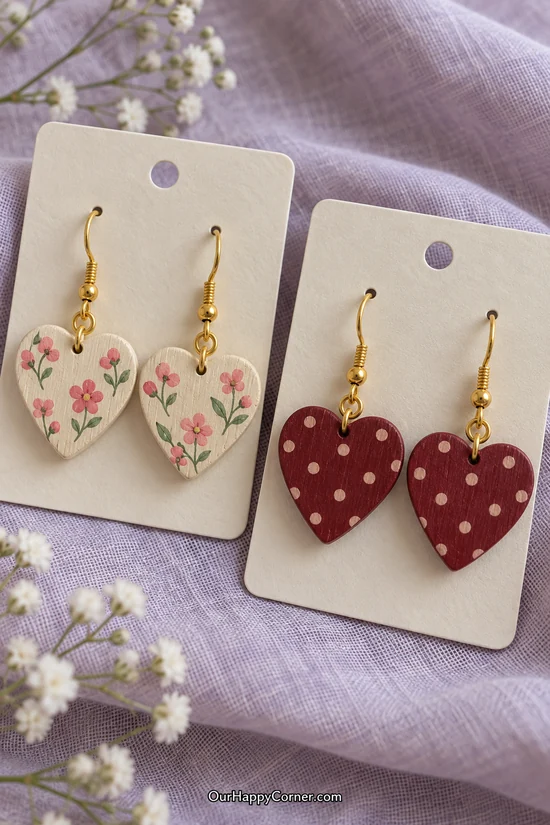
Wooden heart earrings let you turn a small painted motif into something wearable. Floral ivory hearts feel soft and romantic, while burgundy dots offer a simpler companion design.
Use thin, lightweight blanks made for jewelry so the finished pair does not pull heavily on the ears. Keep the two hearts in each pair the same size and repeat the placement of the larger flowers.
Display each pair on a card with the earring dimensions and the stated material of the ear wires. Buy findings with clear material information and avoid promising that a pair is hypoallergenic without support for that claim.
Supplies: Thin drilled wooden heart earring blanks, ivory, pink, burgundy, and sage paint, fine brush, clear finish suitable for handled craft surfaces, jewelry jump rings, labeled ear wires, two pliers, display cards.
How to make it:
1. Smooth the blanks and check the holes, then paint one pair ivory and another burgundy on both sides.
2. Add small pink flowers and sage leaves to the ivory pair, and evenly spaced blush dots to the burgundy pair.
3. Seal the faces and edges according to the finish label and allow the full cure time before attaching the findings.
4. Connect each heart to an ear wire with a fully closed jump ring. Check that the decorated fronts face the same direction, then mount the pairs on separate cards.
15. Love Note Wall Pocket
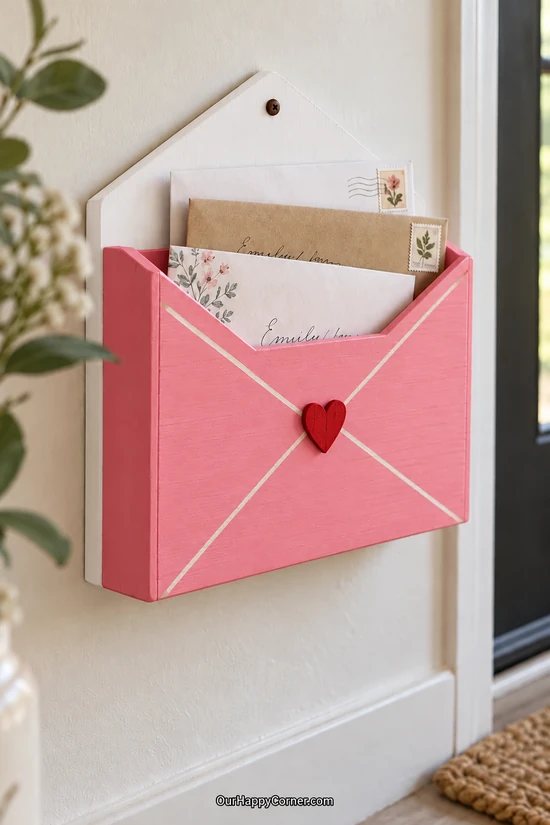
An envelope-shaped wall pocket keeps love notes and cards somewhere they can be enjoyed again. Its open top makes it easy to add a new message without taking the holder off the wall.
Give the pocket real side walls and a base so it can hold paper rather than function as a flat sign. Painted diagonal lines suggest an envelope while a small red heart provides the finishing detail.
Offer it as an indoor note holder with a few blank cards tucked inside. Include suitable hanging hardware and let customers know the pocket is intended for lightweight paper contents.
Supplies: Plywood back panel, front panel, two side strips and a bottom strip, wood glue, small brads, clamps, white and strawberry pink paint, red wood heart, saw, drill, appropriate wall-mounting hardware.
How to make it:
1. Cut a back panel around 9 inches wide with a pointed upper flap shape, and a shorter front panel with a shallow V at the top. Cut side and bottom strips about 1½ inches deep to fit between the panels.
2. Dry-fit the pocket, then glue and secure the side and bottom strips to the back and front panels with small brads. Keep the top opening clear and let the assembly cure.
3. Paint the back white and the pocket strawberry pink, then add white diagonal envelope lines. Attach a red wooden heart where the lines meet using an appropriate adhesive or a bare joining spot.
4. Finish the piece and fit hanging hardware securely to the back. Hang it with wall fixings suitable for the wall type and add a few lightweight notes.
16. Heart Plant Pot Sleeve
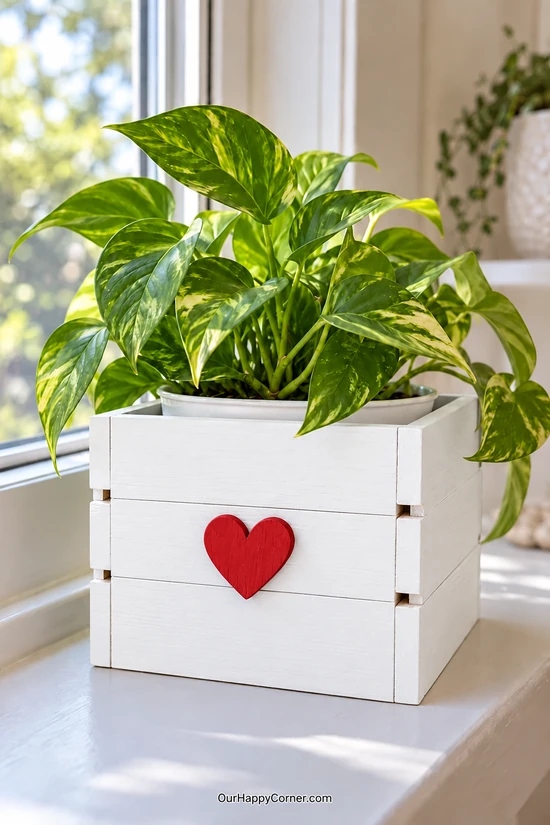
A wooden sleeve turns an ordinary plant pot into a thoughtful Valentine gift. White paint and one cherry red heart create a festive accent against a leafy green plant.
Build or choose the sleeve around the pot you plan to use, leaving a little room to lift it out. A separate watertight inner container helps keep the wooden shell dry.
Sell the sleeve on its own or offer a complete planted gift for local pickup. Clearly state whether the plant and inner container are included so buyers know exactly what they are receiving.
Supplies: Small wooden planter sleeve or slatted craft box, removable nursery pot and watertight outer pot or liner, white and cherry red paint, flat wood heart, suitable adhesive, moisture-resistant finish for the wooden exterior.
How to make it:
1. Measure the plant container and choose a sleeve with enough clearance around its sides and rim for easy removal.
2. Smooth the wood and paint the sleeve white, keeping its slat gaps clear. Paint the small heart cherry red.
3. Attach the heart to the front with a surface-appropriate adhesive, then finish the wood as directed and allow it to cure.
4. Fit the watertight container and nursery pot inside. Remove the plant for watering, let excess water drain, and return it once the outside of the container is dry.
17. Valentine Wooden Bookmarks
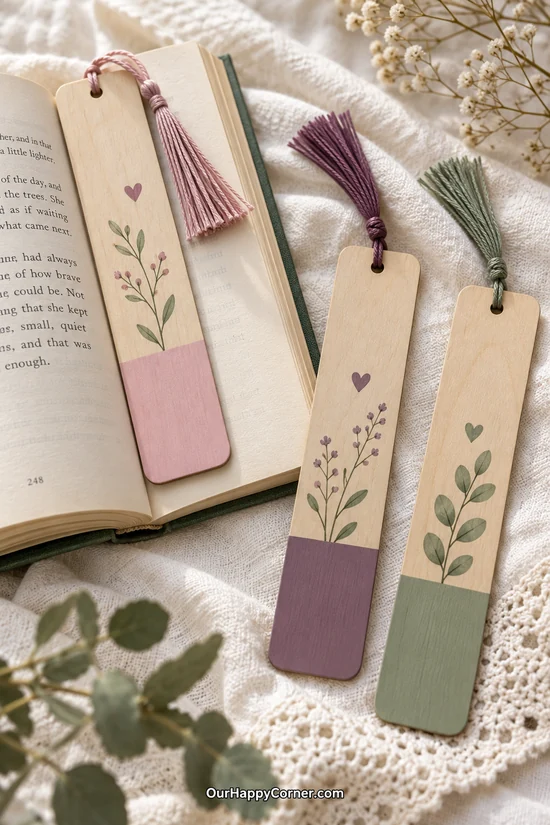
A painted wooden bookmark is a small gift that has a clear everyday use. A few leafy sprigs, a little heart, and a color-blocked end give each one a personal finish.
Choose very thin bookmark blanks so the wood does not force the book open. Smooth edges and flat decoration matter more here than raised embellishments.
Offer the bookmarks individually or as a small set for a reader who likes to keep several books going. Matching tassels make the colors feel coordinated without adding extra painted detail.
Supplies: Thin drilled wood bookmark blanks around 6 inches long, pink, plum, sage, and ivory acrylic paints, small brushes, painter’s tape, thin compatible clear finish, cotton embroidery thread or tassels.
How to make it:
1. Smooth both sides, all edges, and the drilled hole, then tape off the lower third of each bookmark.
2. Paint the taped sections pink, plum, or sage and remove the tape carefully after the paint has set.
3. Add a simple stem, a few leaf strokes, small buds, and one heart to the natural-wood section. Apply a thin protective finish and let it cure flat.
4. Thread a coordinating tassel through the top hole and secure it. Check that there are no rough edges or paint ridges that could catch a page.
18. Personalized Couple Name Plaque
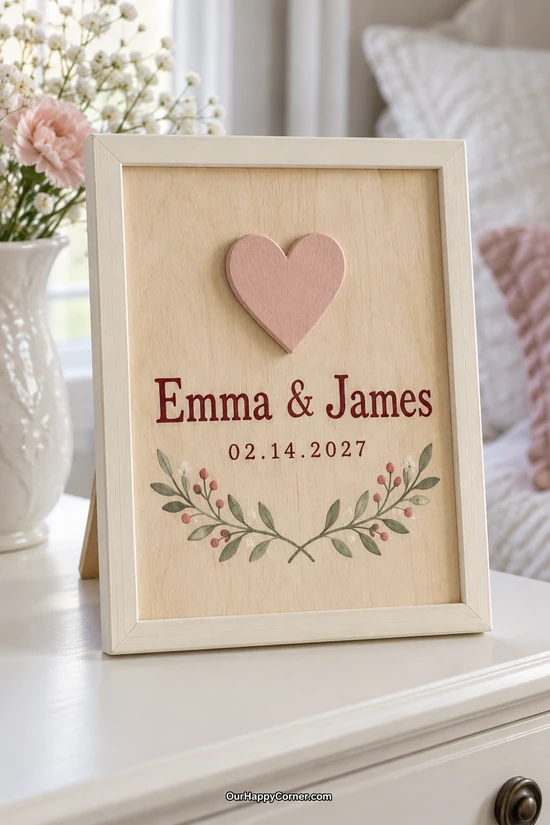
A couple’s names and a meaningful date make a wooden plaque feel like a keepsake. One raised heart and a few painted sprigs give the lettering room to stand out.
A ready-made wood panel in a frame saves time and gives the design a clean border. Use a lettering template so the names stay centered, especially when one is much longer than the other.
Offer the plaque for Valentine’s Day, an anniversary, or an engagement gift. Ask customers to confirm the spelling and date before you paint, and choose either wall hardware or a sturdy easel back for the intended display.
Supplies: Framed wooden panel, ivory, blush, burgundy, and sage paint, lettering stencil or transfer template, small wood heart, appropriate adhesive, clear finish, easel back or wall hardware.
How to make it:
1. Paint the frame ivory and leave the central panel natural or lightly finished, following the paint and lettering product requirements.
2. Plan the names and date on paper, then transfer the layout and paint the lettering burgundy.
3. Paint a small heart blush and attach it above the names. Add two simple leafy sprigs beneath the date without crowding the lower frame.
4. Protect the artwork with a compatible finish, allow it to cure, and fit the chosen display hardware. Recheck every name and number before packing the order.
19. Heart Magnet Gift Set
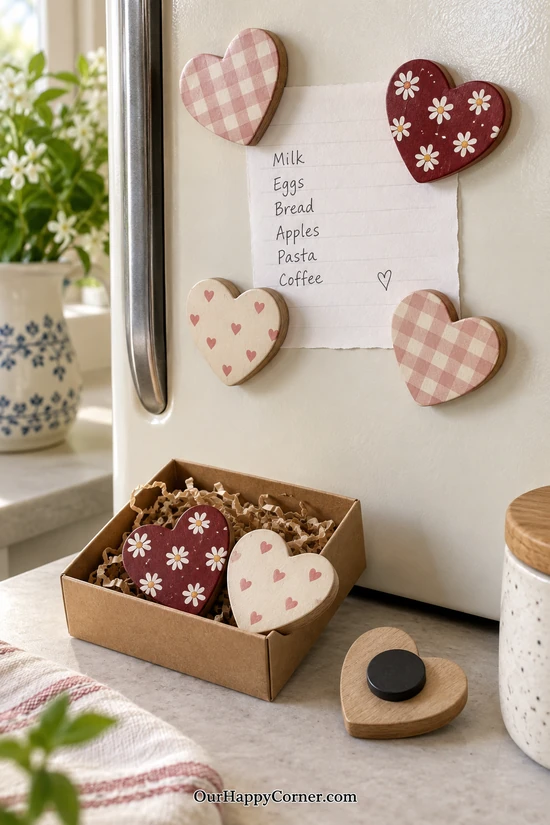
A coordinated magnet set brings Valentine color to a refrigerator without taking up counter space. Gingham, small daisies, and scattered hearts give the set variety within one palette.
Flat wooden hearts are easier to package than bulky shapes and leave a broad area for the magnet on the back. Keep the decorations painted so the fronts remain smooth and light.
Offer a small boxed set or let customers choose their favorite individual designs. Fit the magnets securely and describe them as home accessories, with loose magnets and small parts kept away from children.
Supplies: Flat wood heart blanks, blush, ivory, burgundy, mustard, and sage paints, small brushes, painter’s tape, clear finish, appropriately sized craft magnets, adhesive rated for the magnet and wood surfaces, gift box.
How to make it:
1. Smooth the hearts and reserve a clean attachment area on each back, then divide the fronts among gingham, floral, and scattered-heart designs.
2. Paint the patterns in the coordinating colors, keeping the motifs large enough to remain clear on the small shapes.
3. Finish the painted areas and allow the finish to cure, then attach a magnet to the reserved spot with the appropriate adhesive.
4. Let the adhesive fully set and check each magnet’s hold on a suitable metal surface. Pack the finished designs snugly so they cannot rattle against one another.
20. LED Tealight Heart Blocks
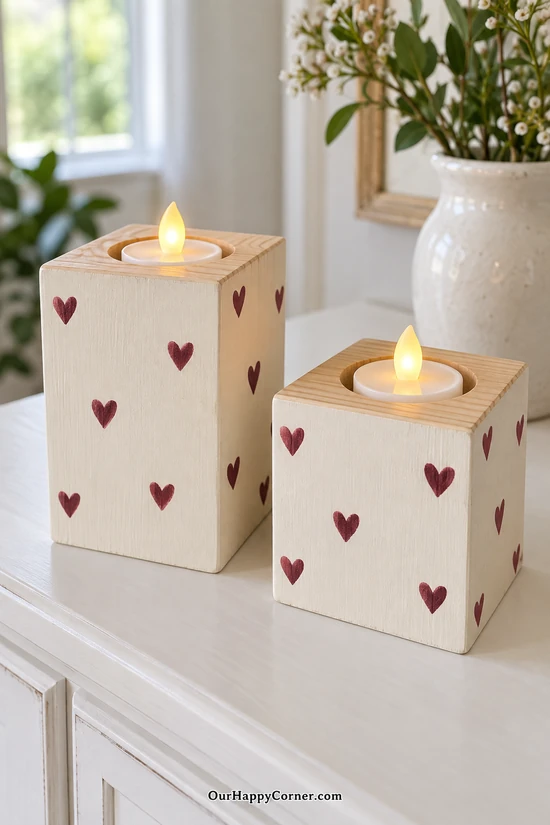
Heart-painted blocks make a simple lighted display for a shelf or console. Two heights give the pair more presence without requiring a complicated shape.
Use solid wood with enough width around the drilled recess to hold a battery tealight comfortably. Keep the natural grain on top and scatter small burgundy hearts across the ivory sides.
Sell the blocks as an LED-only pair and include the light dimensions in the listing. If the lights are included, make sure customers can lift them out to reach their switches and battery compartments.
Supplies: Two solid wood blocks of different heights, battery-operated LED tealights, drill with a matching Forstner bit, clamps, ivory and burgundy paint, heart stencil, clear finish.
How to make it:
1. Mark the center of each block’s top and measure the tealight base. Clamp the block and bore a shallow recess that fits the light without drilling through the wood.
2. Test the fit, leaving enough of the plastic base accessible to lift it out, then smooth the rims and edges.
3. Paint the sides ivory and add small burgundy hearts at varied heights. Protect the wood with the chosen finish and allow it to cure.
4. Insert the battery LED lights and confirm they can be removed easily. Label the holders for battery-operated tealights only; never substitute a flame candle.
21. Wooden Rose Posy Wall Plaque
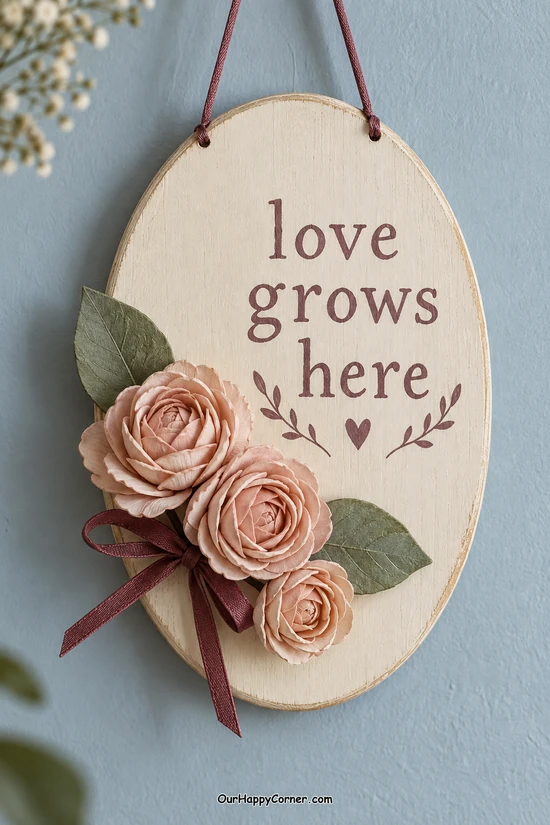
A small cluster of wood flowers gives an oval plaque a romantic finish without covering the whole surface. The words ‘love grows here’ make it suitable for a bedroom, entryway, or quiet corner of the home.
Use purchased sola roses for the posy so the project stays manageable. Their delicate texture contrasts nicely with the flat painted lettering and a narrow ribbon bow.
Offer the plaque as an indoor decoration and pack it in a box deep enough to protect the flowers. A shorter message or a family name can become a personalization option once you have settled on the layout.
Supplies: Oval wooden plaque, three small ready-made blush sola roses, two decorative leaves, ivory and muted plum paint, lettering stencil, burgundy ribbon, hanging cord, clear finish for the plaque, adhesive suitable for the flowers and wood.
How to make it:
1. Smooth the plaque, drill two hanging holes if needed, and paint the surface ivory. Leave a small attachment area bare if your chosen adhesive requires it.
2. Stencil ‘love grows here’ toward the center and right, then add two small painted sprigs beneath the words.
3. Finish the wooden plaque and let it cure before attaching the leaves and three roses in a compact cluster at the lower left.
4. Secure a small burgundy bow below the flowers and thread the hanging cord through the top holes. Keep the flowers dry and cushion around them rather than pressing packing material onto the petals.
22. Mini Valentine House Village
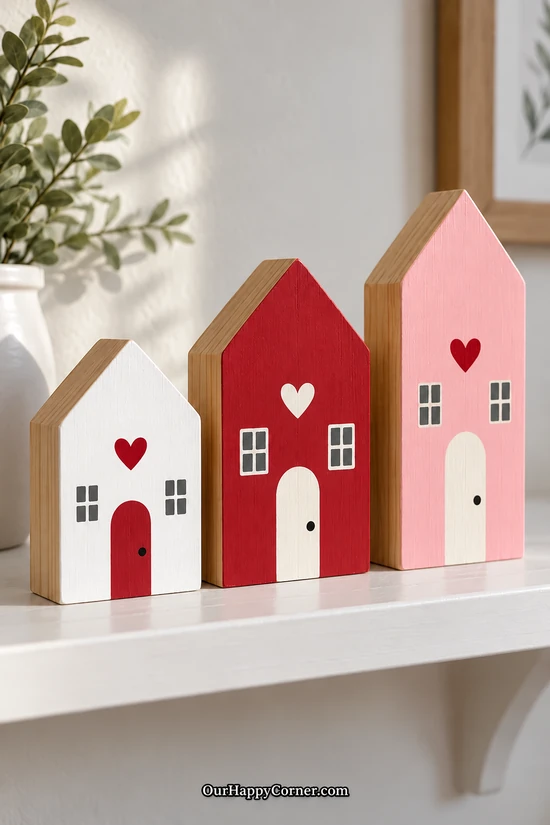
A little house village adds a Valentine touch to a shelf without relying on a large sign. Three heights and a mix of red, pink, and white fronts make the group feel collected rather than repetitive.
Choose thick house-shaped blanks that stand on their own flat bases. Simple doors, square windows, and one heart above each doorway are enough to give every house a character.
Sell the village as a trio or offer individual houses for customers building a larger display. Keep the natural wood sides visible and record the finished heights so buyers can plan their shelf space.
Supplies: Three thick freestanding wooden house blanks in different heights, white, candy pink, cherry red, and charcoal paint, small brushes, painter’s tape, pencil, matte clear finish.
How to make it:
1. Check the bases for stability, smooth the blanks, and paint the fronts white, cherry red, and candy pink while leaving the sides natural.
2. Lightly mark one arched door and two small windows on each house, varying their placement to suit the different heights.
3. Paint the doors in the contrasting color and the windows charcoal with simple ivory divisions. Add a red heart above the white and pink houses’ doors and a white heart above the red house’s door and a tiny dark doorknob.
4. Apply the compatible matte finish and let it cure, then arrange the houses to check the balance of the set. Wrap them individually to protect the painted fronts.
23. Heart String Art
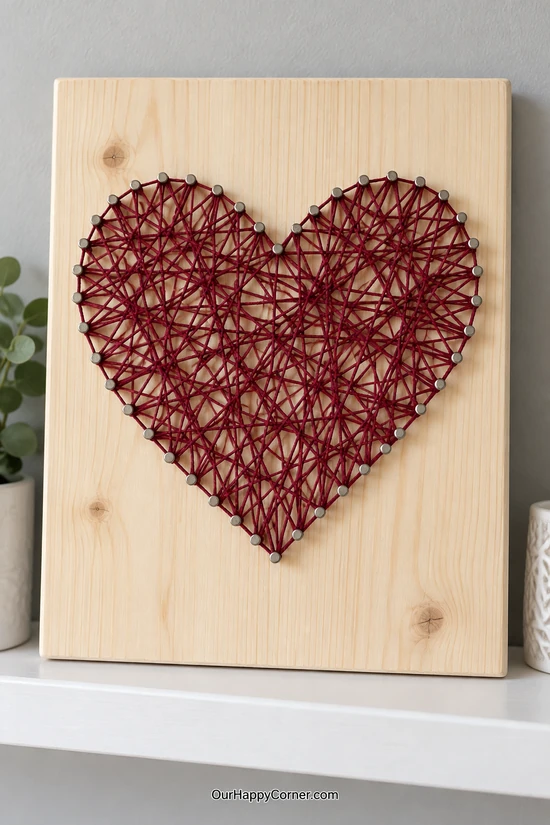
String art adds texture to Valentine wood crafts while allowing the natural panel to stay part of the design. A burgundy heart feels striking even when the rest of the board is left plain.
Use a solid wood panel thick enough to hold short nails securely. Consistent nail spacing gives the outline a neat shape, while the crossed threads inside can follow a relaxed pattern.
Sell the finished panel with secure hanging hardware or as a piece designed to rest on a shelf. Protect the front during transport so the nails and threads cannot catch on the packaging.
Supplies: Solid wood panel around 8 by 10 inches and about ¾ inch thick, paper heart template, short small-head nails, hammer, burgundy cotton string, scissors, optional wood finish, hanging hardware.
How to make it:
1. Smooth and finish the panel first if desired, then center a paper heart template and mark evenly spaced nail positions around its outline.
2. Hammer the nails to a consistent height, embedding them securely without breaking through the back, then remove the paper template.
3. Tie the string to one nail and wrap the outer outline before crossing the heart from nail to nail. Maintain gentle, even tension so the nails are not pulled sideways.
4. Build up the center until it has the desired fullness, then tie off the string and trim the tail. Check every nail and attach secure display hardware to the back if required.
24. Heart-Topped Bottle Stoppers
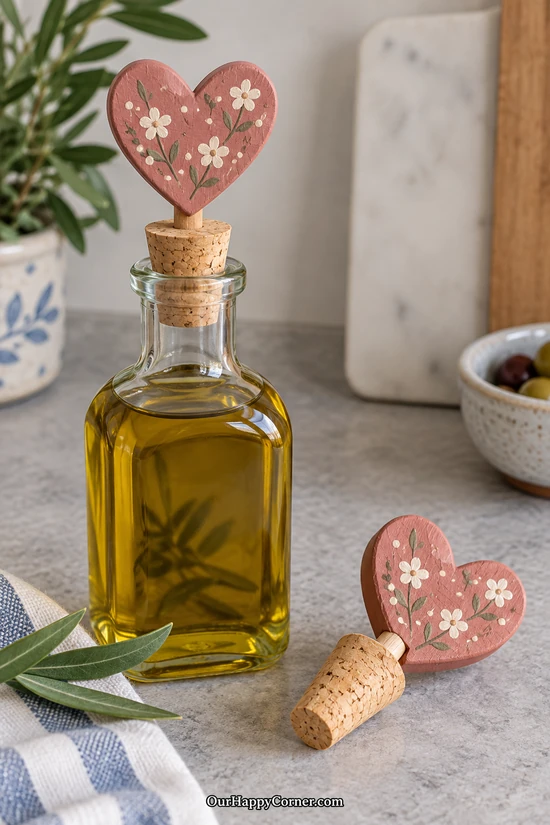
A painted heart gives a plain cork stopper the feel of a little gift. Small ivory flowers add just enough detail to make the topper special without hiding its shape.
Use a purchased stopper component intended for bottles, with a secure attachment point above the cork. The decorated wood and adhesive should remain outside the bottle and away from the contents.
Offer the stoppers individually or as a coordinating pair, and state the stopper measurements rather than calling them universal. A simple care card can explain that the painted topper should be wiped clean and kept out of the dishwasher.
Supplies: Bottle-grade cork stopper blanks with wooden attachment pegs, two small wooden heart blanks, drill if the hearts need mounting holes, dusty pink, ivory, mustard, and sage paint, suitable adhesive, clear finish for the decorative wood.
How to make it:
1. Check the purchased stopper’s attachment instructions and fit a short hole or attachment recess in the underside of each heart if required.
2. Paint the hearts dusty pink and add a few small ivory flowers with sage leaves, keeping the joining areas clear.
3. Finish only the decorative wood and allow it to cure, then attach each heart to the stopper’s peg with the specified suitable adhesive.
4. Let the bond fully set and check that the topper is firmly attached. Keep paint, finish, and adhesive off the cork section that enters the bottle, and package the stopper dry.
25. Valentine Jewelry Peg Rack
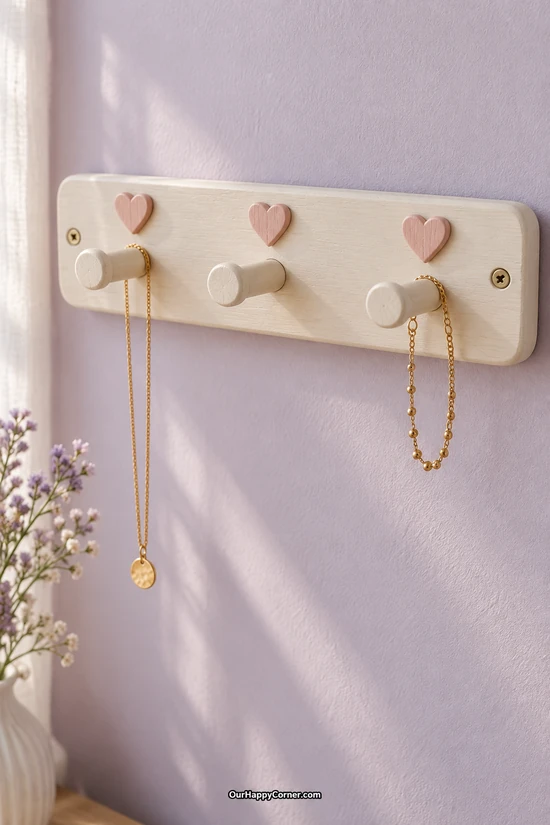
A jewelry peg rack keeps necklaces visible and separates them from a crowded drawer. Three blush hearts give the useful wall accessory a soft Valentine detail.
Use a solid back board with enough thickness to support the pegs and mounting screws. Space the pegs far enough apart that chains can hang without immediately tangling together.
Offer the rack as a gift for someone who likes practical bedroom accessories. Include the rack’s dimensions and suitable mounting guidance, and describe it as a holder for lightweight jewelry rather than heavier household items.
Supplies: Solid wood board around 10 by 4 inches, three wood pegs, three small wood hearts, drill, wood glue, clamps, ivory and blush paint, clear finish, secure wall-mounting hardware.
How to make it:
1. Mark three evenly spaced peg positions and drill holes to match their stems, keeping enough wood behind each hole to support the joint.
2. Glue the bare peg stems into the bare holes and clamp or support them square while the glue sets. Prepare the wall-mounting holes or rear hardware positions.
3. Paint the rack and pegs ivory and the small hearts blush, then attach one heart above each peg with an appropriate adhesive.
4. Finish and cure the rack, fit its mounting hardware, and secure it using fixings appropriate for the wall. Check the pegs and mount before adding lightweight jewelry.
26. Heart-Decorated Gift Crate
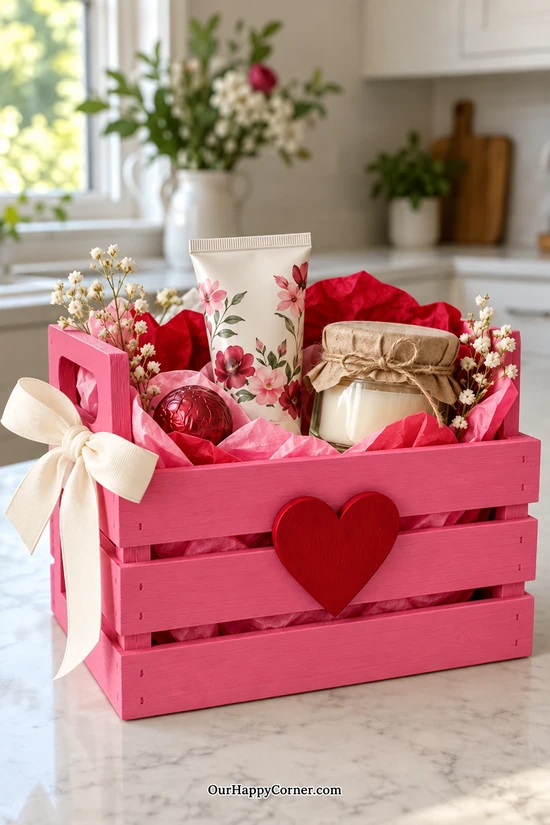
A decorated wooden crate makes the container part of the Valentine gift. After the treats are gone, the buyer can use it to hold small toiletries, cards, or craft supplies.
Start with a compact slatted crate and let one cherry red heart carry the front decoration. An ivory ribbon bow softens the design without making the handle difficult to use.
Sell the painted crate empty or offer a carefully planned gift bundle for local customers. List each included item and leave enough room inside that products can be lifted out without snagging on the slats.
Supplies: Small unfinished wooden crate around 8 by 6 inches, bright pink and cherry red paint, wood heart, suitable adhesive, clear finish, ivory ribbon, tissue paper, optional sealed hand cream, candle jar, and wrapped chocolate.
How to make it:
1. Smooth the slats and handle openings, check the crate’s joints, and paint the wood bright pink in thin coats.
2. Paint the heart cherry red and attach it securely to the front, keeping the handle openings clear.
3. Apply the compatible finish and allow it to cure fully before adding tissue or products. Tie an ivory bow near one handle.
4. Arrange the gift contents with cushioning between any hard containers, keeping everything within the crate’s footprint. Use only wrapped food and clearly describe whether the crate is sold empty or filled.
27. Valentine Coffee Tray
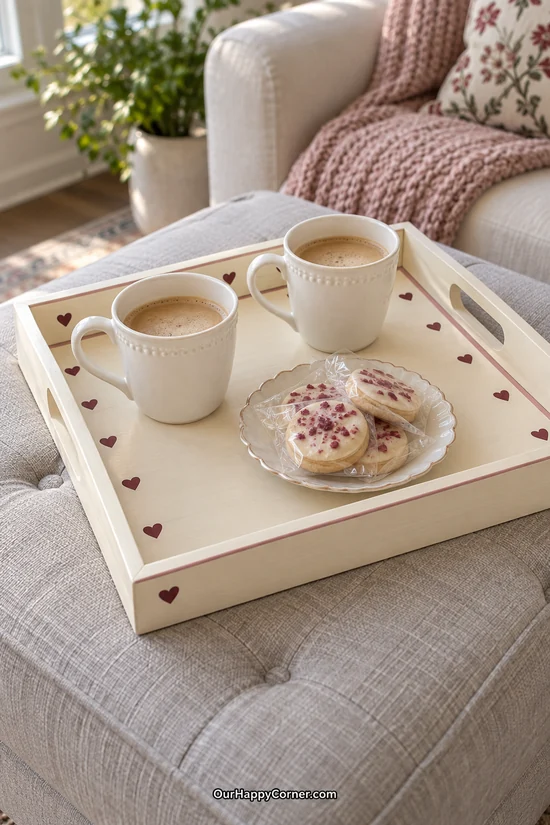
A heart-painted tray turns coffee for two into a thoughtful little occasion. A narrow pink border and scattered burgundy hearts give the tray character while leaving plenty of clear space for mugs.
Choose a sturdy tray blank with raised sides and comfortable handle openings. A size around 12 by 14 inches can accommodate two ordinary mugs and a small plate without feeling oversized.
This is a useful option for customers who prefer a gift they can keep using after Valentine’s Day. Sell the tray on its own or offer a local gift bundle, with food kept on plates or in its original wrapping.
Supplies: Unfinished wooden tray with handles, ivory, dusty rose, and burgundy acrylic paint, painter’s tape, small heart stencil, brushes, suitable clear protective finish, optional felt pads.
How to make it:
1. Check the tray’s joints and handles, smooth the wood, and paint the interior and exterior ivory without building up thick paint in the corners.
2. Mark a narrow border just inside the tray base and paint it dusty rose, then add small burgundy hearts around the inside edge.
3. Apply a clear finish suitable for the tray’s intended use and allow the full cure time. Add discreet felt pads underneath if desired.
4. Check that mugs and plates sit flat and the handles can be gripped comfortably. Include care instructions for the chosen finish and keep loose food off the painted surface.
28. Wooden Heart Wreath
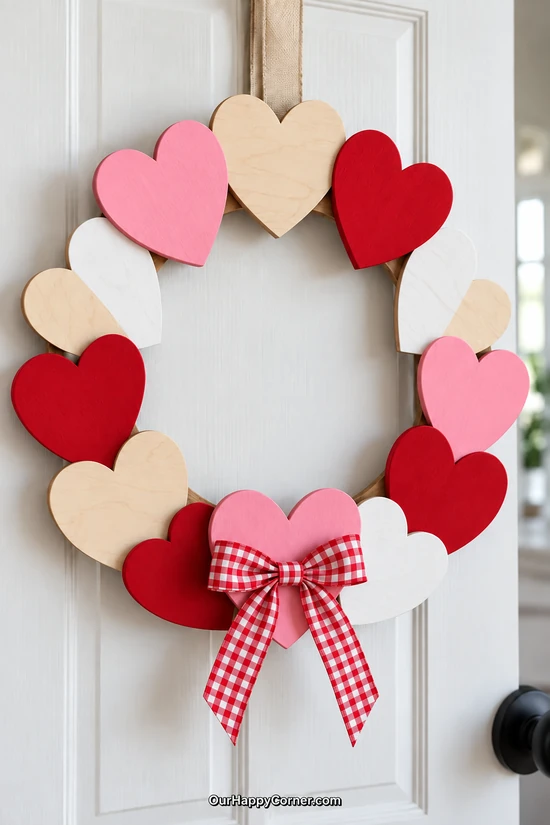
A wreath made from overlapping wood hearts creates a clear Valentine statement without needing greenery. Natural birch, candy pink, cherry red, and white make the individual shapes easy to distinguish.
Use a flat wooden ring as the hidden support so the hearts have a consistent base. Lay out the whole circle before attaching anything, adjusting the overlaps until the center opening looks balanced.
Offer it as an indoor door or wall decoration with a hanging ribbon already fitted. For shipping, choose a shallow box that supports the ring and keeps the bow from being flattened.
Supplies: Flat wooden wreath ring around 13 inches across, enough flat wood hearts to cover it with slight overlaps, candy pink, cherry red, and white paint, wood glue or suitable adhesive, clamps, clear finish, red-and-white gingham bow ribbon, sturdy hanging ribbon.
How to make it:
1. Arrange the hearts around the ring to work out the spacing, then mark the joining areas and decide which hearts will remain natural.
2. Paint the chosen hearts pink, cherry red, or white, keeping bare wood at the attachment spots when using wood glue.
3. Attach the hearts to the ring in the planned order, using adequate contact areas and supporting the overlaps while the adhesive sets. Let the assembled wreath cure flat.
4. Finish the wood as appropriate, then attach a hanging ribbon securely around the supporting ring and add the gingham bow at the bottom. Check the hanger before displaying or packing.
29. Date Night Token Box
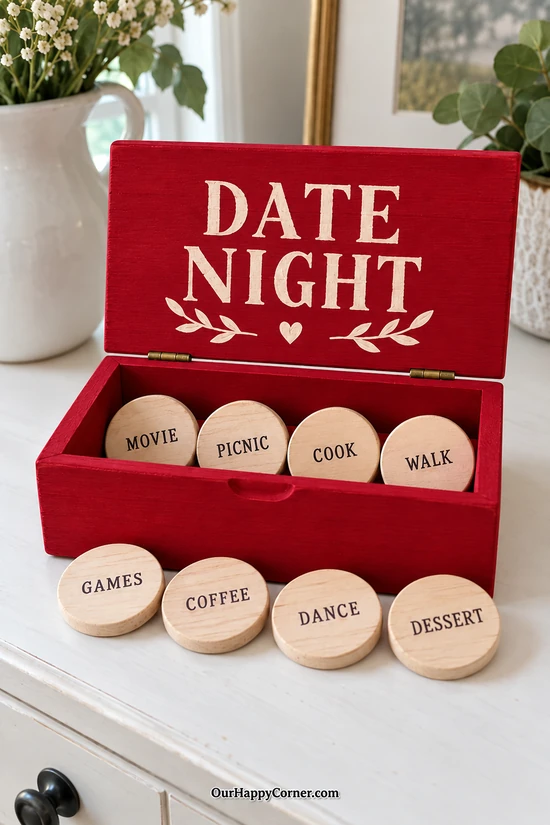
A date-night box gives a couple a small collection of ideas to reach for when they cannot decide what to do. Wooden tokens make the activities feel like a lasting gift rather than a stack of loose notes.
Keep the words short so each token is readable without tiny lettering. A cherry red box, ivory lid lettering, and natural wood rounds create a coordinated set with very little extra decoration.
Offer a standard set of eight activities and a separate option for custom wording. Check that all the tokens fit inside with the lid closed, then list the included activities so buyers can choose a set that suits them.
Supplies: Small hinged wooden box, eight wood round tokens that fit inside, cherry red and ivory paint, dark paint pen or alphabet stamps suitable for wood, lettering stencil, brushes, compatible clear finish.
How to make it:
1. Check the fit of all eight tokens before painting, then paint the box cherry red while keeping the hinges and closing edges clear.
2. Stencil ‘DATE NIGHT’ in ivory on the lid and add two small leafy sprigs or a heart beneath the wording.
3. Label the tokens ‘MOVIE,’ ‘PICNIC,’ ‘COOK,’ ‘WALK,’ ‘GAMES,’ ‘COFFEE,’ ‘DANCE,’ and ‘DESSERT,’ using lettering materials that will not smear under your selected finish.
4. Protect the box and tokens with thin compatible finish coats and allow them to cure separately. Count the complete set, place it inside, and confirm the lid still closes easily.
Final Thoughts
Start with the Valentine wood crafts you would enjoy making more than once, then build a small collection around them. A thoughtful design, a smooth finish, and neat packaging can make even a simple wooden piece feel like a special gift.
Choose one idea, make your first piece carefully, and use it to plan your supplies and production time. Whether you offer personalized keepsakes, useful accessories, or seasonal decor, give each finished craft a clear purpose and a little heart.