This post may contain affiliate links. If you make a purchase through these links, I may earn a small commission at no extra cost to you. Thank you so much for your support.
Jewelry box painting ideas can turn a plain wooden box into something you actually want to keep on your dresser.
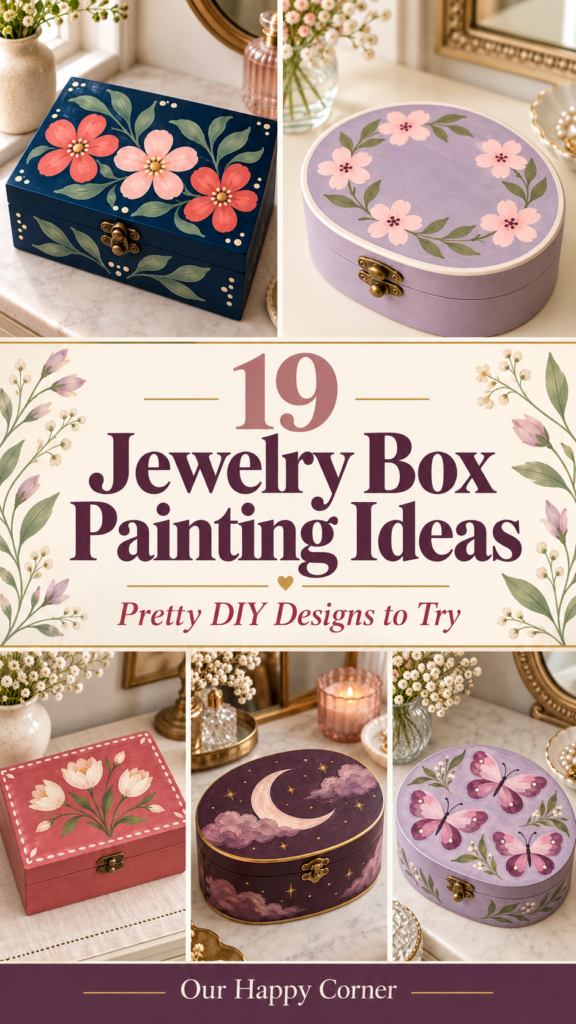
You don’t need to paint a perfect rose or master tiny details to make one look lovely. A few well-placed flowers, an easy repeating pattern, or a small scene can give it plenty of personality.
The 19 finished boxes below offer different looks, from soft florals to a moonlit sky. Each idea includes the colors and steps to recreate the design.
Pick one that suits your room or someone you’d like to make a gift for, and keep the first version simple. You can always add another detail after you’ve seen how the main design looks.
Materials for Painting a Jewelry Box
You can use the same basic supplies for every design and change only the paint colors.
An unfinished wooden jewelry box. A flat lid is easiest to paint, especially for the tile, landscape, and shell designs. Check that the lid opens and closes properly before you begin.
Fine-grit sandpaper or a sanding sponge to smooth rough wood and edges.
A clean, lint-free cloth to remove sanding dust.
Acrylic craft paint in your chosen background and design colors. You only need a few small bottles for most of these projects.
A wood-compatible acrylic primer or craft sealer if the bare wood is very absorbent, or a suitable bonding primer if you’re repainting a previously finished box. Follow the label for the surface you have.
Brushes: a flat brush for the background, a medium round brush for petals and leaves, and a small round or liner brush for stems and edges.
A pencil and eraser for lightly marking the design. A paper circle or simple paper cutout can help with symmetrical shapes.
A palette or small plate, water, and paper towels for mixing paint and cleaning brushes.
Painter’s tape to protect hinges and clasps, and optionally to mark the tile divisions or a straight border.
A compatible clear acrylic craft varnish in matte or satin if you want to protect the finished exterior from regular handling.
A dotting tool is helpful for flower centers and stars, but the rounded end of a clean brush handle works too. If you already own acrylic paints from another project, use those before buying a new set.
Prepare the Box Before You Paint
1. Check and clean it. Open the box, remove any loose dust, and decide whether you want to paint only the outside. Protect the clasp and hinges with small pieces of painter’s tape. Avoid building up paint along the line where the lid meets the base.
2. Smooth the wood. Lightly sand rough areas, especially the lid and front edge. Wipe away all sanding dust. If the box has a glossy factory finish, use a primer specified for that surface rather than assuming regular craft paint will grip it.
3. Prime if needed. Bare wood can soak up paint unevenly. Apply a thin coat of wood-compatible primer or craft sealer according to its instructions and let it dry completely. A smooth base makes light pinks and creams easier to paint.
4. Paint the background. Apply thin coats with a flat brush, letting each coat dry before adding another. Painting the lid separately while it is open helps prevent it from sticking shut.
5. Add your design, then protect it. Sketch very lightly or mark a few guide points. Paint larger shapes before tiny accents. Once the artwork has dried as directed by your paint and varnish labels, apply a compatible clear finish if desired. Keep varnish off the clasp and the lid’s contact edges, and allow it to cure according to the label before storing jewelry inside.
A useful beginner tip: Practice your flower petals or leaf strokes on scrap paper first. Three confident strokes often look better than repeatedly brushing over a petal while the paint is drying.
Jewelry Box Painting Ideas
1. Navy Jewelry Box With Folk Flowers
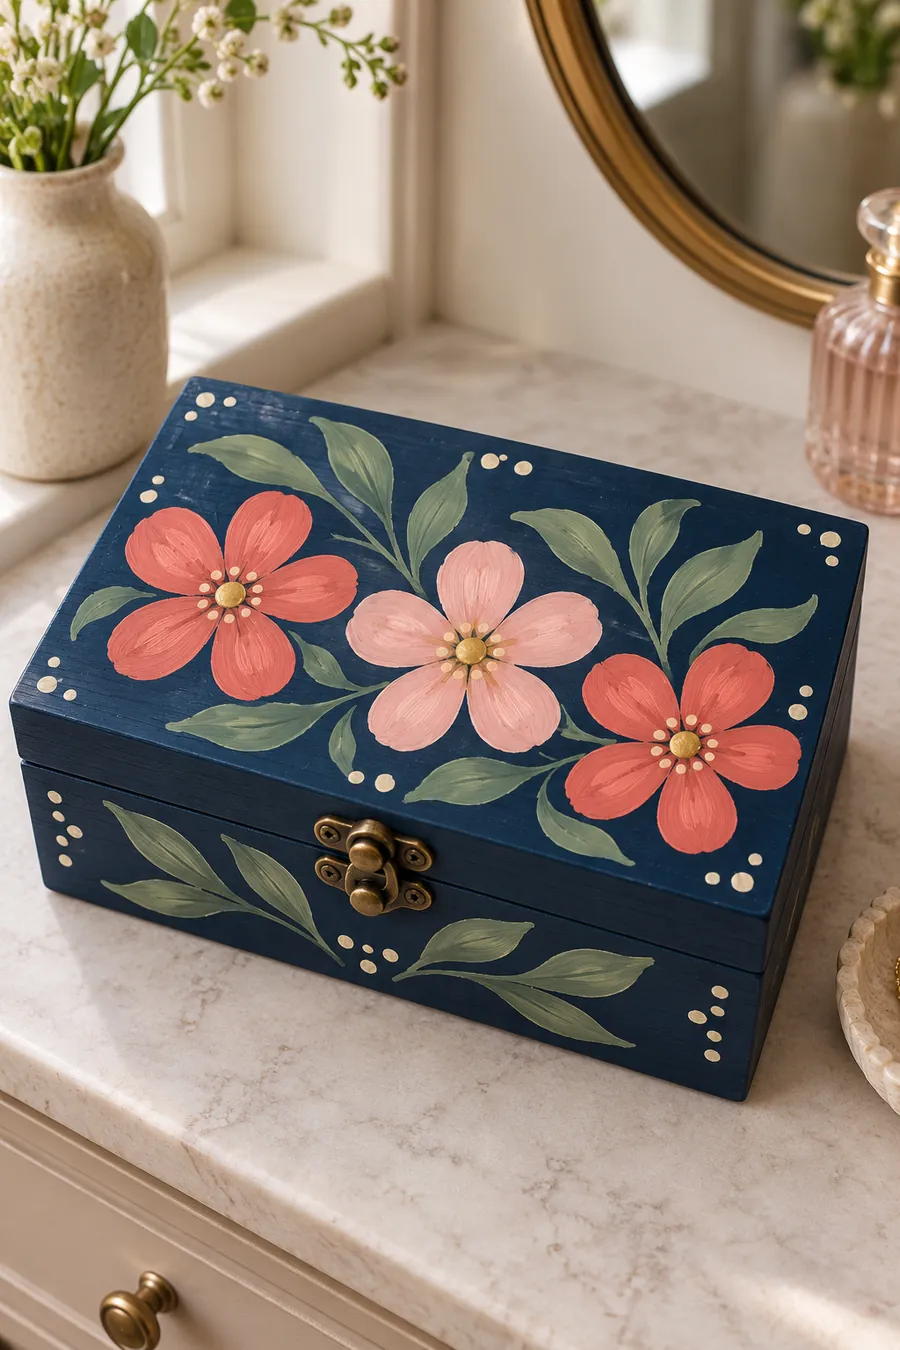
The deep navy background makes three simple flowers stand out without requiring a crowded bouquet. Each flower is built from five broad petals, while the sage leaves and cream dots fill the spaces around them. The design continues onto the front of the box, so it looks finished from more than one angle.
Paint colors and extras: Navy, coral, soft pink, sage green, cream, and a little gold or mustard; medium round brush and dotting tool.
1. Paint the entire exterior navy and let it dry. Lightly mark three flower centers across the lid.
2. Paint five broad coral or pink petals around each center. Alternate the flower colors for balance and leave a little navy between them.
3. Add a gold dot in each center. Paint a few stems and long sage leaves in the open spaces, then repeat two small leafy sprigs on the front.
4. Place a few cream dots near the lid edges. Stop while you can still see plenty of the navy background.
2. Lilac Box With a Blossom Wreath
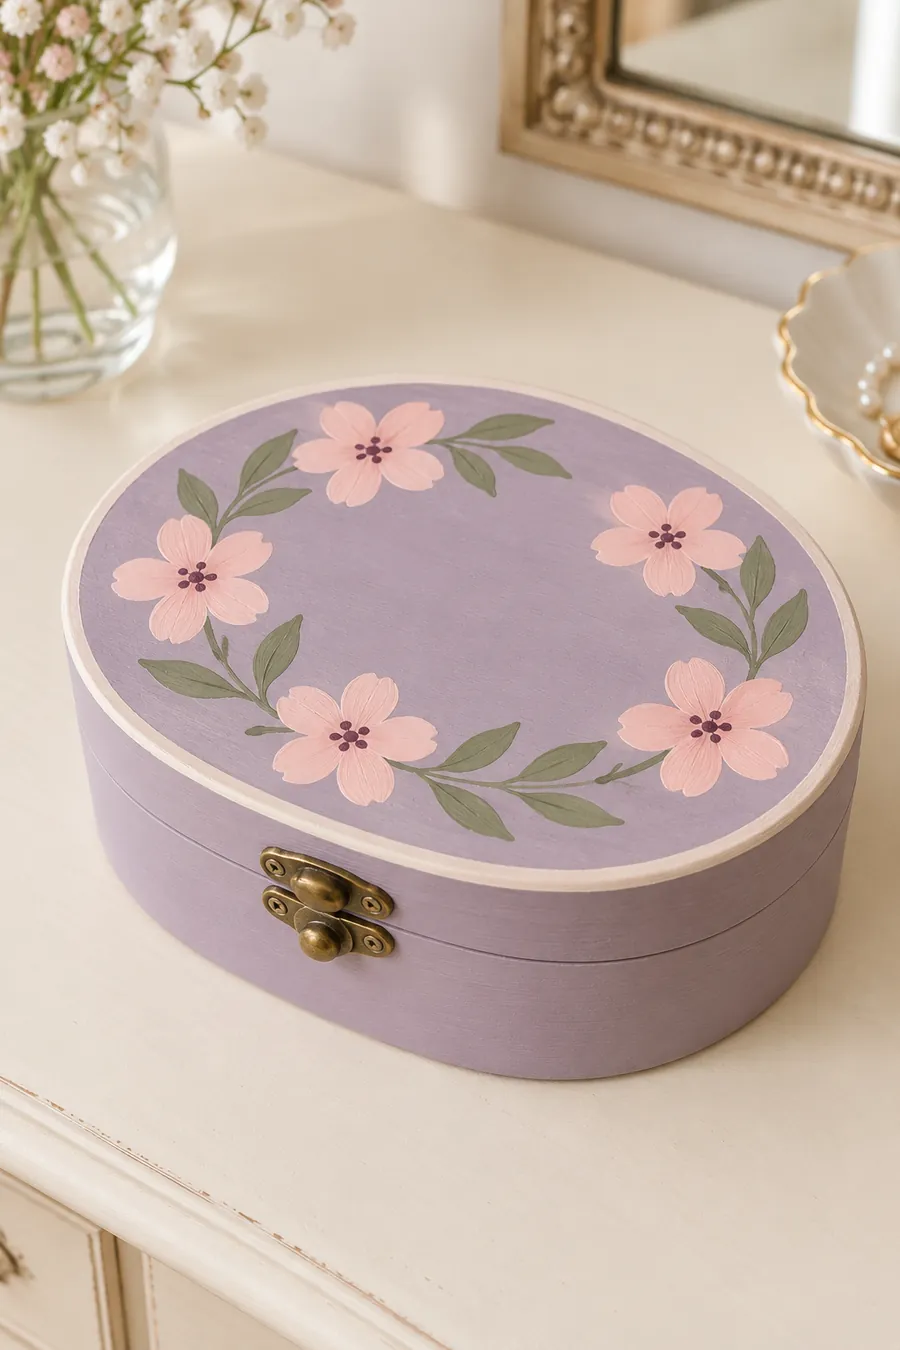
This oval jewelry box uses the shape of the lid to guide the painting. Pale pink blossoms and simple green leaves circle an open center, creating a soft design without filling every inch. It would also make a lovely personalized gift if you later decide to add an initial in the middle.
Paint colors and extras: Dusty lilac, blush pink, sage green, dark plum, and cream; medium round brush.
1. Paint the box lilac, leaving the hardware uncovered. Once dry, lightly mark four or five spots around the lid where the flowers will go.
2. Make each blossom with five separate pink petal strokes. Dab a few small plum dots into its center.
3. Connect the flowers with thin curved stems and pairs of sage leaves. Let the leaf sizes vary slightly.
4. Paint a narrow cream line around the rim if you have a steady hand, or skip it for a softer finish.
3. Rose-Pink Box With Cream Tulips
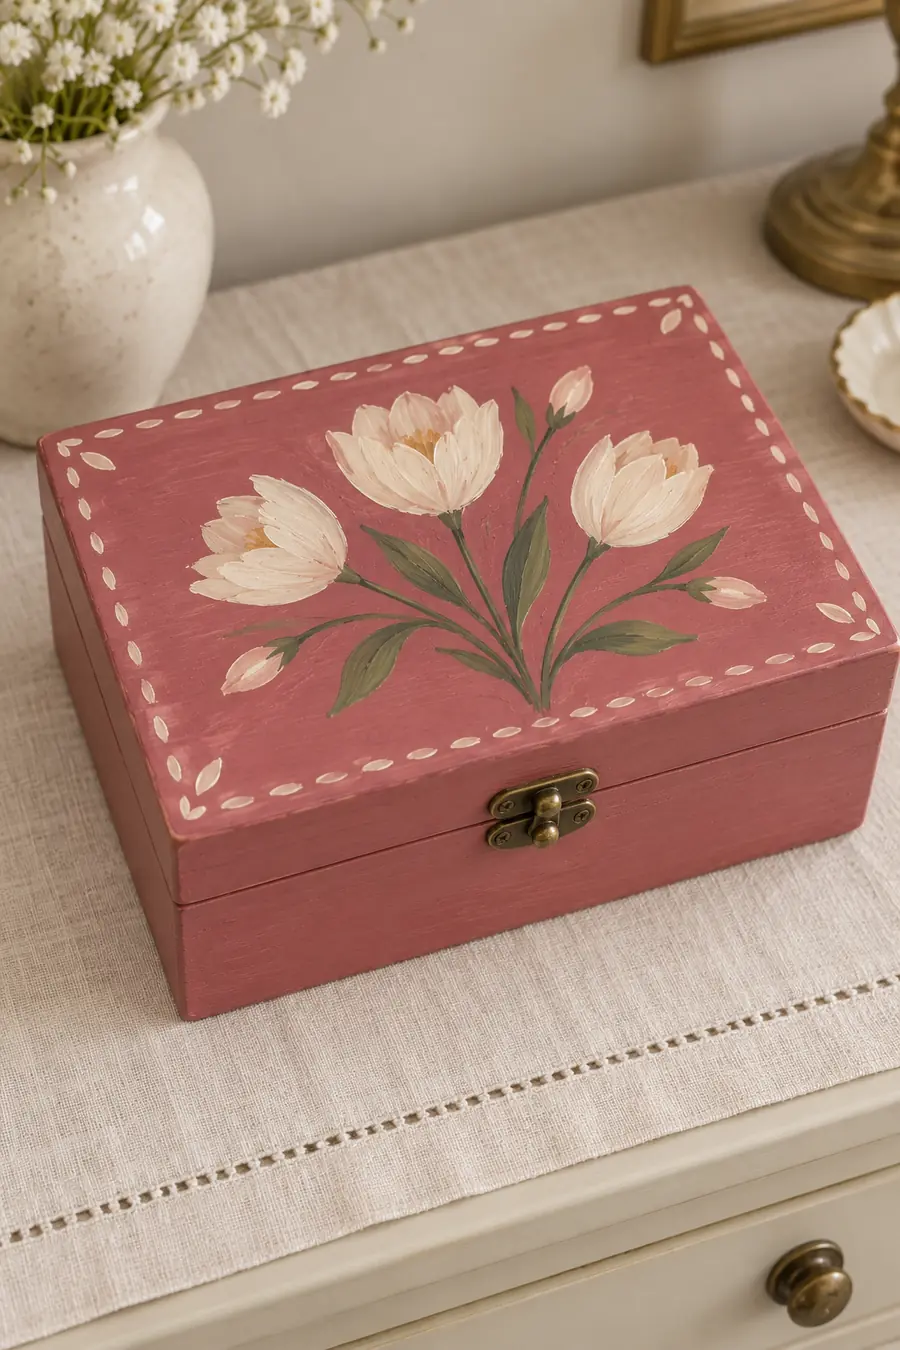
Three cream flowers rise from the middle of this rosy box, with small buds and a dashed border around the lid. The flower heads look full, but you can make them by overlapping a few wide petal strokes. The darker background gives the light paint a pretty contrast.
Paint colors and extras: Muted rose pink, cream, olive green, and a touch of warm yellow; flat and medium round brushes.
1. Paint the exterior muted rose pink. For each flower, sketch a short stem and a simple cup shape near the top.
2. Fill each cup with two or three broad cream strokes, overlapping them slightly. Add a small yellow mark in the center of the open flowers.
3. Paint slim green stems, several oval leaves, and two or three closed buds.
4. Finish with short cream dashes around the lid’s edge. Space them by eye; they don’t have to be identical.
4. Single Rose Jewelry Box
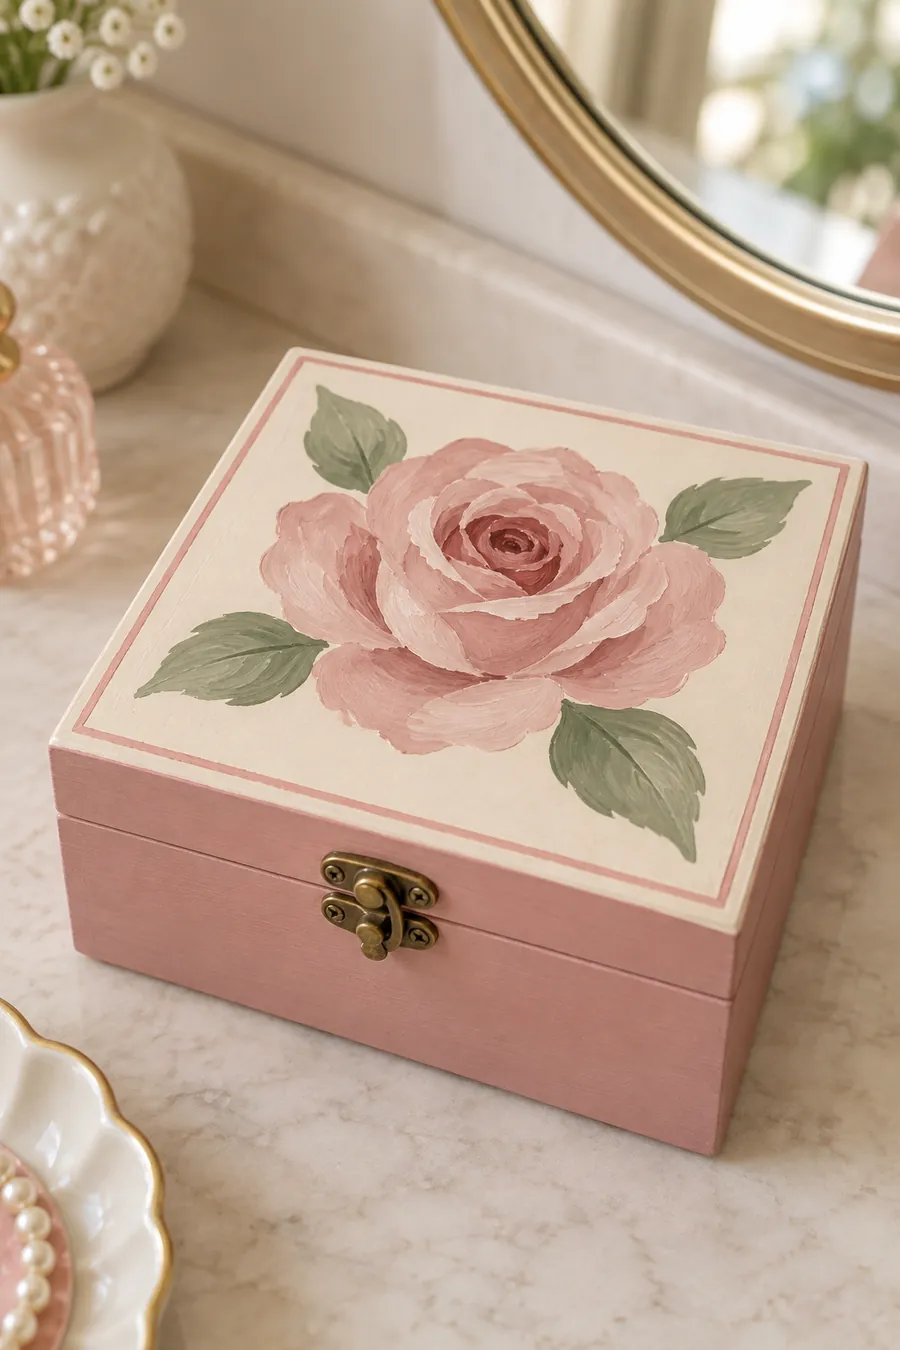
One large rose makes this box feel romantic without asking you to paint a whole bouquet. The soft ivory lid gives the flower room to stand out, and the matching pink sides and fine border tie the design together. This is a good choice if you want to take your time on one focal point.
Paint colors and extras: Ivory, dusty pink, a darker rose pink, sage green; medium round brush and pencil.
1. Paint the lid ivory and the lower box dusty pink. When dry, lightly mark a large circle in the center of the lid.
2. Put a small dark pink curved stroke in the middle. Add several wider C-shaped dusty pink strokes around it, gradually making them larger toward the outside.
3. Paint four broad sage leaves around the flower. A darker stroke along one side of each leaf can give them definition, but isn’t essential.
4. Add a thin pink border set slightly inside the edge of the lid. Let the artwork dry fully before handling the box.
Tip: The rose will still read as a rose if the curves are uneven. Keep the center darker than the outer petals and resist adding dozens of extra lines.
5. Lavender Sprig Jewelry Box
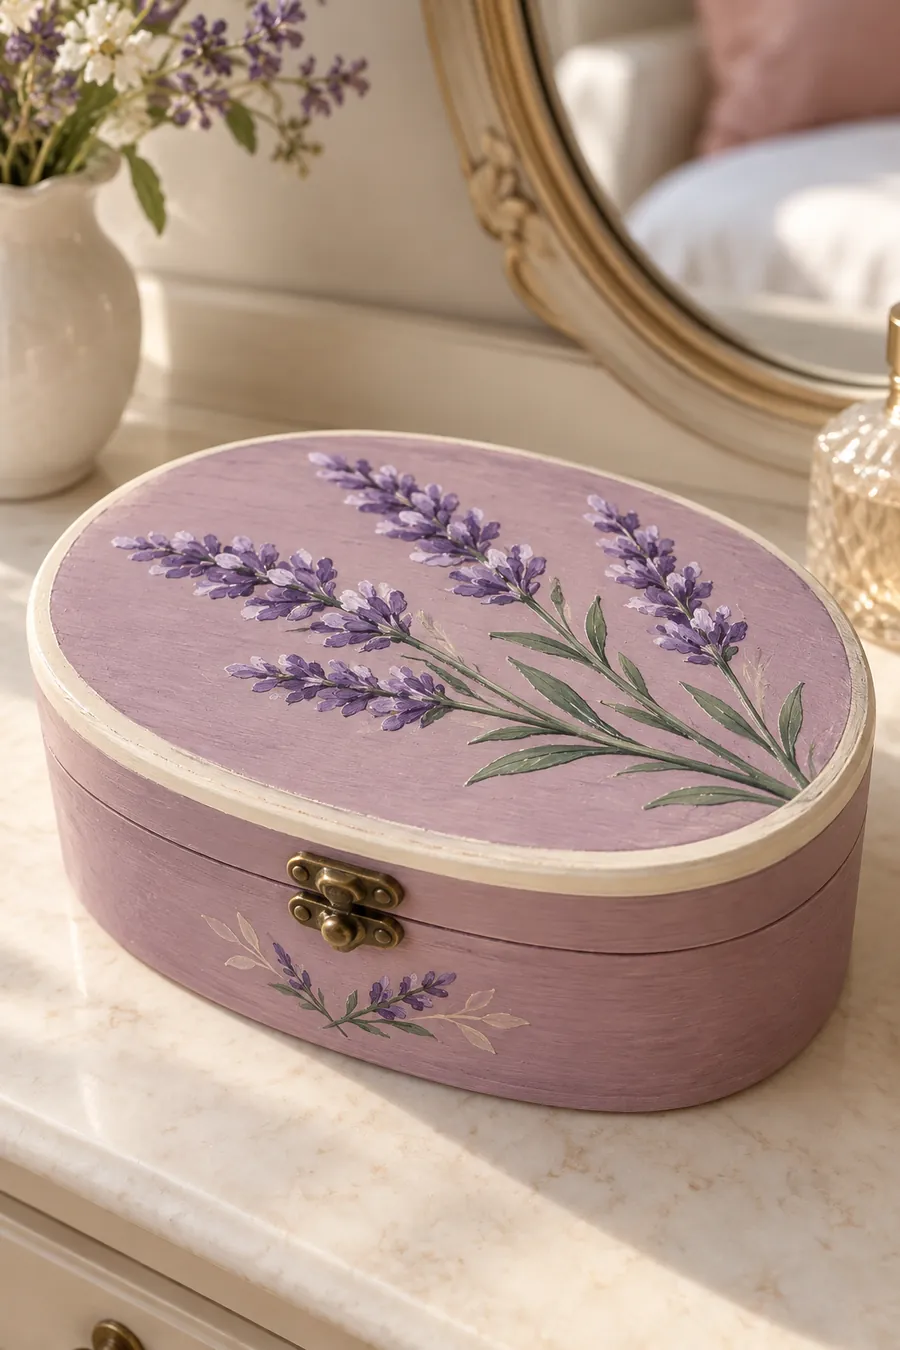
A few lavender stems give this oval box a calm, cottage-style look. The purple flower heads are short dabs rather than individually drawn petals, so the design is approachable even if you haven’t painted flowers before. A small sprig on the front connects it to the lid.
Paint colors and extras: Dusty mauve, medium purple, pale lavender, sage green, and cream; small round brush.
1. Paint the box dusty mauve and, if you like, add a cream line around the lid rim.
2. Paint three or four thin green stems at slightly different angles. Add narrow leaves near their bases.
3. Along the top half of each stem, make short purple dabs on alternating sides. Add a few lighter lavender dabs once the first layer dries.
4. Paint one small sprig on the front of the box. Leave open mauve space around the larger stems so the design feels light.
If you enjoy painting decorative pieces for your home, our terracotta pot painting ideas offer more ways to use florals and color on everyday objects.
6. Lilac Scallops With Tiny Flowers
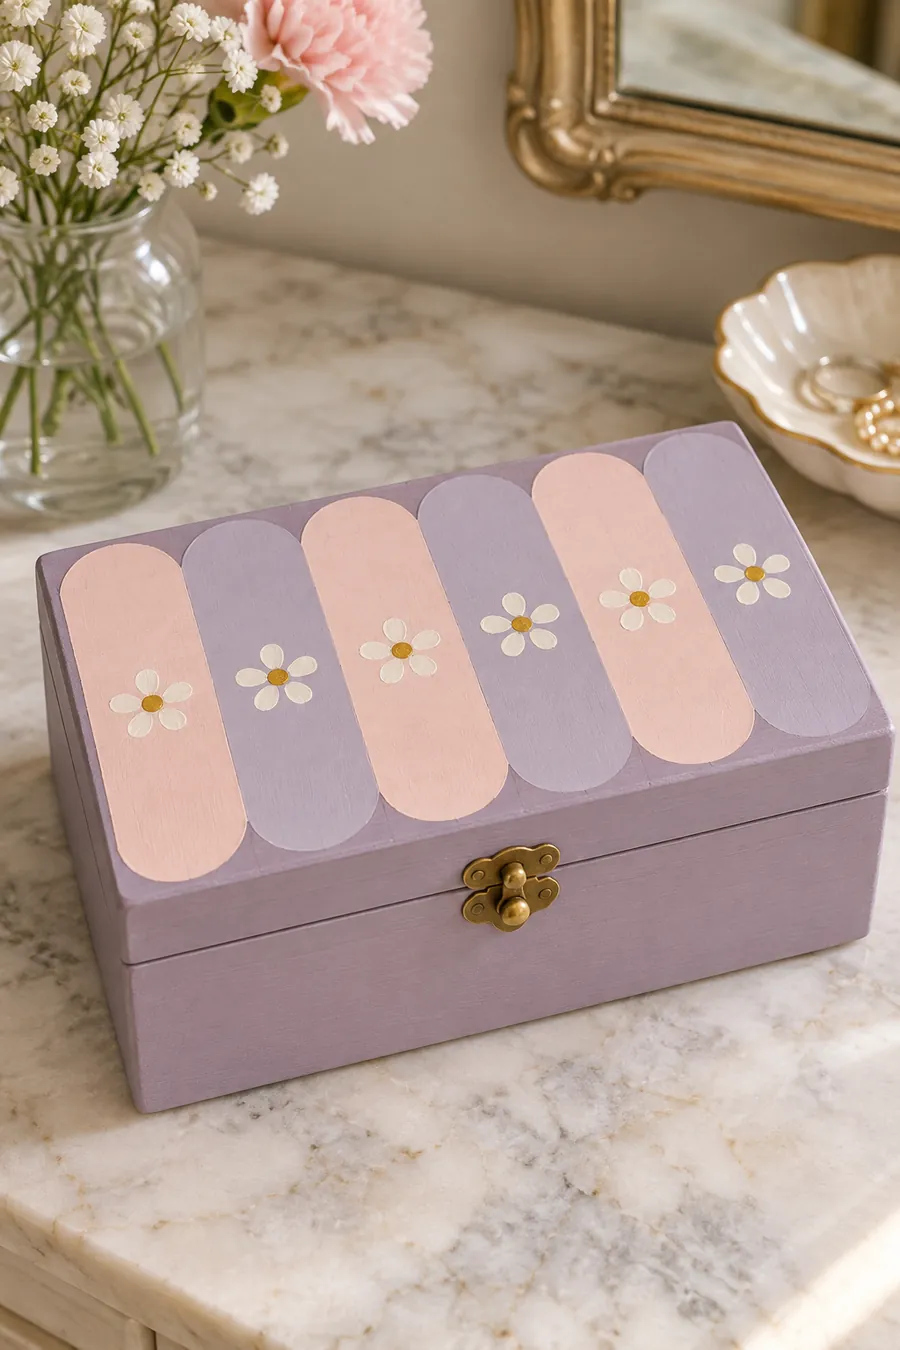
Alternating pink and lilac rounded panels give this box a decorative look, while the small cream flowers keep it from feeling like a plain striped design. Repeating one easy flower shape makes the painting go faster once you’ve finished the first panel.
Paint colors and extras: Lilac, pale pink, cream, and mustard yellow; flat brush, medium round brush, and pencil.
1. Paint the box lilac. Across the lid, lightly mark six wide panels with rounded ends. They can be slightly uneven.
2. Fill every other panel with pale pink. For the remaining panels, use a lighter lilac if you want a subtle difference from the background.
3. In the center of each panel, paint five small cream petal strokes around a mustard dot.
4. Touch up the panel edges only where needed. Their soft, hand-painted outlines are part of the design.
7. Coral Box With Cream Blossoms
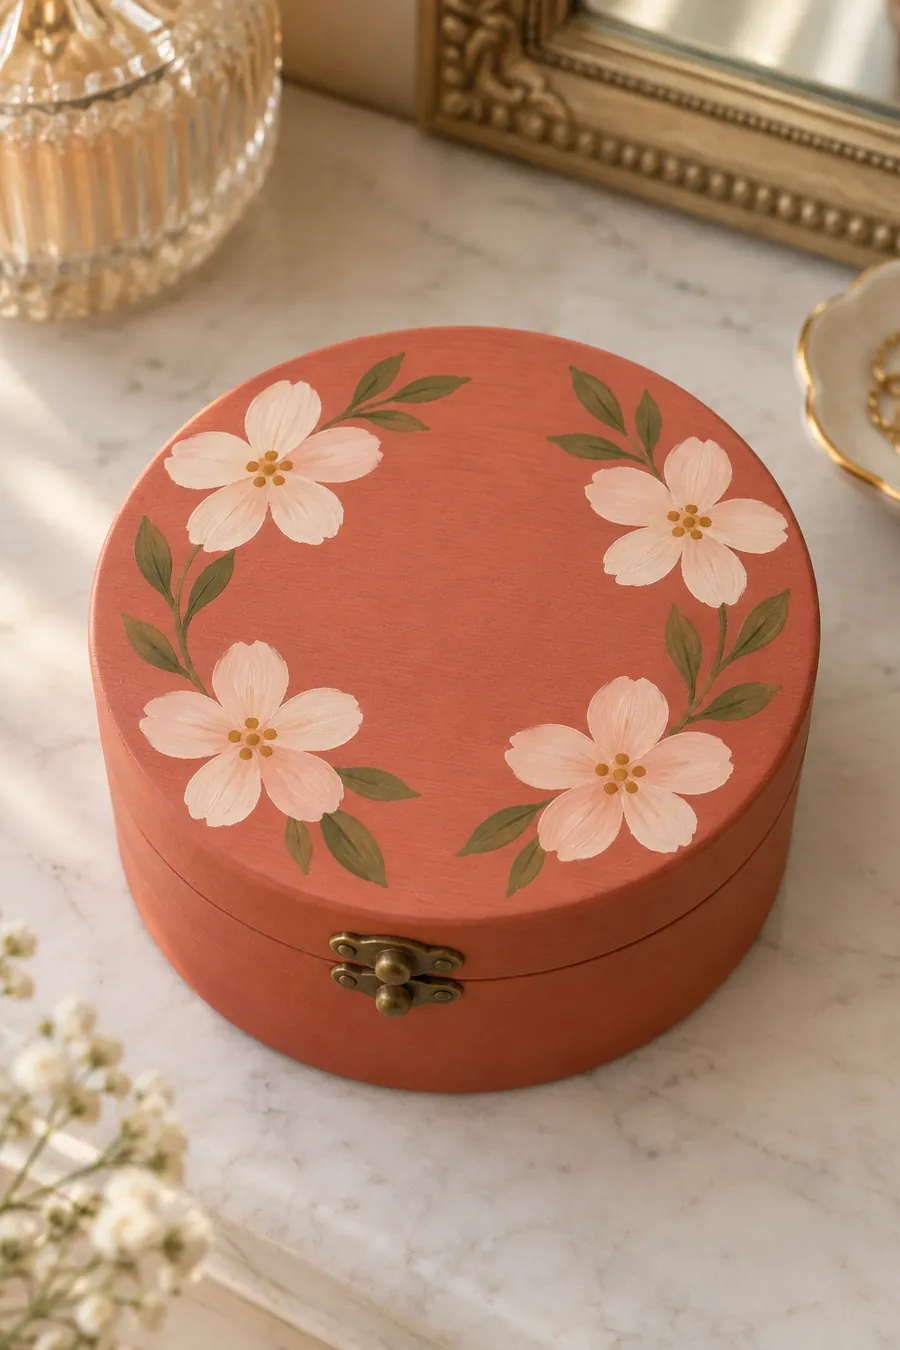
Four cream flowers sit around the edge of this warm coral lid. The middle stays clear, which makes the arrangement look intentional and keeps the painting manageable. Small olive leaves give the flowers a little movement without turning the project into a detailed wreath.
Paint colors and extras: Muted coral, cream, olive green, and mustard; medium round brush.
1. Paint the whole box coral. When it dries, place four light pencil dots around the lid to plan the flower centers.
2. Use five broad cream strokes for each flower. Turn the box as you work so the petals point naturally around the circle.
3. Add mustard dots to the centers and paint two or three olive leaves beside each flower.
4. Look at the lid from a little distance before adding anything else. The clear center is what gives this design its balance.
8. Pink Floral Tile Jewelry Box
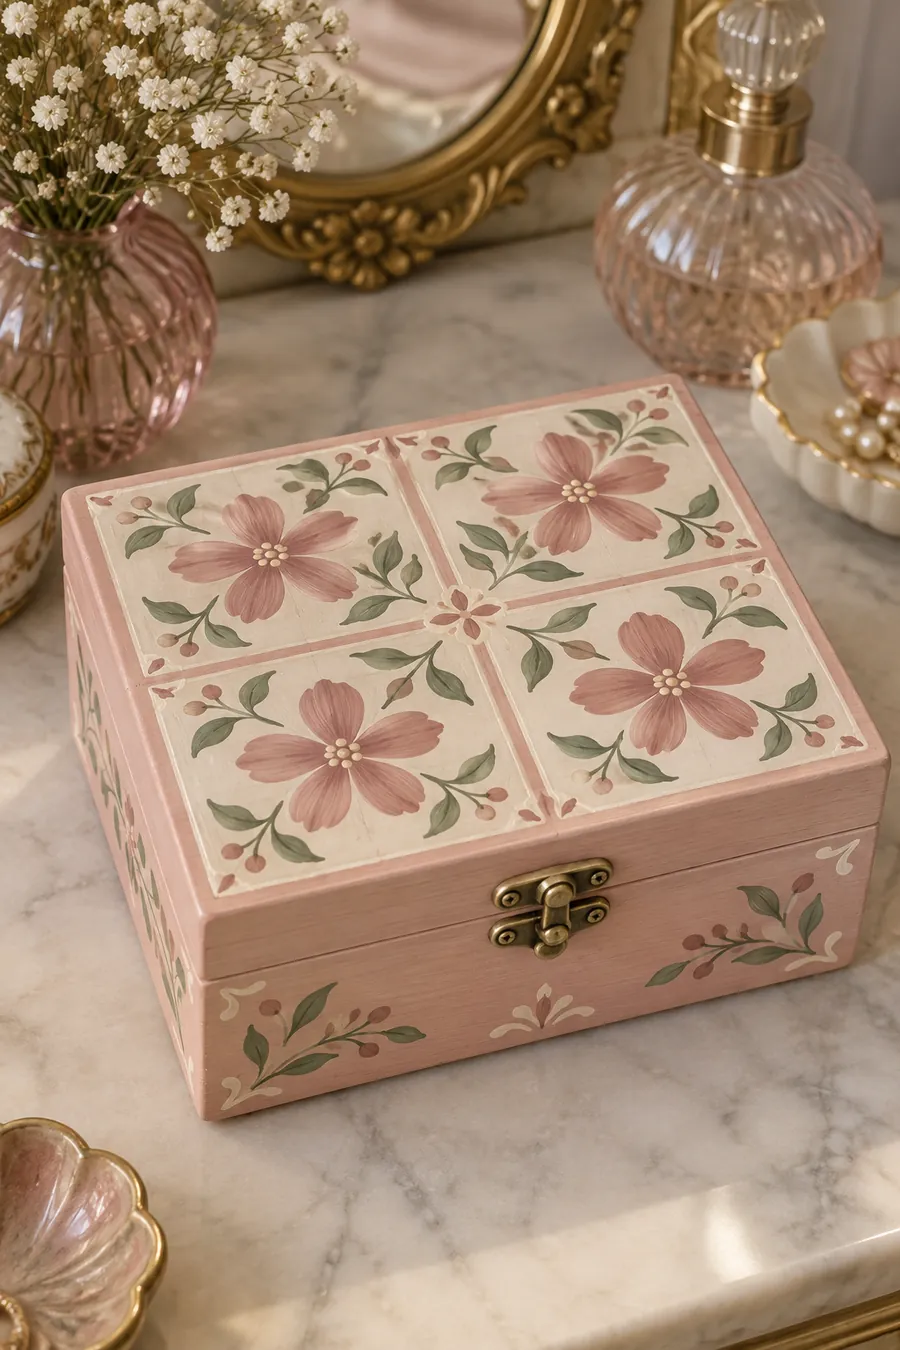
The lid of this box looks like four little painted tiles. Each section repeats a simple mauve flower and a few green leaves. Painting the same motif four times sounds like more work, but it takes away the pressure to invent a new design for every corner.
Paint colors and extras: Dusty pink, warm cream, mauve, sage green; ruler, pencil, and optional painter’s tape.
1. Paint the box dusty pink and the lid cream. After drying, divide the lid into four equal sections with a lightly penciled cross.
2. Paint a five-petal mauve flower in each section. Keep the flowers roughly the same size, without trying to make them exact copies.
3. Add a short green stem, two or three leaves, and a few small berry dots around each flower.
4. Paint thin pink lines over your division marks. You can add a small flower where the lines meet to soften their intersection.
9. Moon and Stars Jewelry Box
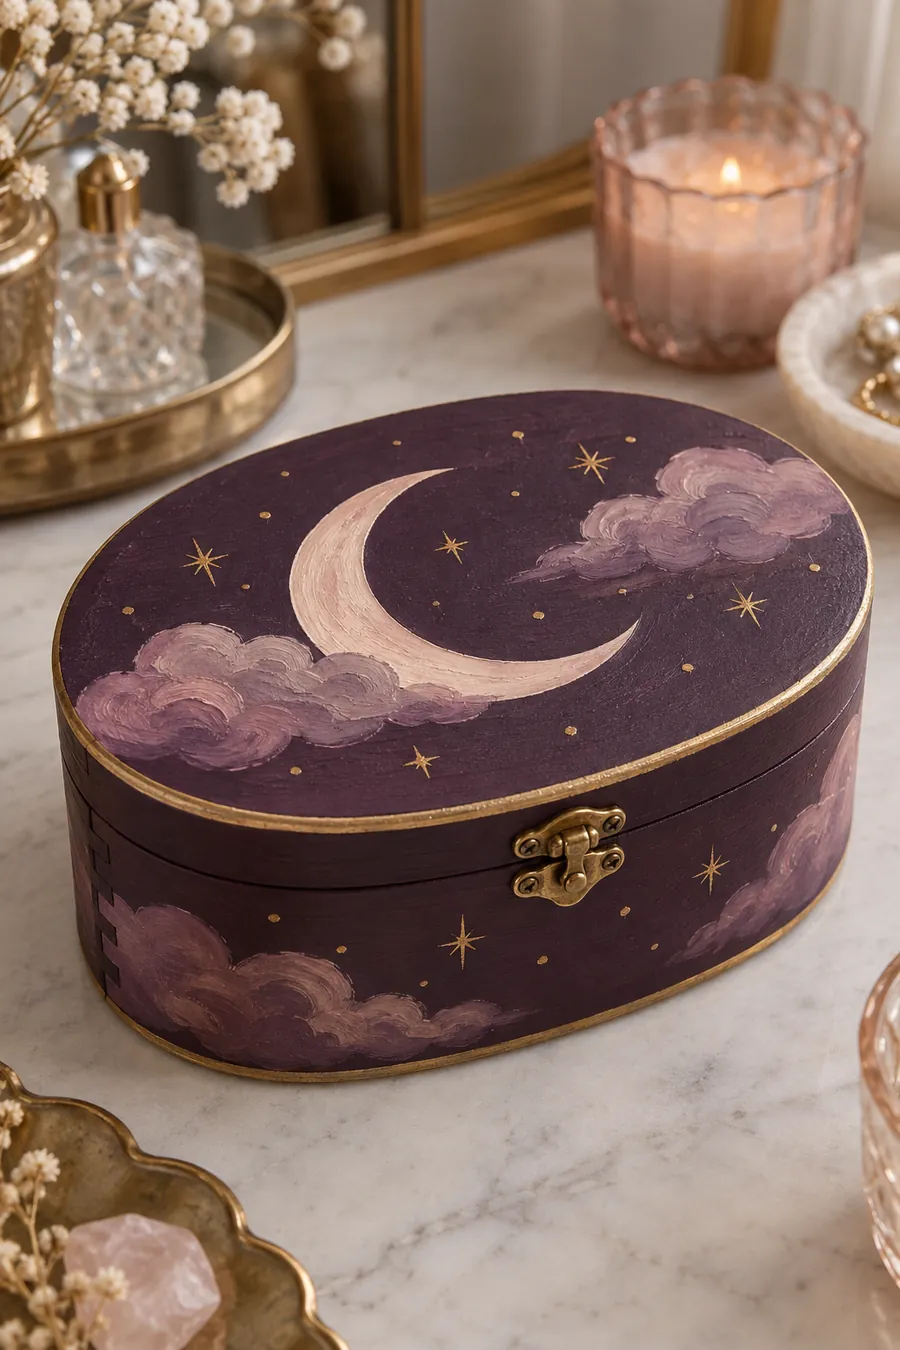
Deep plum paint makes the pale crescent moon and small golden stars glow on this jewelry box. Two loose mauve clouds soften the scene. The main shapes are simple enough to sketch before you paint, so you can spend your time choosing where everything goes.
Paint colors and extras: Deep plum, pale blush, mauve, and muted gold; pencil, small round brush, and a paper circle to trace if helpful.
1. Paint the entire box deep plum. Lightly sketch a large crescent on the lid; tracing two overlapping circles can help you find the shape.
2. Fill the moon with pale blush. Make two low, rounded mauve cloud shapes near opposite sides of the lid.
3. Use the tip of a small brush to paint a few gold stars and dots. Add several on the front side so the scene wraps around the box.
4. Add a thin gold rim only if you enjoy painting narrow edges. The dark base and large moon already carry the design.
10. Pink Seashell Jewelry Box
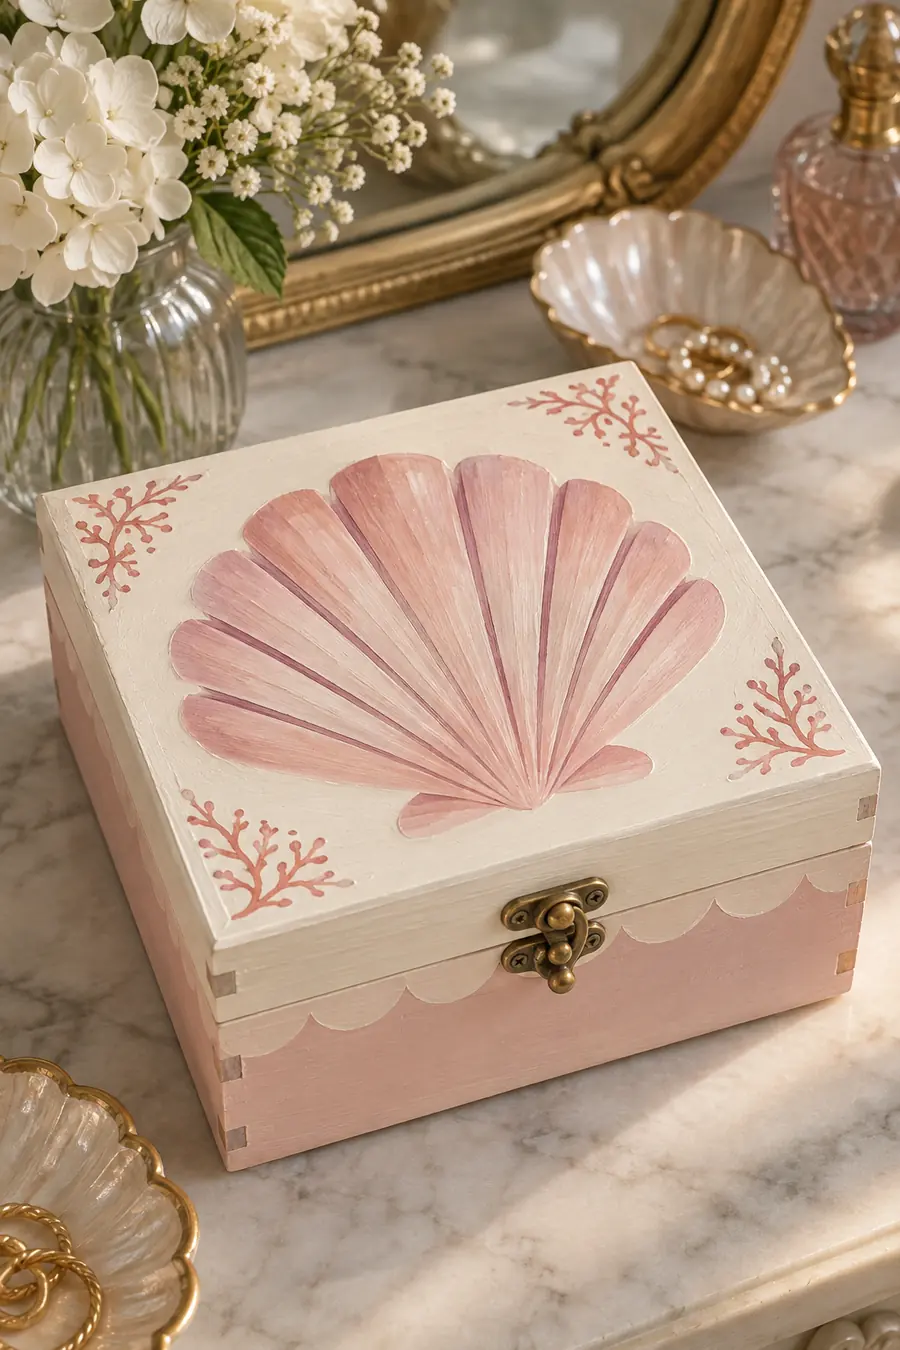
A single shell fills most of the ivory lid, giving this jewelry box a gentle coastal feel. Its fan shape is made with repeated wide strokes that spread out from one point. Small coral-colored corner sprigs add color without competing with the shell.
Paint colors and extras: Ivory, light pink, dusty rose, and muted coral; medium flat brush and small round brush.
1. Paint the lid ivory and the lower box pale pink. Mark a point near the lower center of the lid where the shell ribs will meet.
2. Paint wide, fan-shaped pink strokes from that point toward the top of the lid. Round their outer ends to form the shell edge.
3. Once dry, draw a few dusty rose lines from the base toward the top to suggest the ribs. You don’t need a line between every stroke.
4. Add a small coral branching shape in each corner and a simple scalloped line along the front if you’d like the sides decorated too.
11. Box With Painted Plums
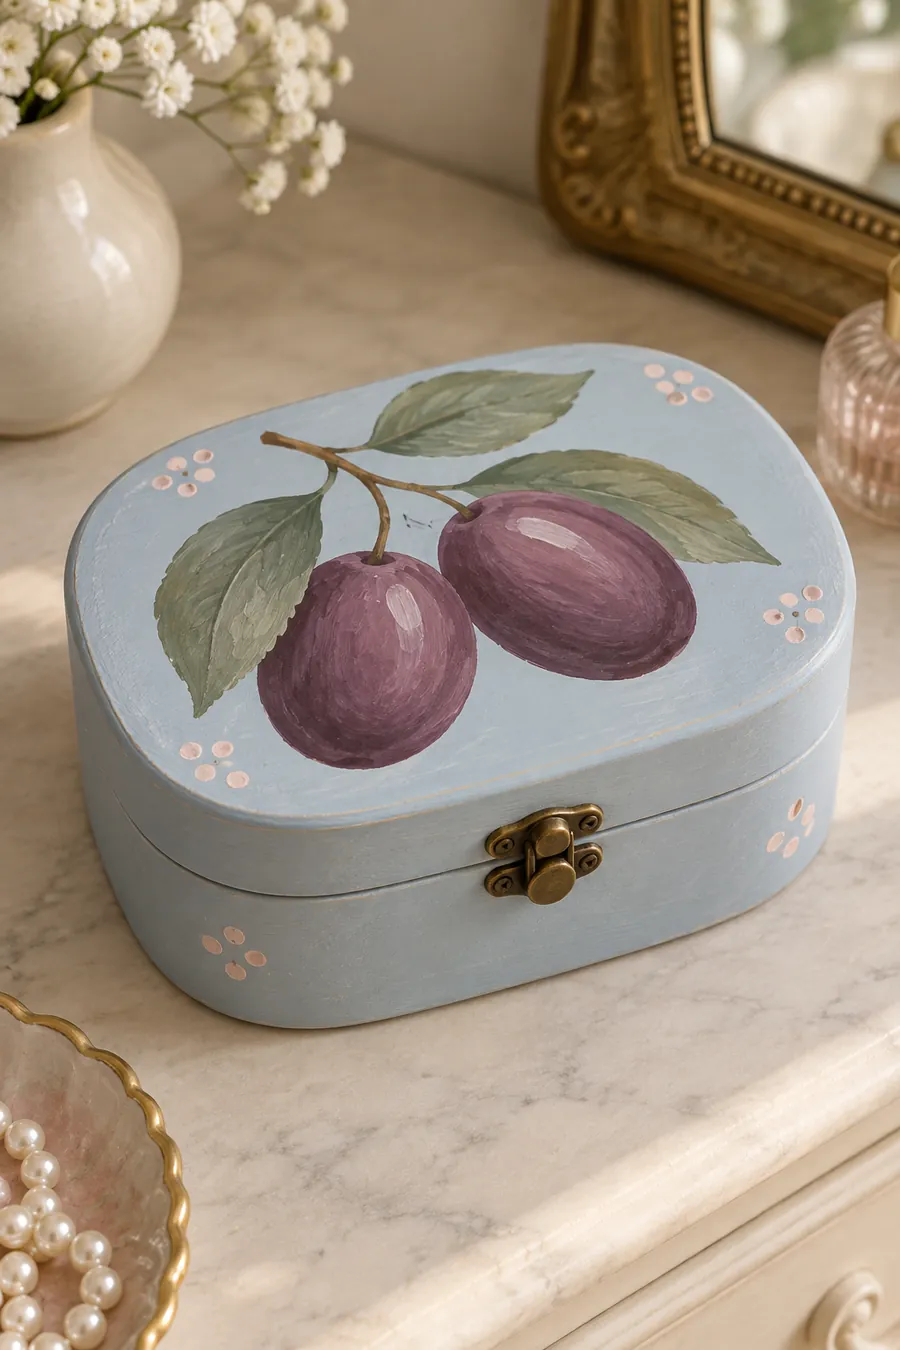
Two purple plums give this pale blue box an unexpected still-life design. The fruit needs only rounded shapes, highlights, a branch, and a handful of leaves. The lilac and blue combination feels soft enough for a bedroom dresser.
Paint colors and extras: Powder blue, deep plum, dusty purple, sage green, brown, and pale pink; medium round brush.
1. Paint the box powder blue. Lightly mark two overlapping oval plum shapes across the lid.
2. Fill the fruit with deep plum, then add a short dusty purple or pale pink highlight to each one after the base dries.
3. Paint a thin brown branch above the fruit and three broad sage leaves. Leave their outlines a little irregular.
4. Make small pale pink dot clusters in two or three open areas near the edge, then stop before the fruit gets lost among details.
12. Cherry Blossom Branch Jewelry Box
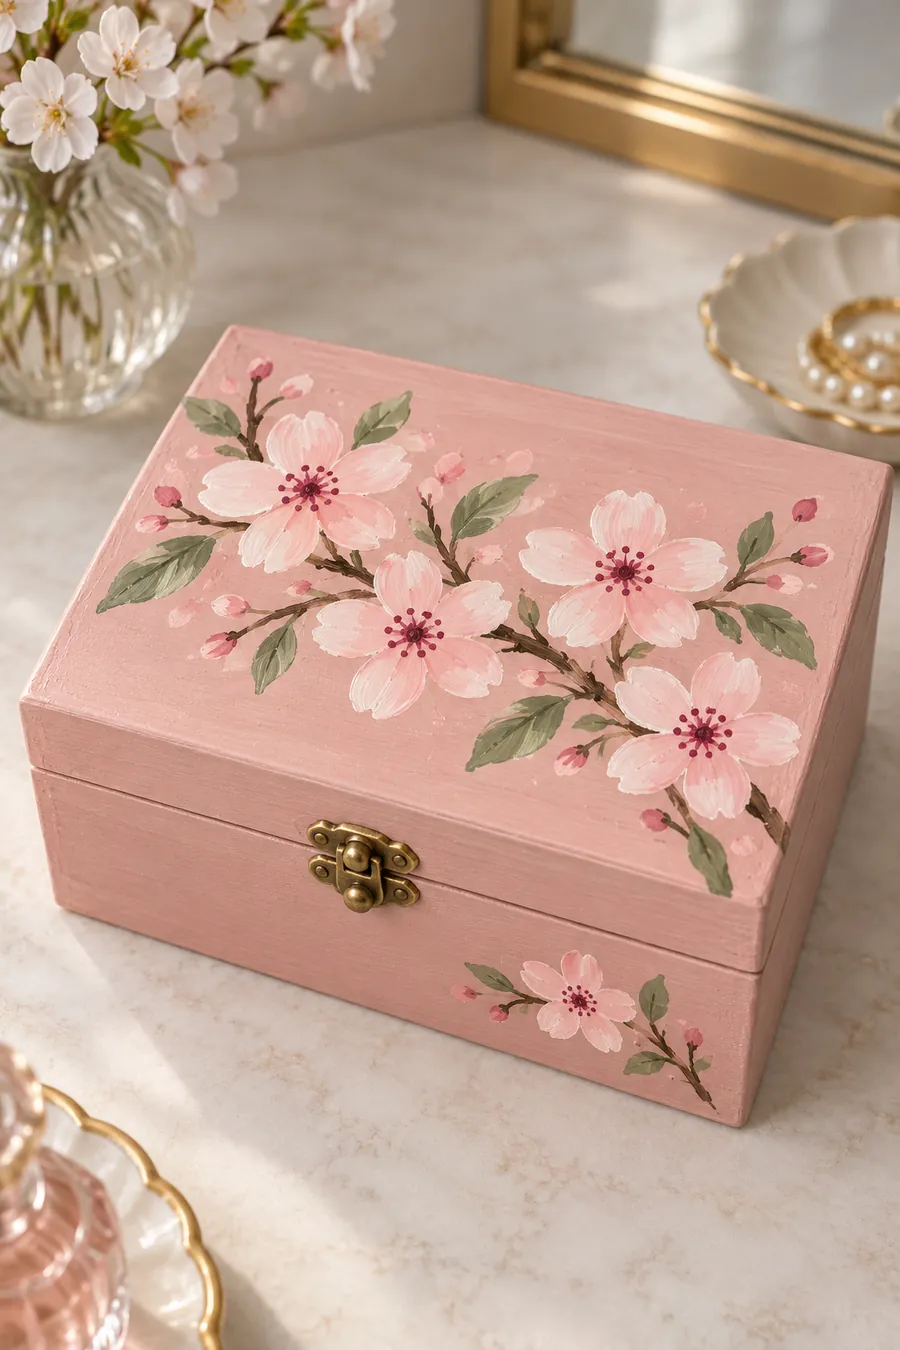
A dark branch crosses the blush lid diagonally, giving the blossoms a natural path to follow. The pale pink flowers are mostly five easy petal strokes each, and a few buds fill the gaps. This design also extends to one small blossom on the front of the box.
Paint colors and extras: Blush pink, pale pink, dark rose, brown, and sage green; medium and small round brushes.
1. Paint the box blush pink. Sketch one gently angled branch across the lid and add two short offshoots.
2. Paint the branch brown. Place four or five pale pink flowers along it, leaving room between the blossoms.
3. Add five strokes to each flower, a dark rose center, a few teardrop buds, and several sage leaves.
4. Repeat one tiny branch and flower on the front. Keep it smaller than the arrangement on the lid.
13. Mauve Butterfly Jewelry Box
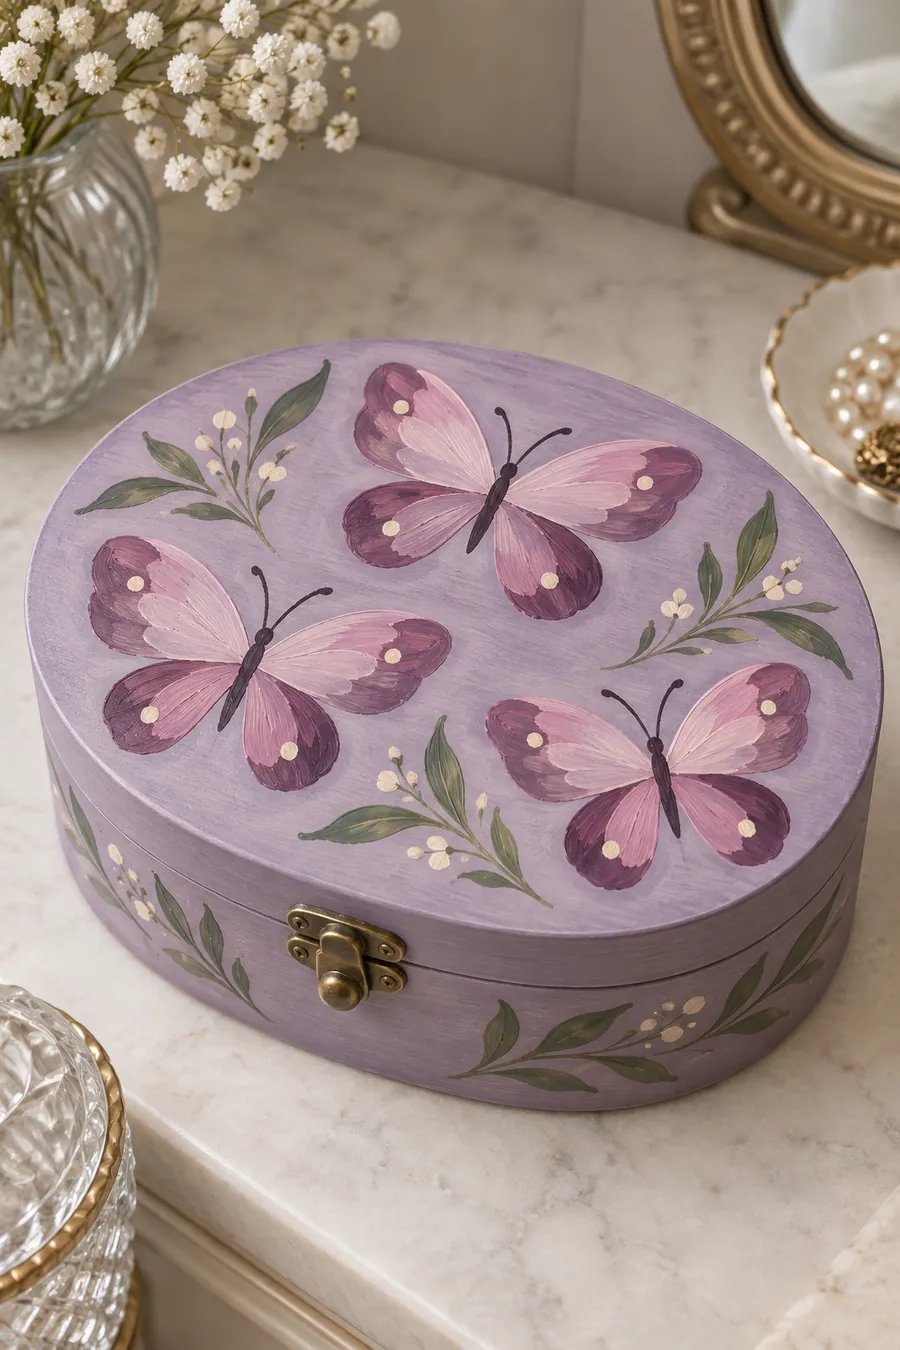
Three mauve butterflies give this oval box movement without covering the entire lid. Their wings can be painted as paired rounded shapes, then finished with one darker edge and a few cream dots. Small leafy sprigs between them make the arrangement feel complete.
Paint colors and extras: Soft lilac, mauve, pale pink, dark plum, sage green, and cream; pencil and round brushes.
1. Paint the box soft lilac. Sketch three short butterfly bodies, leaving space between them and changing their angles slightly.
2. On each side of a body, paint one larger upper wing and one smaller lower wing in mauve. Repeat on the other side as evenly as you can.
3. Add a pale pink stroke inside each upper wing, a dark plum body and antennae, and one or two cream dots on the outer wings.
4. Fill only the larger empty gaps with small green leaf sprigs. The butterflies should remain the focus.
14. Calla Lily Jewelry Box
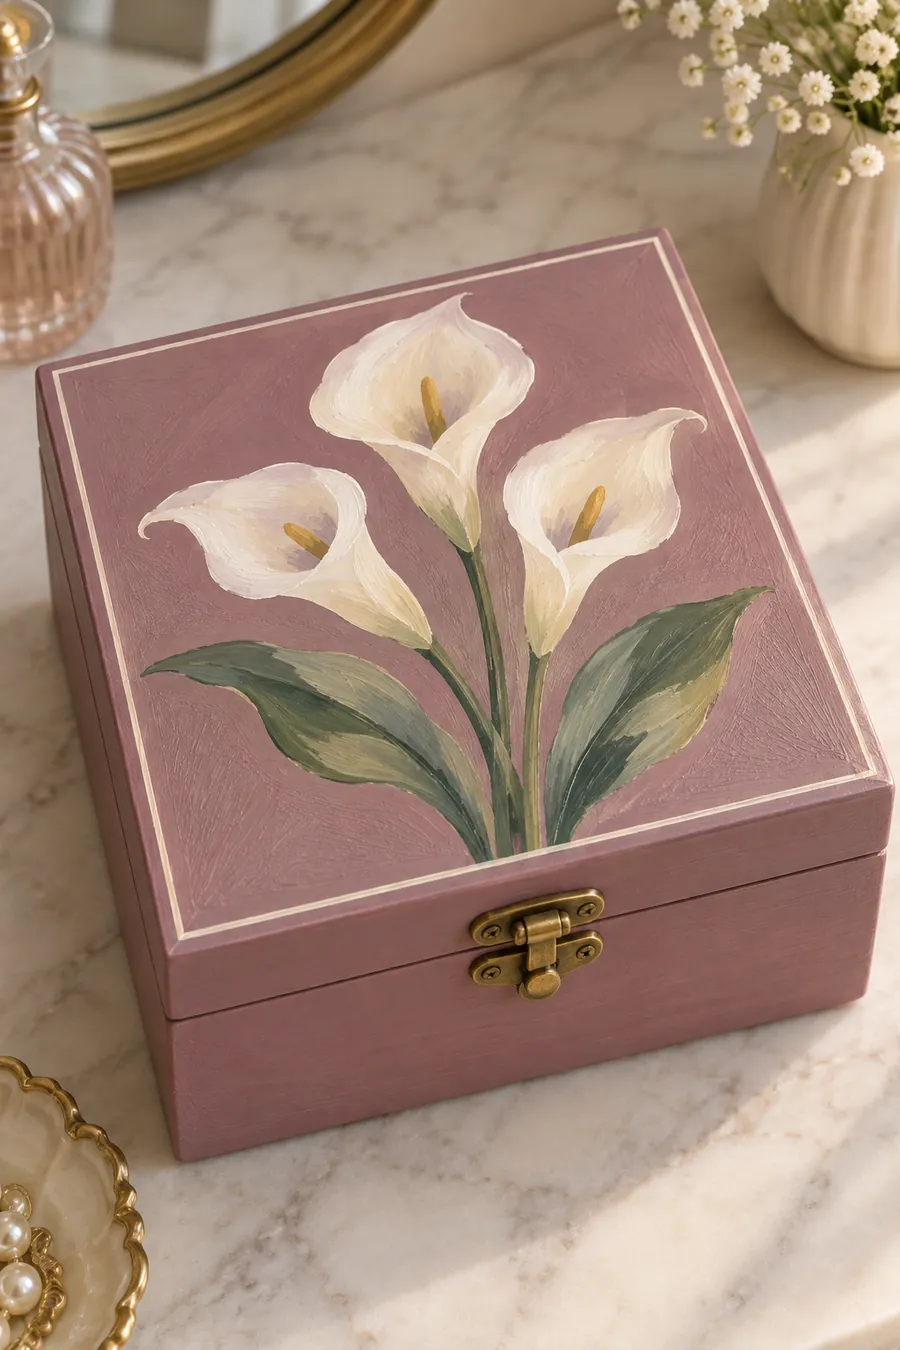
Three cream calla lilies stand out against a muted mauve background. Their curved trumpet shapes make the design look elegant, but each flower can begin as one broad painted form with a simple golden center. Two large leaves are enough to anchor the stems.
Paint colors and extras: Mauve, cream, pale yellow, olive green, and a little gold; medium round brush.
1. Paint the box mauve and sketch three upright stems of slightly different heights.
2. Above each stem, paint a wide cream curved petal that wraps toward a point at the top. Leave an opening near the middle.
3. Add one short golden yellow stroke in each opening, then paint the green stems and two broad leaves below.
4. Frame the lid with a thin cream line if you want a cleaner edge. Let the flowers dry before touching up their shapes.
15. Pomegranate Pattern Jewelry Box
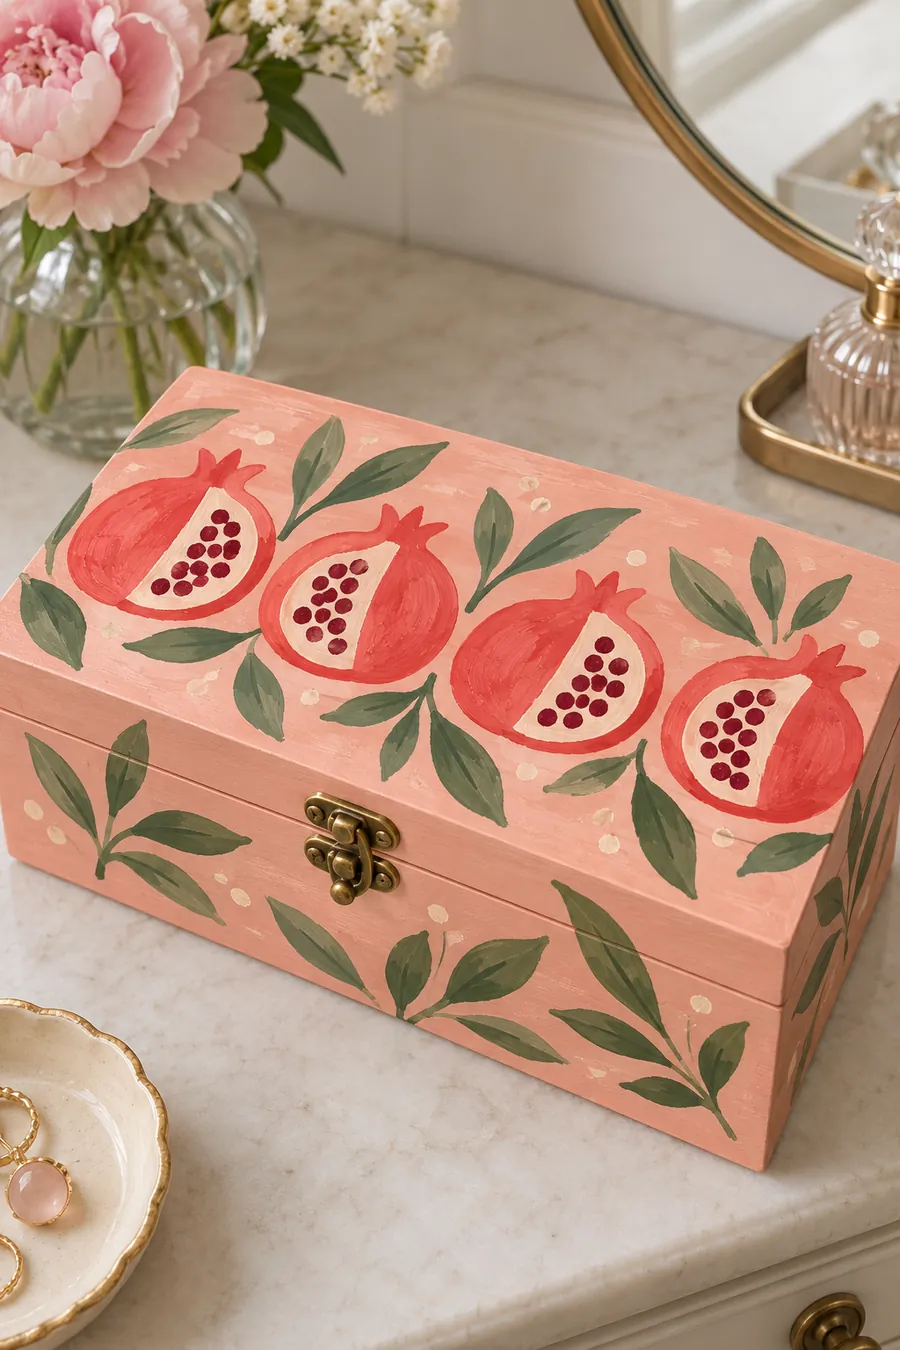
This peach-colored box uses pomegranates as a repeating motif across its long lid. The cut sections are simple cream shapes with wine-colored dots inside. Sage leaves between the fruit help the pattern feel decorative rather than crowded.
Paint colors and extras: Peach, coral, cream, wine red, and sage green; medium brush and dotting tool.
1. Paint the box peach. Mark four evenly spaced rounded fruit shapes across the lid, leaving small gaps for leaves.
2. Fill the pomegranates with coral and add a small pointed crown at the top of each one.
3. Paint a cream curved section inside each fruit. When it dries, add several wine-colored dots for seeds; their spacing can vary.
4. Paint pairs of sage leaves in the spaces between the fruit and add a few leaves along the front edge.
16. Eucalyptus Wreath Jewelry Box
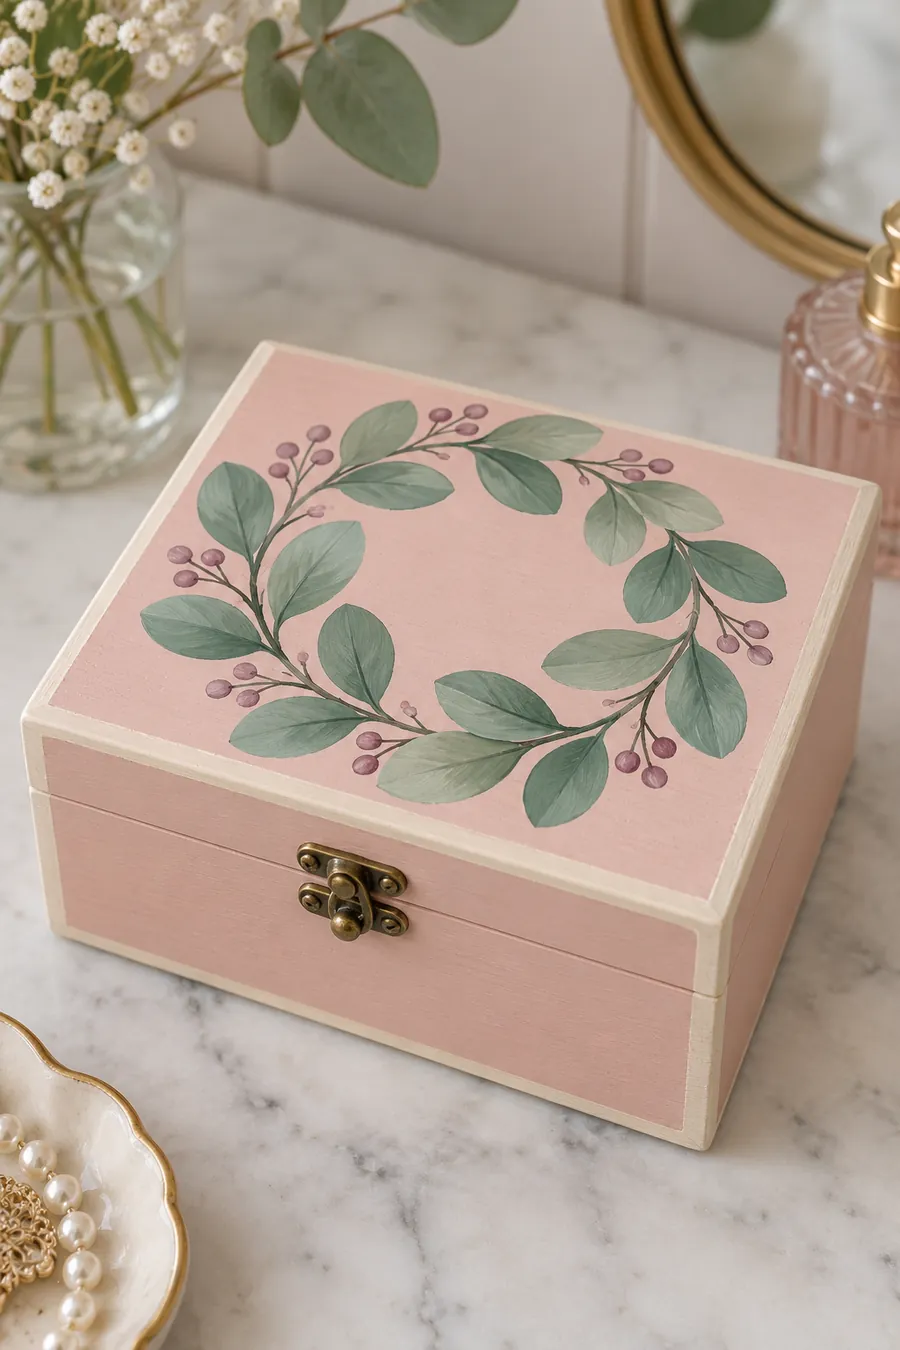
A eucalyptus wreath is a lovely option if you’d rather paint leaves than flowers. Large oval strokes circle the lid, while little mauve berries add a second color. The open center keeps this blush box calm and uncluttered.
Paint colors and extras: Blush pink, sage green, darker green, mauve, and cream; medium round brush.
1. Paint the box blush pink and add a cream edge if desired. Lightly sketch a circle in the middle of the lid as a guide for the wreath.
2. Paint a thin green line around that guide, then add pairs of large oval leaves with single brushstrokes.
3. Alternate your leaf angles as you move around the circle. Add a darker green stroke to a few leaves for variation.
4. Dab small mauve berry clusters into four or five gaps. Erase any visible pencil marks after the paint has dried.
17. Simple Hydrangea Jewelry Box
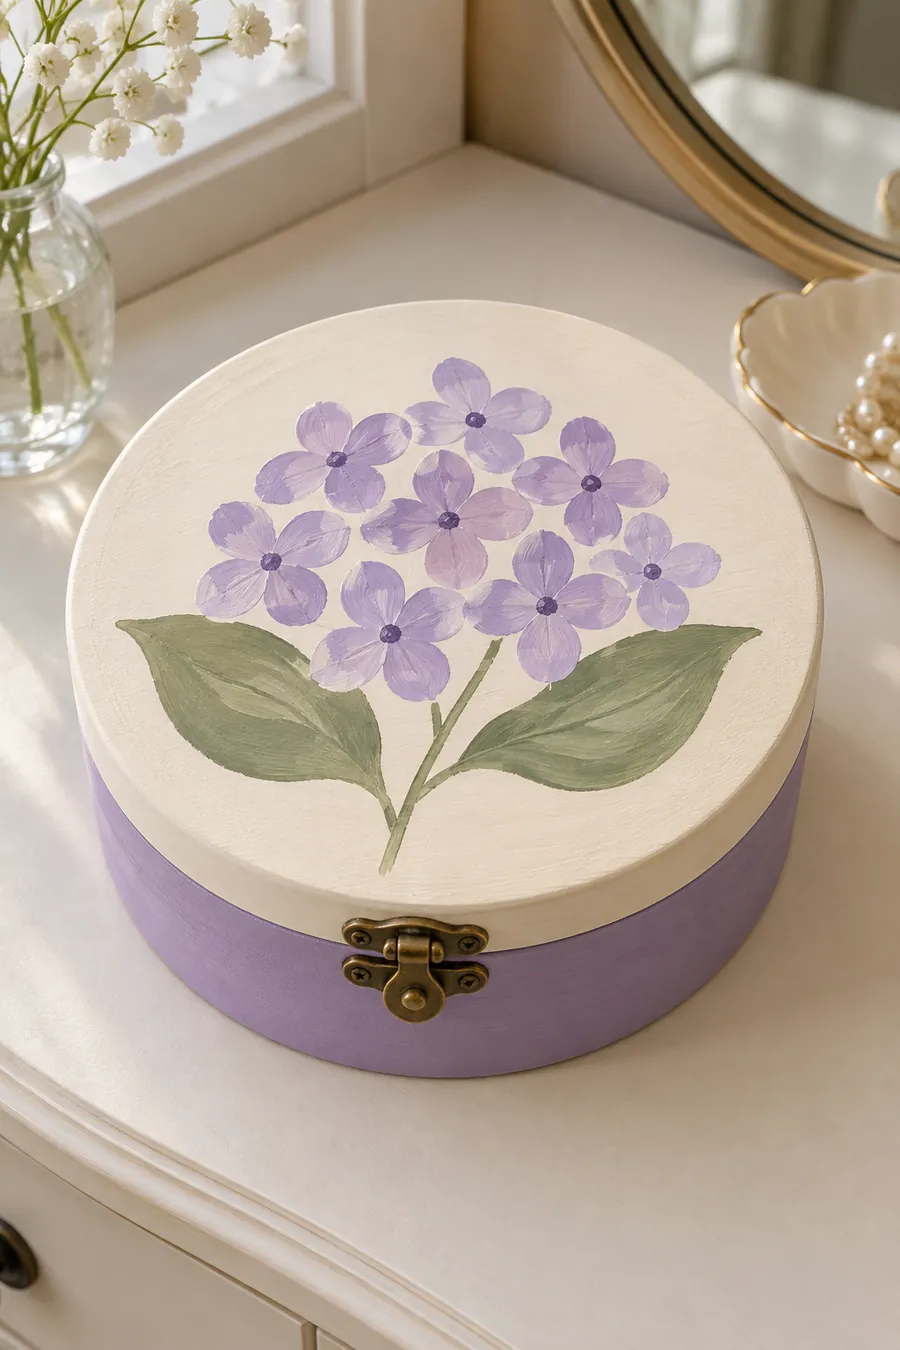
This cream-lidded box has a cluster of lilac blooms that suggests a hydrangea without asking you to paint dozens of tiny petals. Around ten little four-petal flowers create the rounded shape, and two large leaves finish the stem. The lilac sides pick up the color in the blossoms.
Paint colors and extras: Cream, lilac, medium purple, sage green; small round brush.
1. Paint the lid cream and the lower box lilac. Lightly sketch a loose circle for the flower cluster.
2. Inside the circle, paint small four-petal flowers with quick lilac dabs. Let them overlap slightly, but keep each one recognizable.
3. Add a medium purple dot to a few centers and a slightly darker petal here and there for depth.
4. Paint a short stem and two broad green leaves beneath the cluster. Avoid adding dozens more blossoms; the simple grouping is the point.
18. Mauve Sunset Jewelry Box
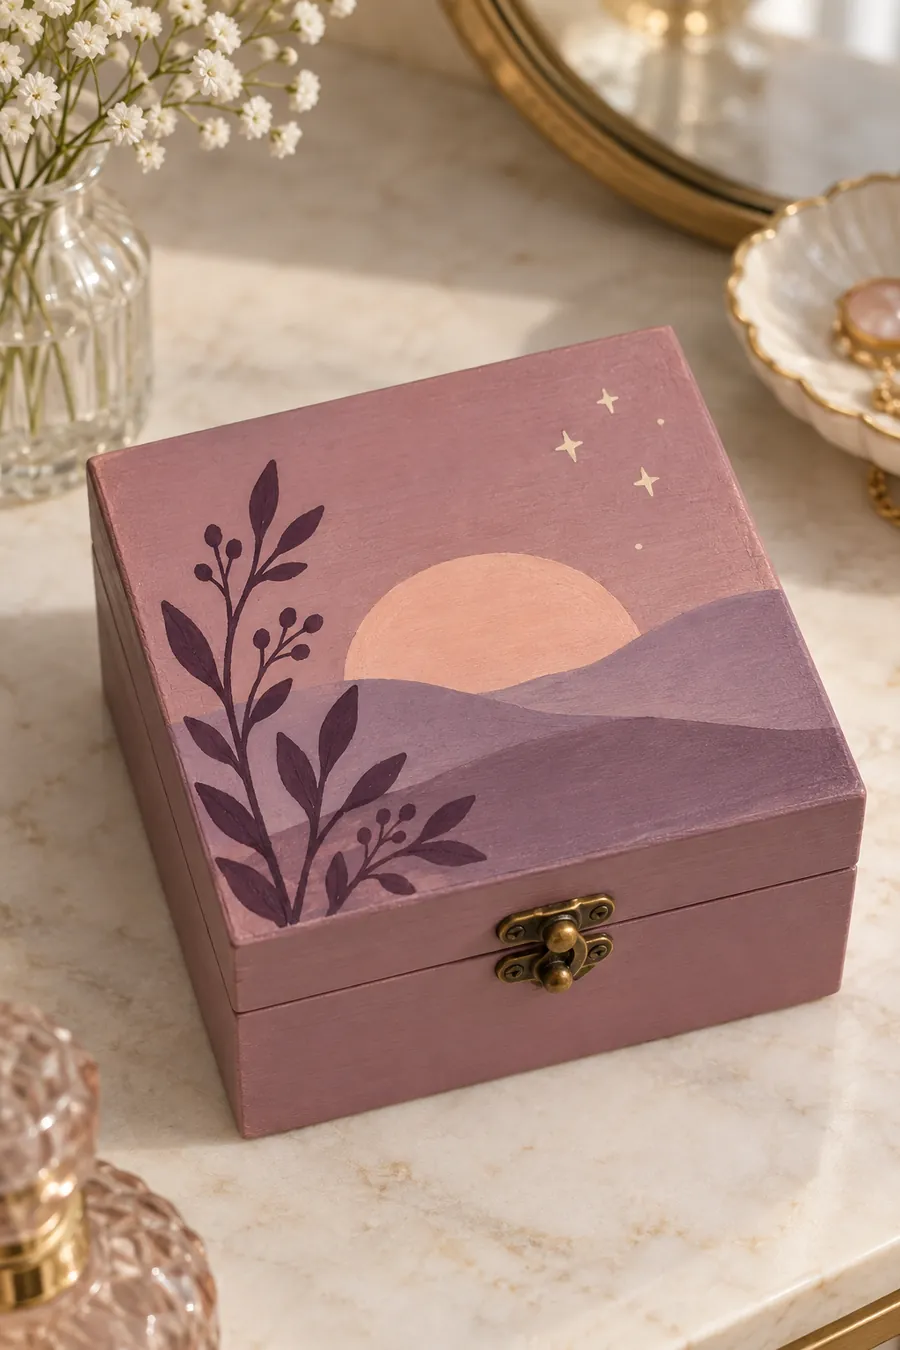
For something beyond florals, paint a small sunset across the lid. The peach sun sits behind two soft mauve hills, with a dark plant silhouette at one side. Large curved shapes do most of the work, making this one of the easiest scenes in the collection to plan.
Paint colors and extras: Dusty mauve, pale peach, medium lavender, deep plum, and cream; flat and small round brushes.
1. Paint the whole box dusty mauve. Mark a large half-circle sun near the center of the lid and fill it with peach.
2. Paint one lavender curved hill across the lower part of the sun. Add a darker hill in front, letting the back one dry first so the layers stay clear.
3. Paint a slim deep-plum branch rising from one lower corner and add oval leaves with single strokes.
4. Add two or three tiny cream stars in the open sky. Keep the side of the box plain so the little landscape stands out.
19. Pink Poppy Jewelry Box
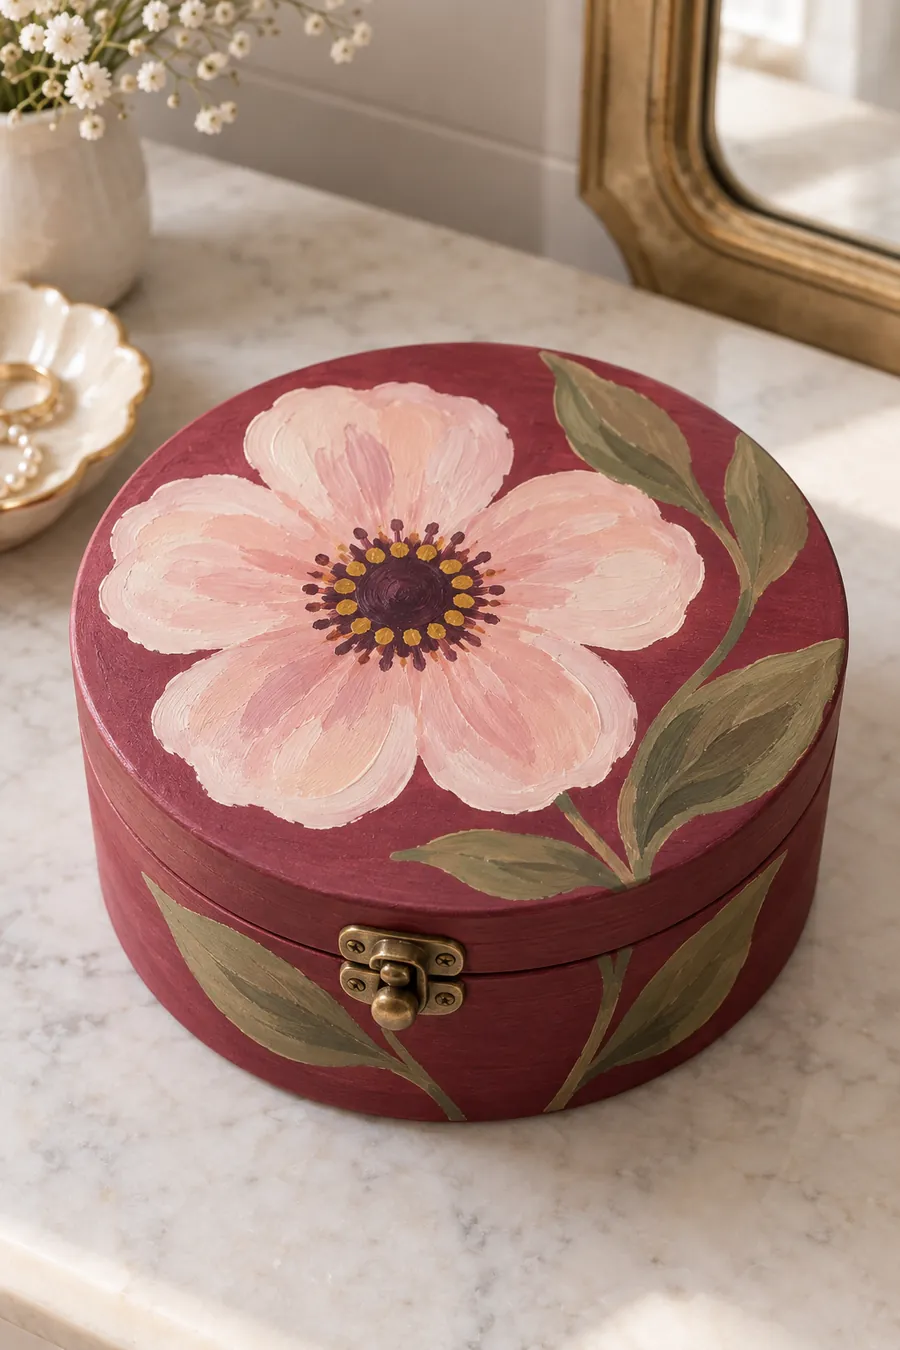
One oversized poppy makes a strong final design. Five pale pink petals fill the lid of a deep rose box, with a dark center and a few large leaves that carry the painting down the side. You can use this idea with another flower color once you know how the petal layout works.
Paint colors and extras: Deep rose, pale pink, plum, mustard, and olive green; medium round brush and dotting tool.
1. Paint the box deep rose. Mark the center of the lid, then paint five wide pale pink petals radiating outward from that point.
2. Leave the petal edges a little irregular. When dry, add a dark plum circle over their meeting point.
3. Place mustard dots around the dark center, keeping them within the flower. Add one darker pink stroke to some petals if you’d like a little depth.
4. Paint two or three large olive leaves along one side of the lid and continue a leaf or stem onto the front of the box.
Tips for a Better Finished Jewelry Box
Choose a design that fits the lid. A round or oval box is a natural match for wreaths and large flowers. A rectangular lid has room for a branch, a row of fruit, or four tile-like panels. If your box is much smaller than the one pictured, reduce the number of flowers instead of squeezing them together.
Let your first coat dry before judging it. A light color over dark wood may look patchy at first. Give it time to dry, then add a second thin coat where necessary. Heavy paint around the lid seam can make the box hard to open.
Protect the inside. Keep paint, dust, and varnish away from fabric lining and jewelry compartments. If you plan to replace an old lining, do that as a separate project after the exterior finish has cured.
Test a sealer before coating the whole box. Try it on a hidden spot or painted scrap, particularly over pale colors or metallic accents. Follow the product’s instructions for drying and curing, and leave the box open while the finish sets.
If you’re looking for another small decor project after this one, take a look at our stool painting ideas. Some of the simple floral motifs can be adapted to a larger surface.
Which Idea Should You Try First?
Start with the lavender sprigs, eucalyptus wreath, four cream blossoms, or mauve sunset if you want a design made from especially straightforward shapes. If you enjoy painting individual petals, try the single rose or pink poppy. The nicest part of painting a jewelry box is that the finished piece can hold the jewelry you wear every day or become a personal gift for someone else.