This post may contain affiliate links. If you make a purchase through these links, I may earn a small commission at no extra cost to you. Thank you so much for your support.
These wall Christmas tree ideas are for you if you’ve ever stood in your living room in December, looked around and thought, where am I going to put a tree this year?

I love a big Christmas tree, but there’s something about a little tree made from garland and warm lights that makes me want to try it even when there’s room for a regular one.
And you can start with what you already have. A box of ornaments, the Christmas cards you’ve been saving or the leftover ribbon from wrapping gifts can all become part of the tree.
If you want that lovely glow in the evening, start with the cedar garland or the birch ladder. If you’d rather spend an afternoon cutting and folding paper, I think you’ll love the snowflakes and rosettes.
Pick the one you’d be happiest to see when you walk into the room. And if you’re decorating the rest of the space too, you can borrow a few ideas from my Christmas mantel decorations.
Before You Make a Wall Christmas Tree
Measure the wall first, including the space around the base and topper. A tape measure and a few temporary paper markers make it easier to picture the finished size.
Lay out your branches, ribbons or ornaments on the floor in the same shape first. Move pieces around until the widest row sits comfortably in the space you measured.
Weigh the finished display, including the greenery, lights and ornaments. Choose mounting hardware rated for that weight and your wall type, and follow its installation instructions.
If you’re using removable hooks, check that they’re suitable for your finish, test a discreet spot and follow the package’s waiting time before loading them. Check the manufacturer’s hook and surface guidance if you’re unsure.
For a lit design, use an undamaged strand labelled for indoor use. Plan where the cord will run before mounting your tree, and hold it with light clips that leave the wire unpinched. See the CPSC’s holiday lighting guidance.
DIY Wall Christmas Tree Ideas
1. Birch Branch Ladder With Bells
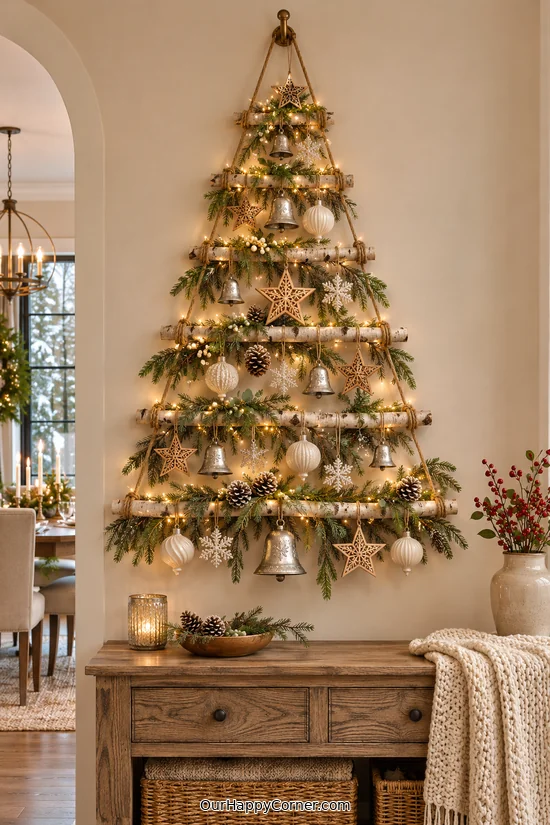
If I had a bare wall over an entryway table, this birch tree is the first one I’d try. I can just picture those little silver bells catching the light when you walk in.
The carved stars, ivory baubles and silver bells leave enough room for the pale bark to show through.
Gather lightweight birch branches, strong jute cord, evergreen sprigs, small ornaments and indoor string lights.
How to make it: Cut or select branches in graduating lengths and lay them out with the widest at the bottom. Lash both ends of each branch to two side cords, keeping the rows level, then join the cords above the smallest branch and hang the ladder from hardware rated for the decorated weight.
Tie sprigs along the branches and loop the ornaments around the wood. Weave in the lights last so you can route the lead neatly down one side.
2. Faux Cedar Garland With Emerald and Gold Baubles

Do you love the look of a full Christmas tree but need the floor space? This cedar garland is the one I’d start with.
Emerald, pearl and champagne baubles give the greenery depth. A large open star adds height without hiding the cedar tips.
Gather a flexible faux cedar garland, wall fasteners suited to its weight, lightweight baubles, a star and indoor string lights.
How to make it: Mark the apex and each turn point, placing the turns farther apart as you work down. Secure the garland in one continuous zigzag, adding supports along the wider runs wherever the greenery sags.
Hang the baubles from the garland with short loops and tuck the lights in along the same path. Give the star its own wall hook above the greenery.
3. Driftwood Ladder With Wooden Stars
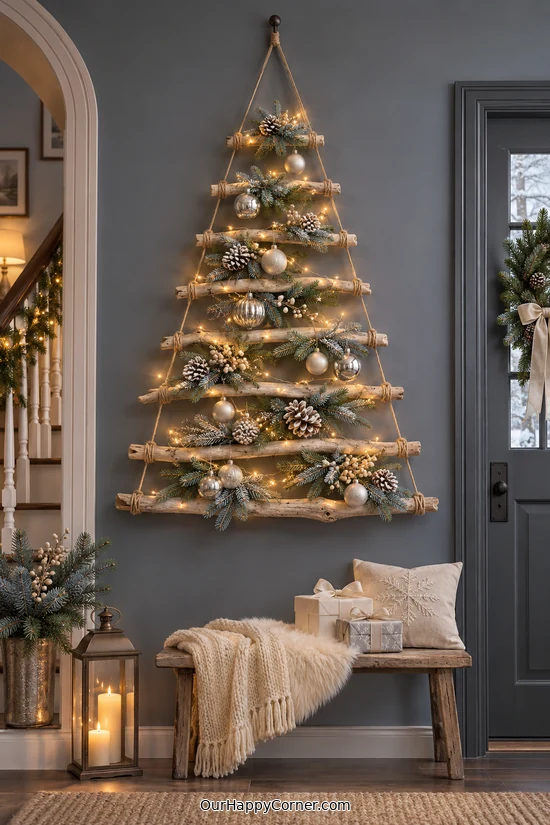
If you’ve ever brought home a piece of driftwood without quite knowing what to do with it, here’s your excuse to collect a few more.
Frosted sprigs and pale ornaments catch the light against a slate wall. I’d use only a little greenery at each level so the shape of the wood stays visible.
Gather clean, dry driftwood in several lengths, sturdy twine, faux spruce, wood stars, pinecones and indoor string lights.
How to make it: Lay the pieces out with the shortest at the top. Tie each end to the corresponding side cord and join the cords above the first branch, then mount the finished ladder on a rated hanger.
Wire the sprigs to the wood with the cut wire ends tucked in. Tie on the stars and pinecones, then follow the ladder shape with a strand of lights.
4. Dried Orange and Cinnamon Wall Tree
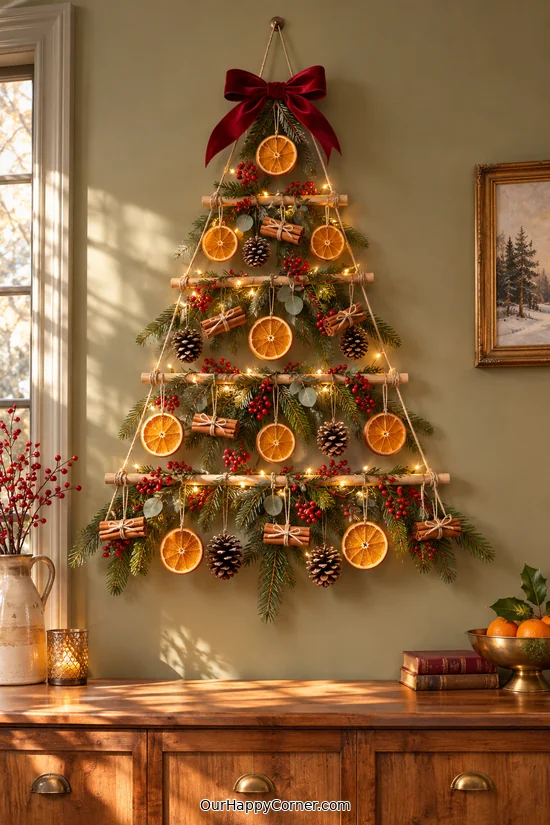
I always think dried oranges look their prettiest next to warm lights. Here, they almost look like little stained-glass ornaments.
A burgundy bow and a few red berry sprigs make the oranges feel especially festive. The cinnamon bundles add texture between the round slices.
Gather slim wooden dowels, strong twine, fully dried orange slices, cinnamon sticks, faux greenery and indoor LED string lights.
How to make it: Lash the dowels to two side cords in graduated lengths, then hang the ladder. Tie the greenery to each dowel and use short loops to hang the orange slices through small holes near their edges.
Bundle two or three cinnamon sticks together with twine and tie them between the oranges. Finish with the bow at the top and run the light strand along the dowels.
5. Fairy-Light Zigzag With Gold Stars
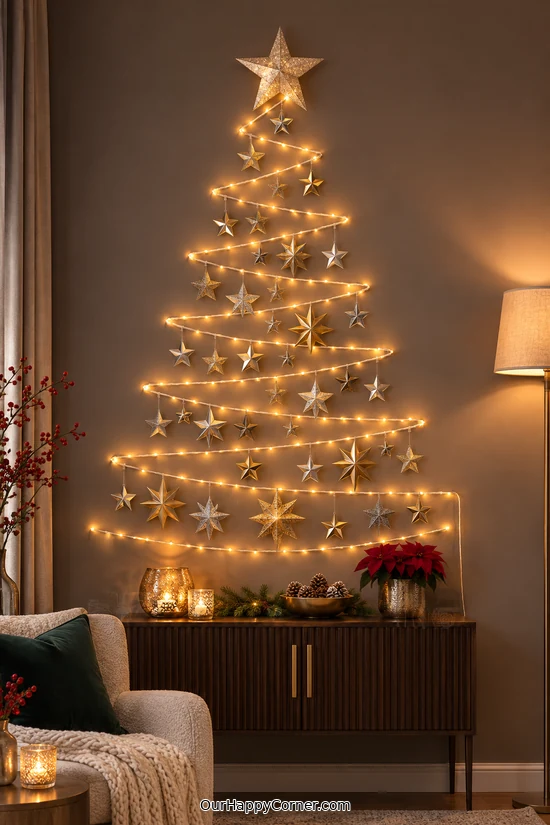
If you want something that makes you smile when you turn off the big light, try this one. The whole tree is drawn in warm fairy lights.
Gold stars scattered between the rows fill the triangle and look pretty even before you switch the lights on.
Gather one indoor LED strand, clips made for light cords, lightweight paper stars and a larger star for the top.
How to make it: Mark the outer turns of the tree, making each row wider as you go down. Fit the cord into the clips so it rests loosely, and plan the route to the outlet or battery pack before you start.
Attach the paper stars separately between the lit rows. Use the largest one at the apex and leave enough gaps for the individual lights to shine.
6. Burgundy Velvet Ribbon Outline

You know the wide velvet ribbon you buy for gifts and want to save every scrap of? Here’s a way to let it be the star of the room.
A few burgundy ornaments and brass bells fill the open middle without covering the outline. The tree would suit a narrow dining room wall or an entryway.
Gather wide velvet ribbon, compatible wall clips, lightweight bells and baubles, and an optional indoor micro-light strand.
How to make it: Measure the stepped outline with string first. Cut the ribbon to fit, then secure it flat against the wall at each corner and add the bow on a separate hook at the top.
Hang the ornaments on their own hooks inside the outline. If you add lights, follow the ribbon with a strand on dedicated light clips.
7. Green and Gold Washi Tape Tree
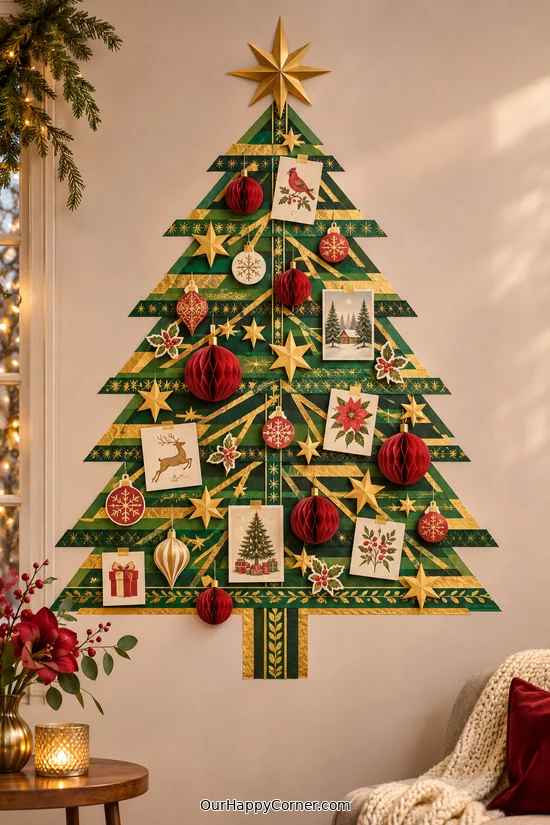
This is the one I’d make on a free afternoon with the bits of tape and paper I already have in the craft drawer.
Vintage-style card cutouts, paper ornaments and small stars make the flat design feel full. It’s a good use for patterned tape and leftover wrapping paper.
Gather washi tape in coordinating colours, cardstock, scissors and a folded paper star. Test the tape on a discreet spot first to see how it lifts.
How to make it: Mark the centre of the tree and build the stepped shape from the top down. Add shorter lengths of tape across each tier for the patterned branches.
Tape lightweight cardstock decorations within the outline and finish with the star. Use thin paper layers so the decorations stay close to the wall.
8. Vintage Christmas Card Display
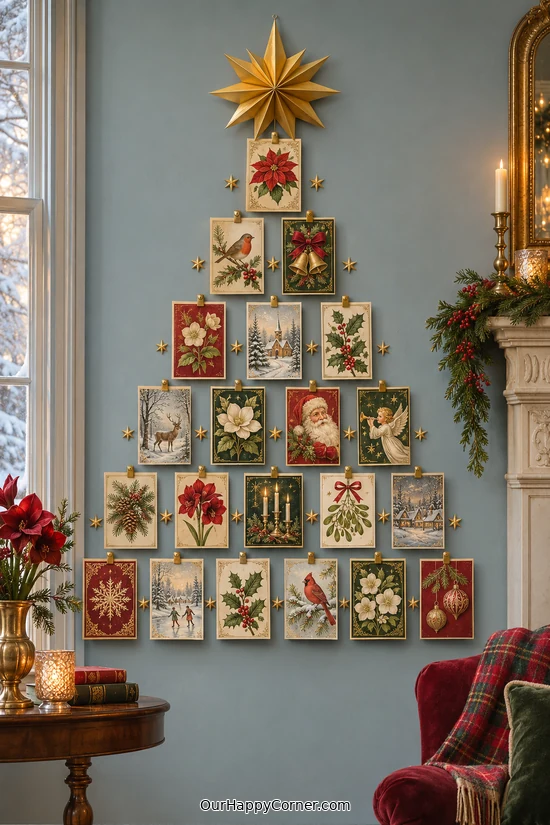
I never quite know where to put Christmas cards once they start piling up. Arranging them on the wall means you get to enjoy the illustrations every time you pass by.
Red and green illustrations pop against a muted blue wall, and a folded gold star gives the display a clear top.
Gather Christmas cards in a mix of sizes, removable tabs suited to the wall and a lightweight paper star.
How to make it: Lay the cards on the floor first in rows that widen toward the bottom. Move any large or particularly bright cards around until both sides of the tree feel balanced.
Transfer the rows to the wall one at a time, leaving a small gap between cards. Add the star and fill any conspicuous gaps with small paper accents.
9. Advent Envelope Tree
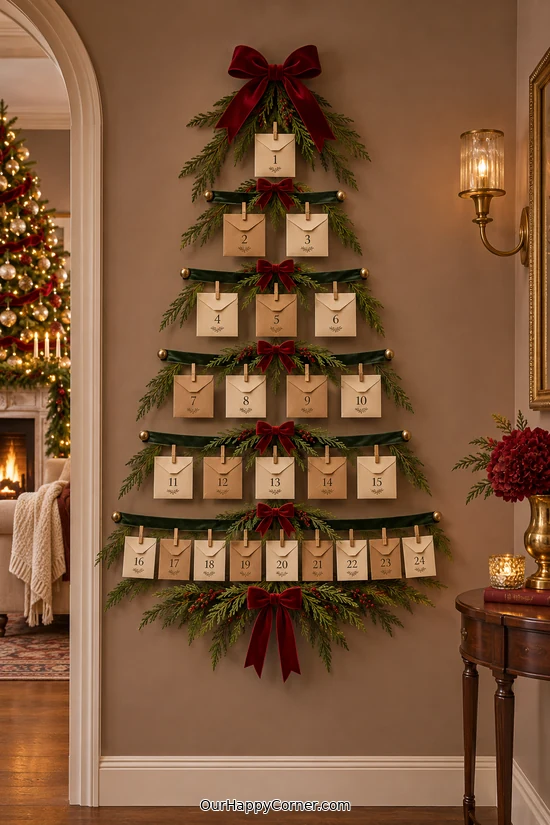
If you like the idea of an Advent calendar you can fill yourself, I think you’ll have fun with this tree.
Each envelope can hold a small note or an activity for the day. You can reuse the ribbons and pegs next year.
Gather 24 numbered envelopes, mini pegs, wide green ribbon, faux cedar tips, red bows and wall hooks suited to the finished display.
How to make it: Arrange five ribbon rows with room for two, three, four, six and nine envelopes. Secure each ribbon at both ends and add a centre support if a long row dips.
Clip the envelopes in numerical order and tuck a few cedar tips at the ends. Keep the contents light so the ribbons hold their shape.
10. Felt Ornament Banner

I love that this felt tree gives you a little Christmas decoration you can bring out and rearrange every year.
Candy canes, stockings and woodland shapes make it feel like something you can bring out year after year.
Gather sturdy canvas, green felt, coloured felt scraps, a wooden dowel, hanging cord and fabric hook-and-loop dots.
How to make it: Hem the banner and sew a sleeve across the top for the dowel. Cut out a large felt tree and stitch it to the canvas before sliding the dowel into place.
Cut the ornaments from felt and add fabric fasteners to the backs so they can be moved. Tie the cord to both ends of the dowel and hang it on a suitable wall hook.
11. Paper Snowflake Tree
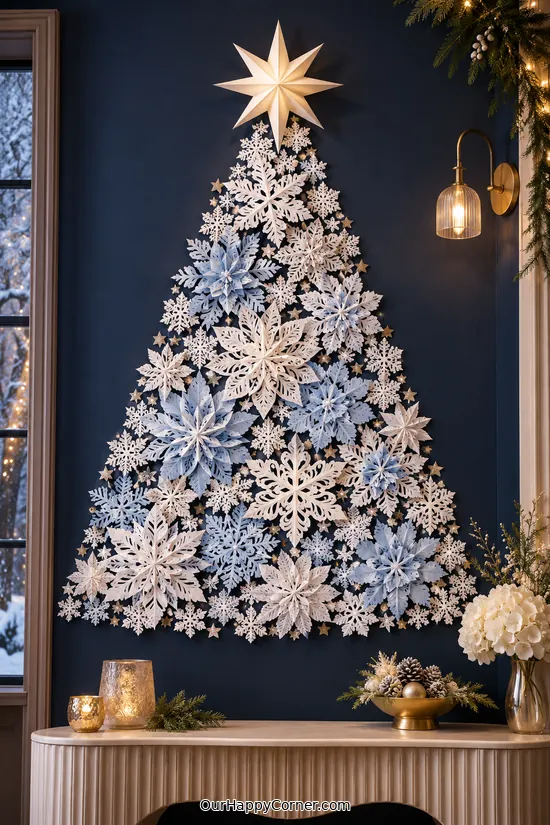
If you’ve ever unfolded a paper snowflake and been surprised by how pretty it turned out, imagine a whole tree of them on a dark wall.
I like the mix of large and small flakes, with the biggest ones near the base and a folded star at the top.
Gather white and pale blue paper, scissors, small foil stars and removable tabs compatible with the wall.
How to make it: Fold and cut snowflakes in different sizes. Lay them out in a triangle, using large flakes to establish the lower edges and smaller ones to fill around them.
Mount each snowflake near its centre so the delicate edges can cast little shadows. Finish with a few foil stars and the folded topper.
12. Folded Paper Rosette Tree
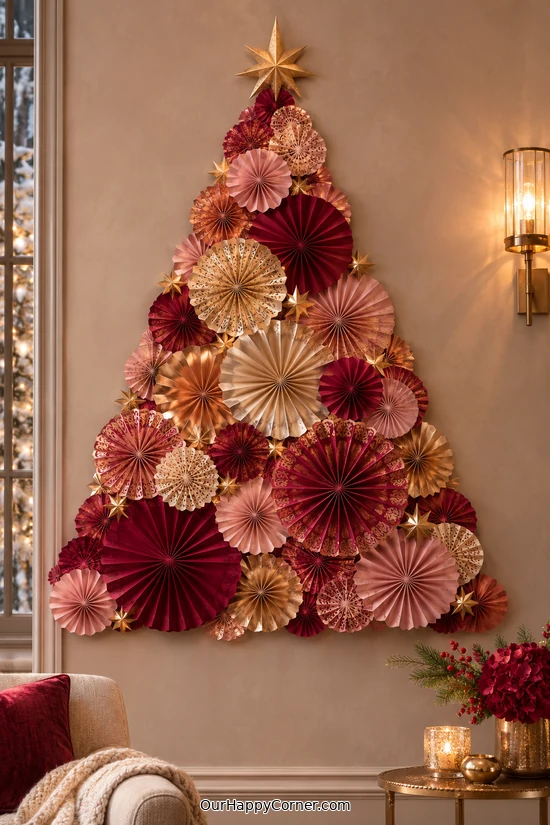
This is the tree I’d pick if you love Christmas colours that lean a little more blush and burgundy.
The accordion folds catch the light, so even a few sheets of patterned paper can give the whole tree texture.
Gather lightweight decorative paper, glue, cardstock circles and removable wall fasteners suitable for the rosettes.
How to make it: Accordion-fold strips of paper, glue their ends together and flatten the rings into circles. Glue each circle onto a cardstock backing and let it dry.
Arrange the largest rosettes along the base and fill in upward with smaller ones. Use the flat backing to mount each rosette and tuck tiny foil stars into the gaps.
13. Emerald and Gold Bauble Tree

You know those few baubles you’d happily keep out all year? Give them pride of place on this wall Christmas tree.
Mix glossy and matte finishes to break up the gold, and scatter emerald baubles through the tiers so the colour feels balanced.
Gather lightweight shatterproof baubles, short hanging loops, small wall hooks rated for each ornament and a lightweight star.
How to make it: Lay out the triangle on a flat surface, then mark matching hook positions on the wall. Space the rows according to the size of your baubles so the ornaments can hang freely.
Use short loops to hang each bauble close to the wall. Fit the star to its own hook and add an indoor LED strand on dedicated clips if you want a glow between the rows.
14. Plaid Embroidery Hoop Tree
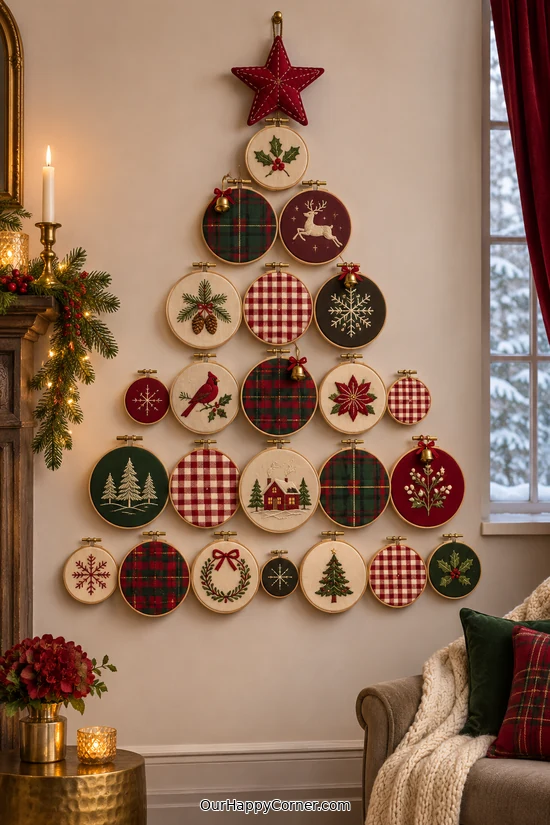
If you have fabric scraps you can’t bring yourself to throw away, this is a lovely way to see them again every December.
The circular hoops have a lovely rhythm together, especially when the fabrics share a few colours across the whole arrangement.
Gather lightweight wooden hoops in different sizes, fabric scraps, scissors and small picture hooks suited to your wall.
How to make it: Stretch the fabric across each hoop, tighten the screw and trim the excess on the back. Lay out a tree shape with the largest hoops at the base, then hang the hoops individually.
Tie a small lightweight bell to a few hoop screws and finish with a fabric star. Mix busy plaid with calmer fabrics so you can see the detail in each hoop.
15. Pom-Pom Canvas Banner

Wouldn’t this be sweet on a narrow hallway wall? Those soft pom-poms make it feel as cosy as a favourite blanket.
Sage, cranberry and cream keep the palette festive, and the velvet star gives the top a little extra texture.
Gather a sturdy canvas banner, yarn pom-poms, strong thread, a dowel, hanging cord and scraps for the star and trunk.
How to make it: Arrange the pom-poms in widening rows on the canvas and stitch each one through its centre ties. Sew on the star and the small fabric trunk.
Slide the dowel through the top sleeve and attach the hanging cord at both ends. Use a hook rated for the full weight of the finished banner.
16. Eucalyptus and Dowel Wall Tree

If you’re drawn to soft greens and pearl ornaments, this eucalyptus tree is one I think you’ll love.
This is a good wall Christmas tree idea if you like greenery and want a softer holiday palette.
Gather slim dowels, faux eucalyptus and pine, floral wire, lightweight ornaments and indoor string lights.
How to make it: Cut the dowels to graduated lengths and support each one at both ends with hardware suited to its shape and decorated weight. Secure the foliage to each dowel with short pieces of wire.
Hang the pearl ornaments from the dowels and tuck in a few small stars. Weave the lights through the greenery and add the top star on its own hook.
17. Woodland Slat Tree With Felt Animals

I’d have as much fun picking the little felt animals for this tree as I would putting it together.
The light wood and warm bulbs suit a cottage entryway or a cosy reading corner.
Gather lightweight pine slats, sturdy cotton rope, faux pine sprigs, felt animals, miniature wood ornaments and indoor string lights.
How to make it: Lay the slats in graduated lengths and lash the ends to two side ropes with knots at each level. Join the ropes at the top and mount the ladder on a hook rated for its full weight.
Tie sprigs to the slats, then hang the felt animals and wood ornaments by short loops. Weave the lights along the slats and check that each row hangs level.
18. Family Photo Ribbon Tree
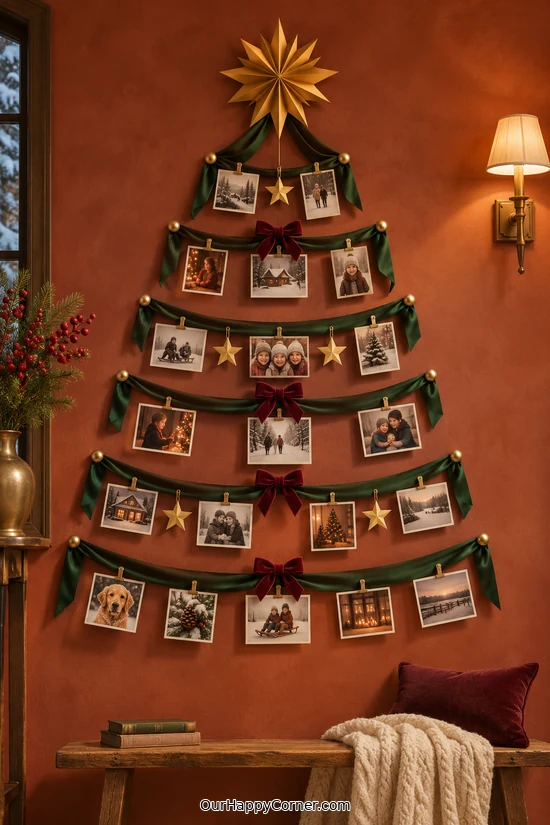
I love the idea of finding a favourite photo from each Christmas and giving it a spot on the tree.
Green satin ribbons, burgundy bows and a gold star tie everything together, and the photos are easy to swap from one year to the next.
Gather small photo prints, satin ribbon, mini clips, compatible wall hooks and a lightweight paper star.
How to make it: Cut ribbons in graduated lengths and fasten each one to the wall at both ends. Leave a gentle dip in each row and space them so the prints have room to hang.
Clip the photos along the ribbons and add lightweight bows and flat stars where there’s space. Mount the topper separately at the apex.
19. Vintage Gold Tinsel Tree

If you grew up with shiny gold tinsel, this one might bring back a few Christmas memories.
Blush, cobalt and red ornaments bring out the playful side of the metallic garland. I’d keep the area beneath the tree simple so all that sparkle can stand on its own.
Gather a lightweight tinsel garland, wall clips rated for the display, small shatterproof baubles, indoor LED lights and a star.
How to make it: Mark a zigzag that gets wider toward the floor, then secure the garland at each turn. Add supports across the longer rows so the tinsel sits close to the wall.
Tie the baubles on with short loops and run the LED strand alongside the tinsel using cord clips. Finish with a gold star on its own hook.
Final Thoughts
Pick the wall tree that fits your space and start with one detail you love. Mine would be the cedar garland with emerald baubles, with a few beautifully wrapped gifts below.