This post may contain affiliate links. If you make a purchase through these links, I may earn a small commission at no extra cost to you. Thank you so much for your support.
Button crafts to make and sell can turn a jar of spare buttons into pretty accessories, personalized gifts, and home accents people enjoy using.
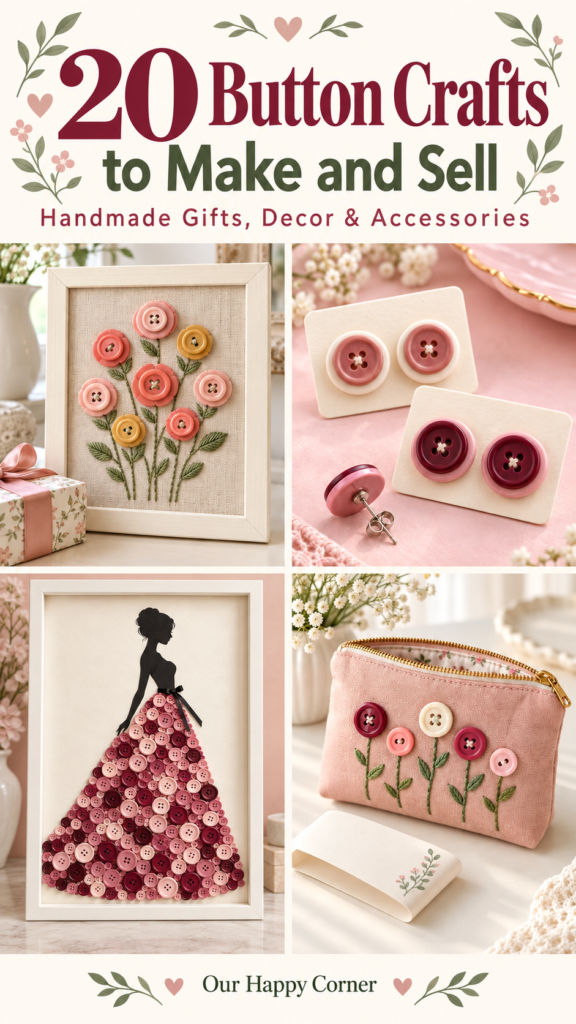
The appeal comes from thoughtful colors, secure construction, and a finish that feels ready to give.
These projects range from small stud earrings and gift tags to framed artwork and a decorative button chain belt. You can start with one idea, make a small coordinated collection, and build from there.
Choose a project that fits the skills you already enjoy, whether that is sewing, paper crafting, or simple jewelry assembly. A carefully finished piece is a much better starting point than trying to make every design at once.
Gather Your Button Craft Supplies
Start with clean, undamaged buttons in two or three coordinating colors. Mix sizes for artwork, but choose smaller, lighter buttons for jewelry and accessories.
Keep sewing thread, embroidery floss, needles, scissors, a ruler, and a removable fabric marker nearby. Felt, linen, ribbon, sturdy cardstock, and ready-made bags provide the bases for many of these projects.
For glued pieces, choose an adhesive labeled for the materials you are joining and allow its full curing time. Jewelry projects also need suitable findings, pliers, and wire that passes easily through the button holes.
Buy only the supplies for your first project, then add others as you develop your range. Our jewelry box painting ideas offer another way to make a coordinated handmade gift alongside the button earrings or brooches.
Plan a Collection You Can Price With Confidence
Make one complete sample before buying supplies for a large batch. Record the buttons, base materials, adhesive, findings, packaging, and time it takes to produce a finished item.
Your selling price needs to cover materials, your labor, packaging, selling fees, and a share of business expenses, with room for profit. Compare similar products for context, then calculate a price that works for your own costs.
Personalized artwork can take longer than a repeatable pair of earrings, so charge for the extra work. Start with a small selection of colors and sizes to keep ordering and production manageable.
Photograph the front, back, fastening, and scale of wearable pieces, and describe the actual materials clearly. Check every button attachment and package raised details so they are protected in transit.
Beautiful Button Crafts to Make and Sell
1. Framed Button Flower Art
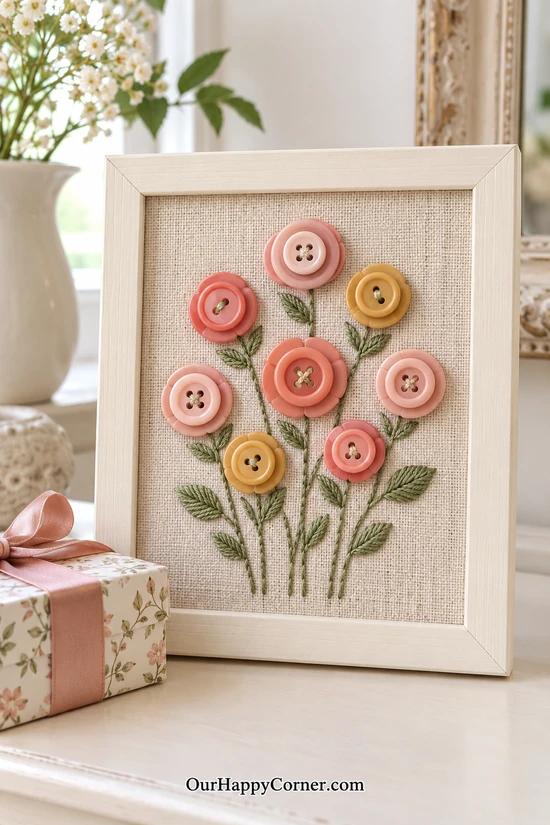
A little button garden makes a lovely piece for a desk, dresser, or bedside table. Blush, coral, and mustard flowers stand out beautifully against natural linen.
Layering two buttons gives each flower more depth without making the arrangement complicated. Keep the stems slender and leave space between the blooms.
Start with a small frame so the stitching remains a manageable project. Offer coordinated color options to make the finished artwork feel personal.
What you’ll need: Linen, embroidery hoop, embroidery floss, assorted buttons, needle, sturdy backing, and a deep frame.
How to make it:
1. Cut the linen larger than the frame opening and secure it in an embroidery hoop. Lightly mark seven flower positions and their stems.
2. Stitch the stems with backstitch and add simple leaf stitches. Sew a larger button at each flower position, then a smaller button on top.
3. Add a few leaves where the arrangement needs balance. Keep the button holes visible and pull the stitches snug without puckering the linen.
4. Press the fabric from the reverse with padding beneath the buttons. Mount it flat on backing and fit it into a frame with enough depth for the flowers.
2. Personalized Button Monogram
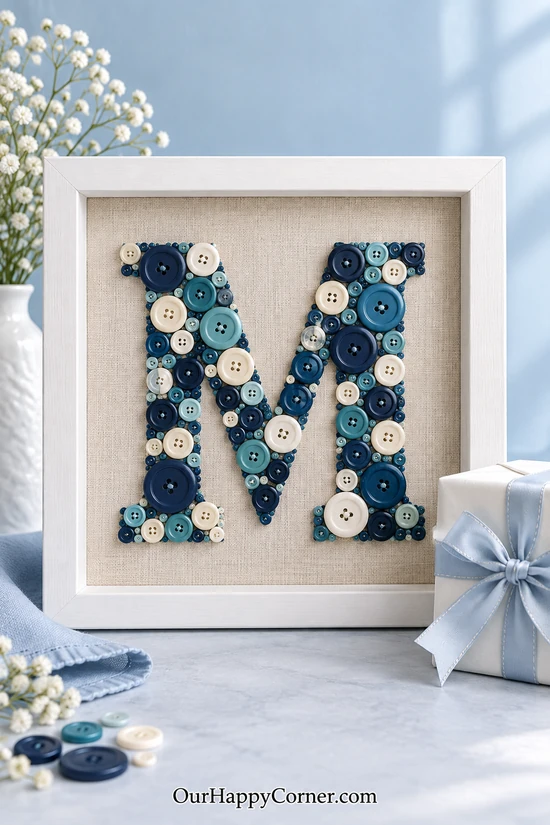
An initial turns a collection of ordinary buttons into a thoughtful personalized gift. Navy, teal, and ivory create a crisp arrangement that suits many rooms.
The clean letter outline matters more than matching every button. Fill the shape with larger pieces first, then use small buttons to soften the gaps.
Keep the background plain so the monogram reads clearly from a distance. Let customers select an initial and a limited palette rather than starting every order from scratch.
What you’ll need: Buttons in several sizes, linen-covered rigid backing, letter template, pencil, suitable craft adhesive, and a shadowbox.
How to make it:
1. Trace your chosen letter lightly onto the linen-covered backing. Make the strokes wide enough to accommodate your largest buttons.
2. Arrange the buttons inside the outline before gluing. Keep the outer edges neat and mix the sizes throughout the letter.
3. Attach the buttons with adhesive suitable for their material and the backing. Add smaller buttons only where they improve the shape.
4. Allow the adhesive to cure fully, then frame the piece without pressing the buttons against the glass. Check the hanging hardware before packaging.
3. Layered Button Stud Earrings
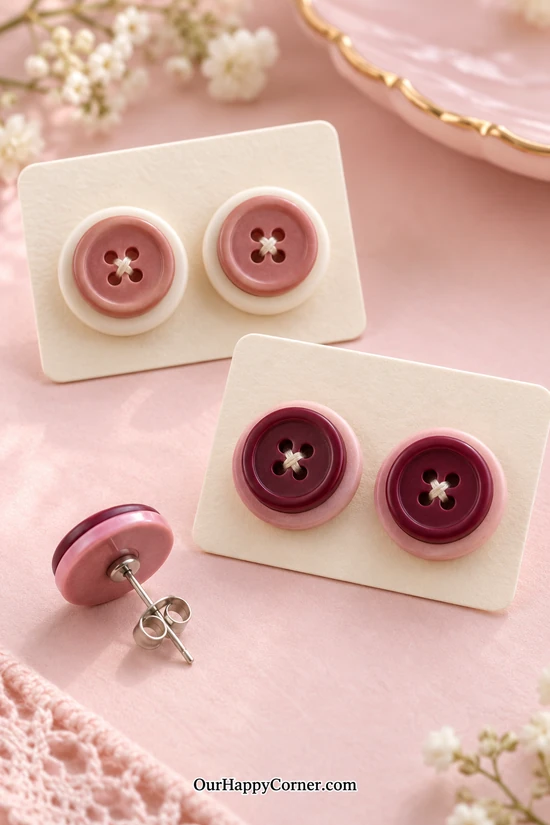
Two stacked buttons can become a charming pair of everyday studs. A pale base button gives the smaller colored button a neat contrasting border.
Choose lightweight buttons of similar thickness so the pair sits comfortably. Matching the size and finish makes the earrings look considered rather than mismatched.
Simple display cards make small jewelry easier to present and package. A few coordinated pairs can form a compact collection for a craft table.
What you’ll need: Lightweight flat buttons, stud posts with flat glue pads, earring backs, thread, and jewelry adhesive compatible with the materials.
How to make it:
1. Match two base buttons and two smaller top buttons. Check that the backs of the base buttons sit flat against the stud pads.
2. Stitch each button stack together through aligned holes, keeping the knot flat at the back. Trim the thread neatly.
3. Attach a stud pad to the back of each base button using compatible jewelry adhesive. Keep adhesive away from the post and wearable surfaces.
4. Cure for the full time on the adhesive label. Check that the posts are secure, add the backs, and mount the pair on a display card.
4. Button Ribbon Bracelet
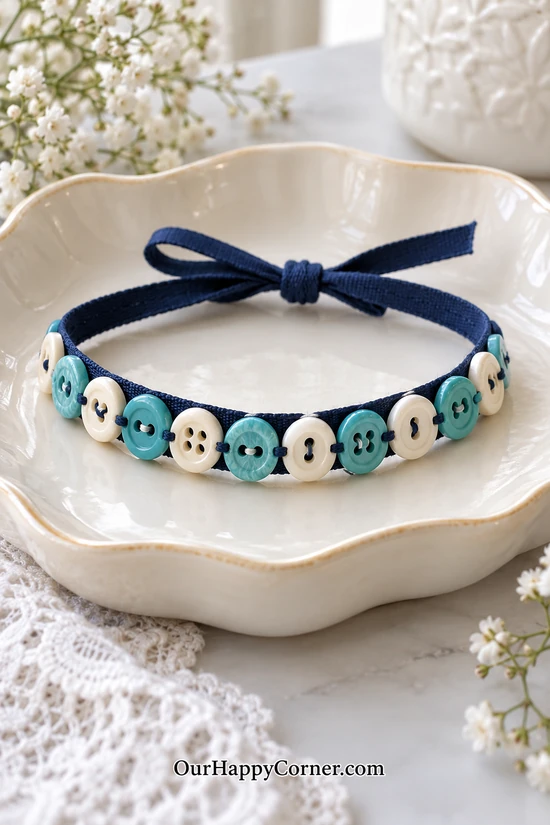
Turquoise and ivory buttons give this ribbon bracelet a fresh, cheerful look. The navy base holds the buttons in place and brings the colors together.
Use a narrow ribbon that feels comfortable against the wrist. Small flat buttons work best because they keep the bracelet flexible.
A tie closure makes this an approachable first accessory project. Offer wrist measurements and ribbon lengths clearly so buyers can choose a comfortable fit.
What you’ll need: Soft woven ribbon, small flat buttons, strong sewing thread, needle, measuring tape, and scissors.
How to make it:
1. Measure around the wrist and add enough ribbon for a bow. Mark the central section that will carry the buttons.
2. Arrange alternating buttons across that section with a little space between them. Keep the ribbon ends undecorated for tying.
3. Sew each button firmly through the ribbon, securing the thread between buttons. Fold and stitch the cut ribbon ends to prevent fraying.
4. Wrap the bracelet around a wrist and tie the bow to check the fit. Adjust any button that digs in or prevents the ribbon from bending.
5. Felt and Button Flower Brooch
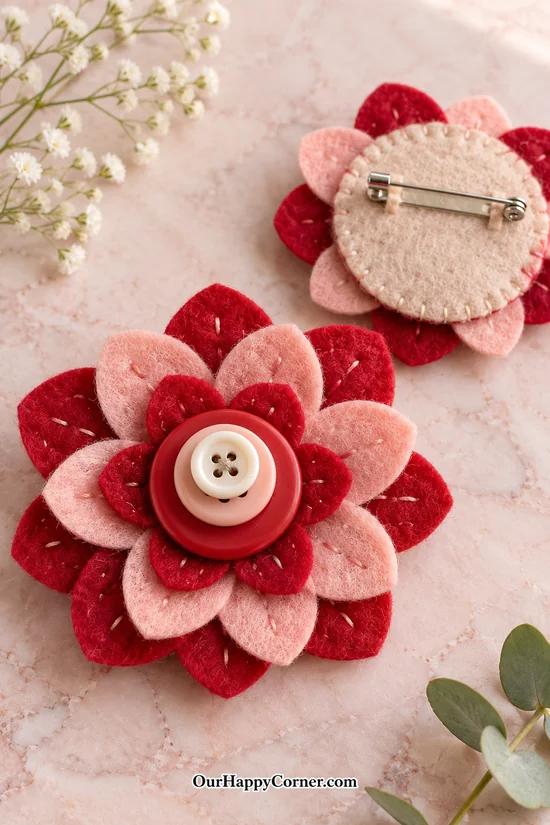
A felt flower gives a button brooch a soft, textured base. Burgundy and blush petals create a pretty contrast around an ivory center.
The overlapping petals can be cut by hand without needing identical shapes. A stacked button center hides their meeting point and finishes the flower neatly.
This piece works well on a cardigan, scarf, or fabric tote. Show the fastening in a product listing so customers know how they will wear it.
What you’ll need: Craft felt, paper petal template, buttons, embroidery thread, needle, scissors, and a brooch pin with a sew-on base.
How to make it:
1. Cut two circles of petals in different sizes and colors. Stack them with the smaller flower turned slightly so both layers remain visible.
2. Stitch through the center to hold the layers together. Sew two or three stacked buttons over the center stitches.
3. Sew the brooch pin securely onto a separate felt backing circle. Keep the hinge and clasp clear of stitching.
4. Stitch the backing circle onto the flower, enclosing loose threads between the layers. Open and close the pin to confirm it works freely.
6. Button Hair Barrettes
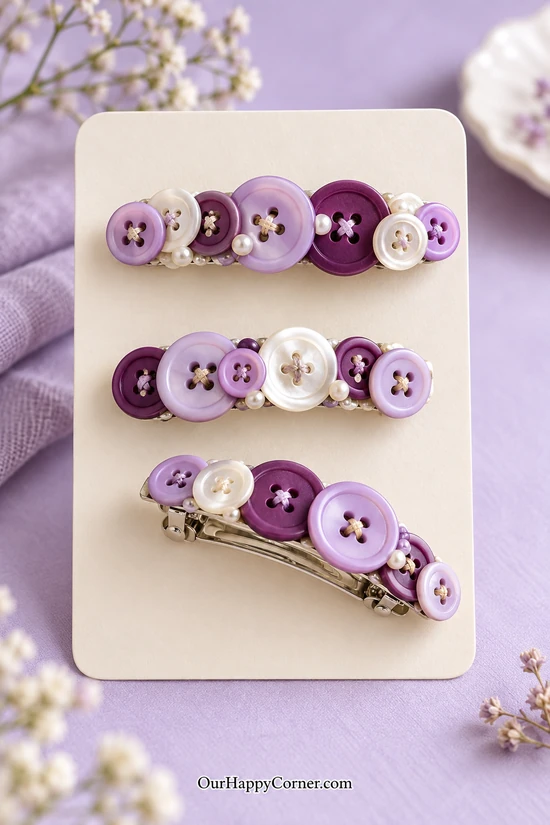
Lilac, plum, and ivory buttons make a lovely set of embellished barrettes. A mix of sizes gives each clip an interesting shape while the limited palette keeps the set coordinated.
Keep the embellishments along the upper surface of the clip. The hinge and clasp need space to open and close normally.
These are small projects that can be made in coordinated batches. Present a pair or trio on a sturdy card so the buttons stay protected during handling.
What you’ll need: Blank metal barrettes, small buttons, optional tiny beads, thread, and adhesive suitable for metal and button material.
How to make it:
1. Open each barrette and plan a row of buttons along its top plate. Avoid the moving ends and keep the largest buttons near the center.
2. Add decorative thread through the button holes if desired, tying it flat behind each button. Test the layout again before attaching anything.
3. Glue the buttons to the top plate with a compatible adhesive. Use only a small amount and avoid the spring mechanism.
4. Let the adhesive cure completely. Open and close the clip several times, then mount it on a card through small slots.
7. Ribbon and Button Bookmarks
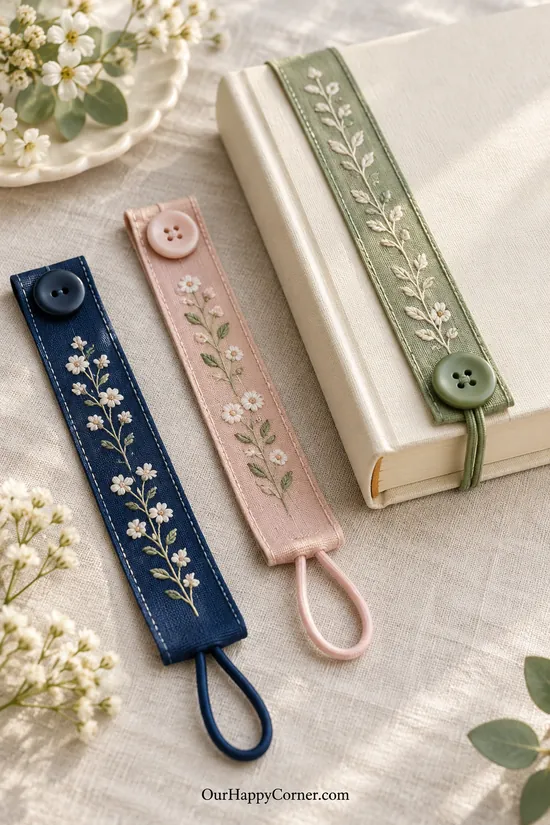
A button and elastic loop turn a ribbon into a bookmark that wraps around a closed book. Navy, blush, and sage versions give the same useful idea three different moods.
Floral embroidered trim adds detail without requiring you to embroider every stem yourself. Choose a trim that feels smooth enough to rest against the cover.
The finished bookmark should fit snugly without pulling the book out of shape. Include its relaxed length and suggested book size when offering it for sale.
What you’ll need: Wide embroidered ribbon or trim, a flat button, thin elastic cord, thread, needle, and scissors.
How to make it:
1. Wrap a length of ribbon around your chosen closed book to establish the size. Leave a small gap at one end for the elastic closure.
2. Fold and stitch both ribbon ends to enclose the raw edges. Sew a button firmly near one end.
3. Form a loop with elastic cord that can stretch over the button. Stitch the cord ends securely inside the opposite folded ribbon end.
4. Wrap the bookmark around the cover and fasten the loop over the button. Adjust the elastic so it holds the ribbon without putting strain on the cover.
8. Button Flower Bouquet
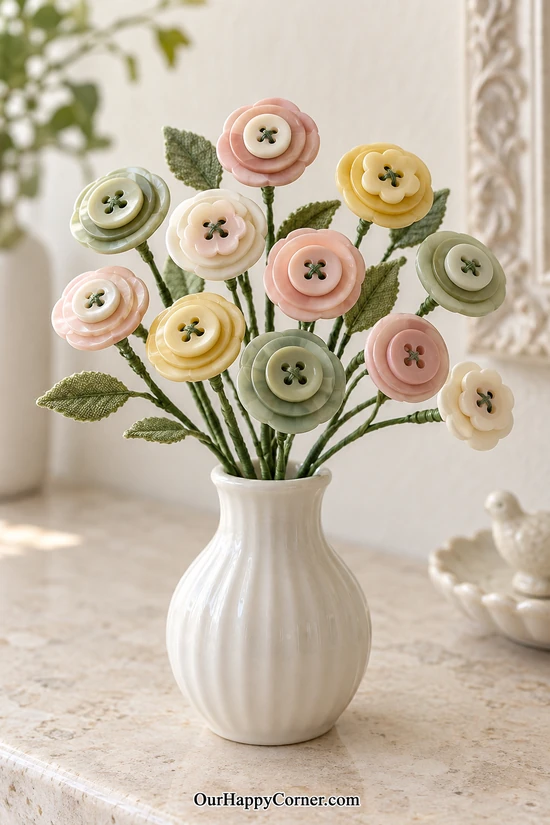
A button bouquet brings color to a shelf without needing fresh flowers. Layered blush, sage, ivory, and yellow buttons form a small arrangement with plenty of texture.
Florist tape covers the wire stems and gives them a tidy finish. A few felt leaves help the flowers feel complete without overcrowding the vase.
Keep the stems flexible enough to arrange but firm enough to support the button heads. This is a lovely option for buyers looking for a lasting handmade gift.
What you’ll need: Buttons in graduated sizes, flexible craft wire that fits the holes, pliers, wire cutters, florist tape, felt leaves, and a small vase.
How to make it:
1. Stack two or three buttons from largest to smallest. Thread a length of wire up through one set of aligned holes and down through another.
2. Pull the wire ends together beneath the flower and twist them into a stem. Fold sharp ends inward and cover the stem with florist tape.
3. Attach a felt leaf to selected stems with wire or a small amount of suitable adhesive, covering the join with tape. Make several flowers at different heights.
4. Arrange the stems in the vase and bend them gently to separate the flower heads. Finish the back of the arrangement as neatly as the front.
9. Everyday Button Wreath
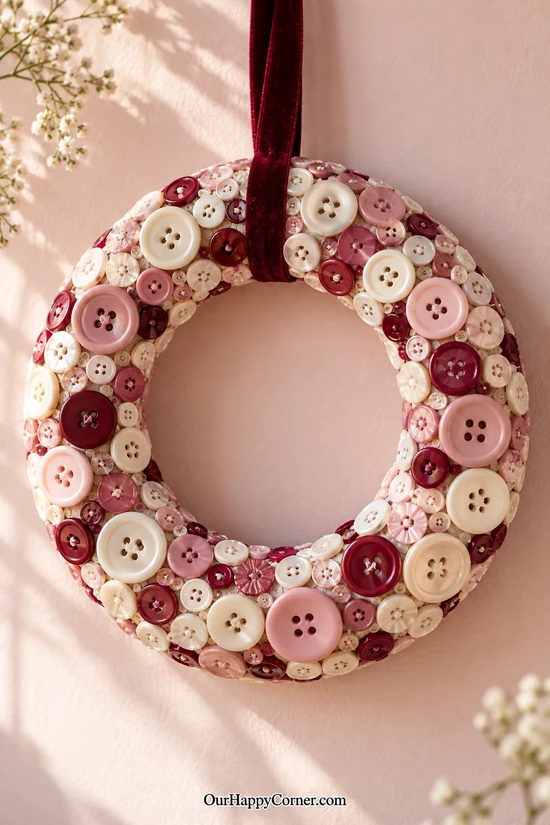
An everyday button wreath gives a wall or sewing corner a playful handmade detail. Ivory and dusty rose buttons keep it soft, while burgundy adds a deeper accent.
The wrapped base is part of the design, so small spaces between buttons are welcome. A mixture of sizes creates texture without needing a complicated pattern.
Use a modest wreath size to keep the materials and assembly time manageable. A simple ribbon hanger makes the piece easy to display.
What you’ll need: Small rigid wreath ring, fabric strips, assorted buttons, ribbon, and adhesive suitable for the base and buttons.
How to make it:
1. Wrap the ring with overlapping fabric strips and secure the ends neatly. Add a ribbon hanging loop around the top of the ring.
2. Lay out the largest buttons around the front, spacing their colors evenly. Fill between them with medium buttons.
3. Attach the buttons using compatible adhesive and let the first layer set. Add a few small overlapping buttons where they improve the arrangement.
4. Allow the piece to cure flat. Check every attachment and cover any rough joins on the reverse before hanging.
10. Framed Button Ball-Gown Silhouette
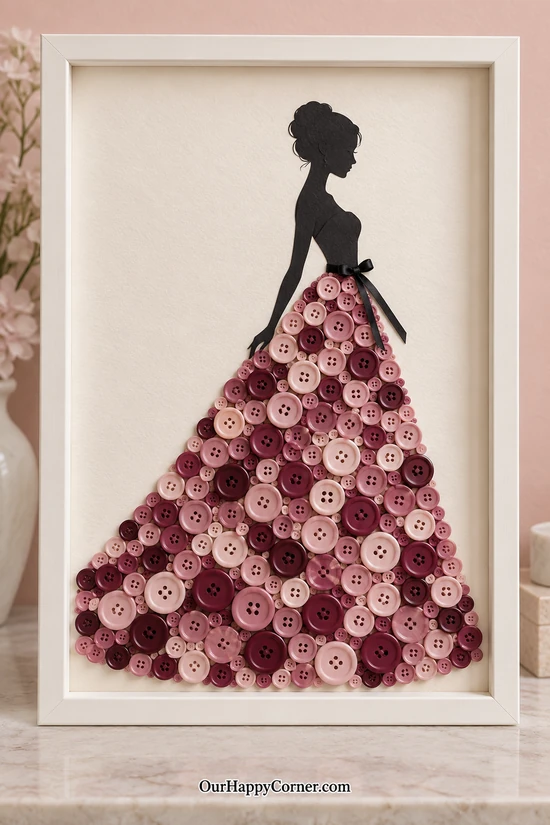
A sweeping button skirt makes this framed silhouette feel special. The black paper bodice keeps the woman’s shape clear while the skirt supplies the color and texture.
Blush, dusty rose, and burgundy buttons work beautifully together. Mixing sizes helps fill the gown while preserving its graceful outline.
This is one of the button crafts to make and sell that can become a statement gift. Offer a few gown palettes and keep the frame style consistent for a coordinated collection.
What you’ll need: Black cardstock, ivory backing, an original woman silhouette template, buttons, narrow ribbon, suitable craft adhesive, scissors, and a shadowbox.
How to make it:
1. Sketch or use a silhouette template you have permission to sell in finished work. Cut the head, arms, and bodice from black cardstock and attach them to the backing.
2. Lightly draw a wide skirt shape below the waist. Arrange the largest buttons inside that shape, keeping the hem and outer edges smooth.
3. Glue the buttons in place, then add smaller ones in the remaining gaps. Tie a little ribbon bow and attach it at the waist.
4. Let all adhesive cure before fitting the artwork into a deep frame. Leave room between the buttons and the glazing, and secure the backing firmly.
11. Button Bouquet Greeting Cards
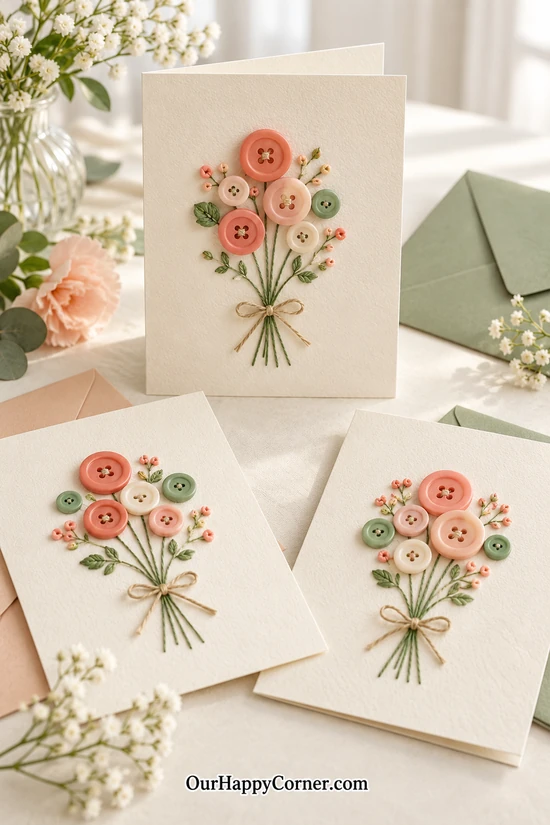
A little button bouquet makes an ordinary blank card feel like a keepsake. Coral and sage details give it a gentle, cheerful style suited to several occasions.
Leave open space for a short handwritten greeting or keep the front word-free. The same arrangement can work for birthdays, thank-you notes, and thinking-of-you cards.
Use sturdy cardstock that can support the button weight. Protective sleeves and envelopes with enough room help the raised details arrive neatly.
What you’ll need: Heavy blank cards, buttons, embroidery floss, needle, paper-piercing tool, suitable adhesive, and envelopes.
How to make it:
1. Sketch a small bouquet on a separate cardstock front panel. Pierce evenly spaced holes along the stems and leaves.
2. Stitch the stems with backstitch and add simple leaves. Sew the buttons at the flower positions or attach them with paper-compatible adhesive.
3. Tie a tiny thread bow at the base of the bouquet. Mount the decorated panel onto the folded card to hide the knots inside.
4. Let any adhesive cure and check that the card stands comfortably. Choose an envelope or mailer that accommodates its thickness.
12. Felt Heart Button Keychains
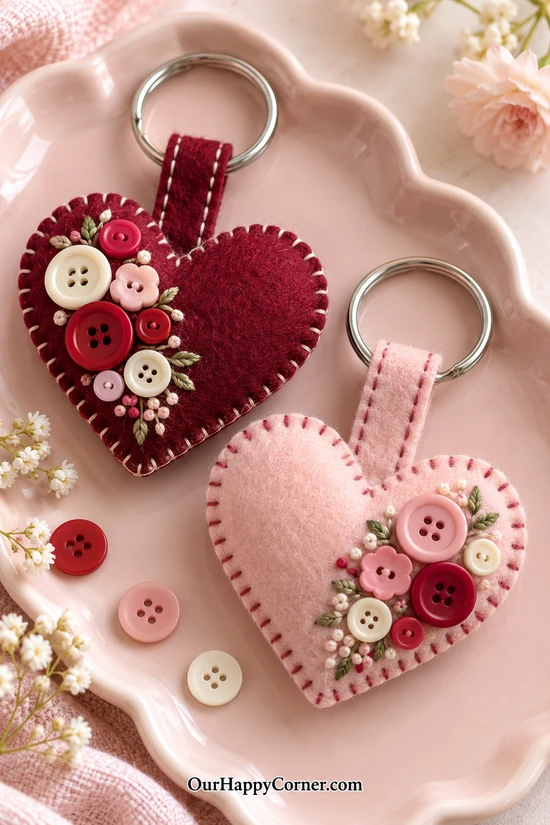
A felt heart keychain is small enough to make in batches and personal enough to give as a gift. Burgundy and blush versions look lovely with ivory button accents.
Keep the decoration to one side so the heart remains easy to recognize. A few simple leaf stitches add texture around the buttons.
The attachment loop needs to be strong because it carries the everyday pulling force. Make the finish on both sides neat before adding a display tag.
What you’ll need: Felt, heart template, buttons, embroidery floss, needle, a little fiberfill, a sturdy fabric loop, and split keyring.
How to make it:
1. Cut two matching felt hearts. Sew the button cluster and optional leaf stitches onto the front piece.
2. Fold a sturdy fabric strip through the keyring to create a loop. Stitch its ends firmly to the inside of the back heart near the top.
3. Place the hearts together and blanket-stitch around the edges. Leave a small opening and add a light amount of fiberfill.
4. Close the opening and reinforce the stitches around the loop. Tug the loop gently and check that the keyring is fully closed.
13. Lavender Button Sachets
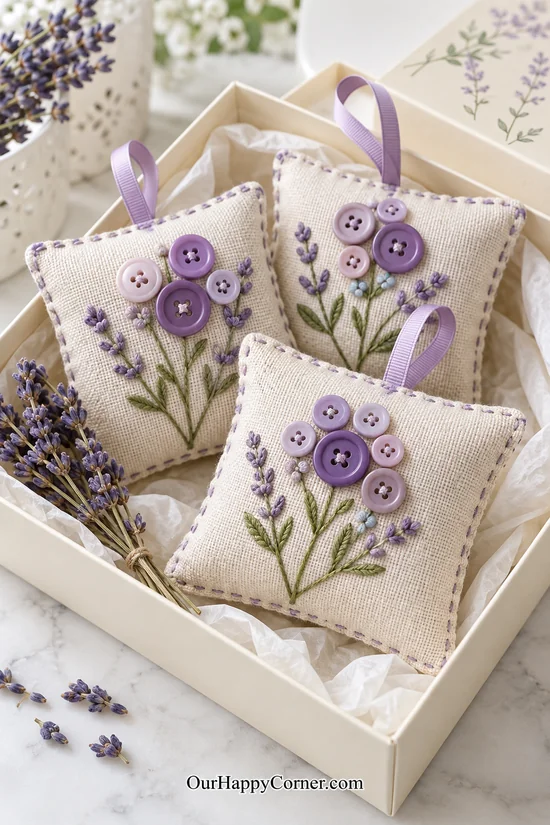
Linen sachets pair soft purple buttons with a familiar lavender scent. They make attractive little additions to a drawer or gift basket.
A few flower stems are enough to decorate the front. Keep the embroidery away from the seams so it stays visible after the pouch is filled.
Dried lavender should be enclosed in an inner pouch so loose pieces do not escape through the linen. Label the filling clearly when packaging a set.
What you’ll need: Linen, buttons, embroidery floss, cotton fabric for an inner pouch, dried lavender, ribbon, needle, and thread.
How to make it:
1. Cut two linen squares with seam allowances. Decorate one with sewn button flowers and simple embroidered stems.
2. Make a small tightly woven cotton pouch, fill it lightly with dried lavender, and stitch it closed. Keep the filling dry.
3. Sew the linen squares together with right sides facing, catching a ribbon loop in the top seam and leaving a turning opening. Turn the outer pouch right side out.
4. Slip the inner lavender pouch inside and hand-stitch the opening closed. Add a contents label and package the sachet for dry storage.
14. Button Flower Canvas Tote
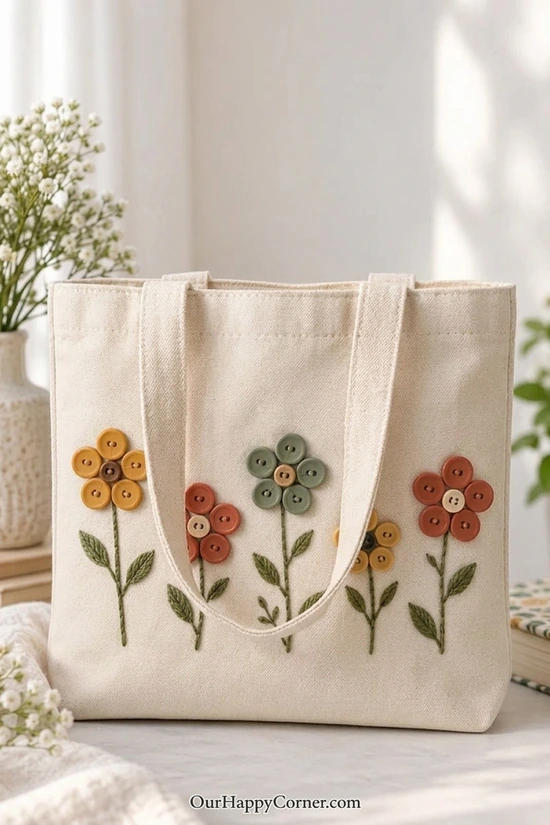
A row of button flowers turns a plain canvas tote into a pretty everyday accessory. Mustard, terracotta, and sage give the design a warm, coordinated palette.
The flowers sit low on the front, leaving the upper part of the bag uncluttered. Simple embroidered leaves connect the button clusters without requiring an elaborate pattern.
Start with a ready-made tote if you want to focus on decorating. Firm stitching and a tidy interior matter as much as the appearance of the front.
What you’ll need: Plain canvas tote, buttons, embroidery floss, strong sewing thread, needle, and removable fabric marker.
How to make it:
1. Mark five flower positions across the lower front of the tote. Slip a barrier inside while marking so the design remains on one side only.
2. Embroider the stems and leaves through the front panel, keeping the back of the tote clear. Use short stitches that lie flat.
3. Sew the button petals and centers firmly in place. Secure each flower independently so one loose thread cannot release the whole design.
4. Remove the markings according to the marker instructions. Check the interior for loose ends and give care guidance appropriate to the bag and embellishments.
15. Button-Embellished Notebook
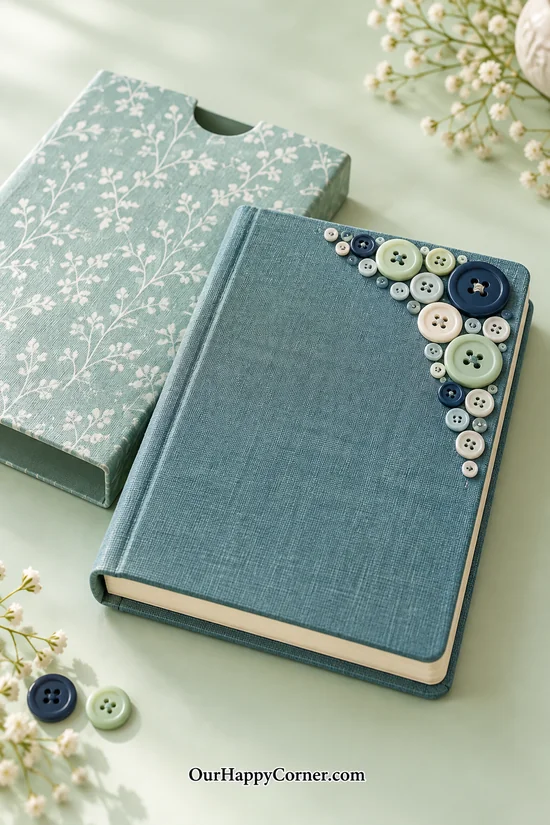
A curved button border gives a linen-covered notebook a distinctive finishing touch. Teal, navy, and ivory create a calm palette that feels grown-up.
Keeping the decoration near one corner leaves most of the cover clear. It also lets the fabric texture remain part of the design.
Choose a sturdy notebook with a cover that opens smoothly. A matching paper sleeve turns it into an easy-to-present stationery gift.
What you’ll need: Fabric-covered notebook, assorted flat buttons, thread for decorative holes, and adhesive suitable for the cover and buttons.
How to make it:
1. Arrange a crescent of buttons near the upper outside corner of the closed notebook. Keep the design away from the spine and cover edges.
2. Add a few thread stitches through button holes if you want that sewn appearance. Tie the knots flat behind each button.
3. Attach the buttons to the cover with compatible adhesive. Use small amounts so it does not seep through or stain the fabric.
4. Let the notebook cure flat and check that it opens fully. Package it with padding around the raised decoration rather than stacking heavy items on top.
For another decorative project with a similar personal feel, explore our mirror painting ideas. A small painted mirror can sit beside the notebook in a coordinated dressing-area gift set.
16. Button Flower Gift Tags
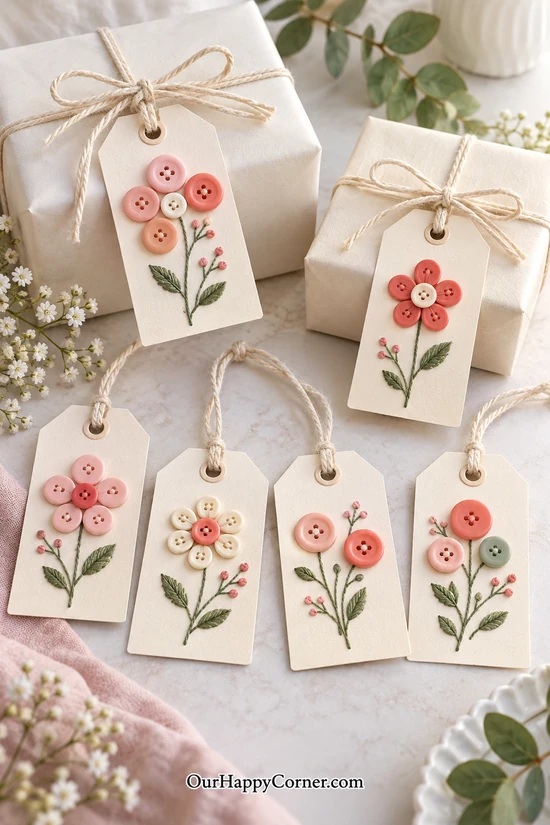
Button flowers give gift tags a little more presence than a printed design. Blush and coral details stand out against cream cardstock and simple wrapping.
Vary the flowers across the set so each tag feels individual. One large bloom, a pair of stems, and a small bouquet all work within the same palette.
Leave the reverse available for a message. Coordinated sets are easy to bundle with string and a protective backing card.
What you’ll need: Heavy cardstock tags, buttons, embroidery floss, needle, piercing tool, hole punch, cotton string, and suitable adhesive.
How to make it:
1. Cut matching tags and punch a hanging hole near the top of each. Plan a small flower design with room around the edges.
2. Pierce the stems and leaf lines, then stitch them with floss. Attach the buttons at the flower heads.
3. Cover the reverse with a second plain cardstock tag to hide knots and provide a writable surface. Keep the hanging holes aligned.
4. Thread cotton string through each tag and allow any adhesive to cure. Group the finished tags into a set with enough space to protect the buttons.
17. Linen Button Napkin Rings
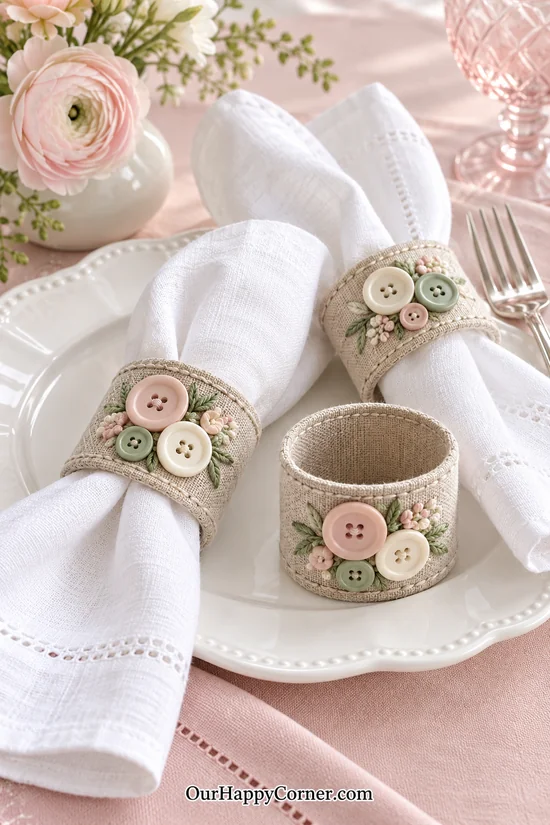
Linen rings with small button clusters bring a handmade detail to a place setting. Blush, sage, and ivory feel soft enough for everyday entertaining.
Keep the cluster compact so it sits comfortably on the front of the napkin. A little embroidered greenery adds interest without spreading across the entire ring.
Matching sets of four or six make this idea easy to present as table decor. Keep the opening size consistent so all the napkins sit similarly.
What you’ll need: Linen, stiff sew-in interfacing, buttons, embroidery thread, sewing thread, needle, and scissors.
How to make it:
1. Cut linen rectangles to form rings about two inches wide, allowing for seams. Add interfacing to help the fabric hold its shape.
2. Decorate the front center with sewn buttons and a few leaf stitches. Keep the seam allowances undecorated.
3. Sew the long edges together with right sides facing, then turn the strip right side out. Fold the ends inward and join them into a ring with a secure seam.
4. Insert a folded napkin to check the opening and shape. Make the remaining rings to the same dimensions and provide suitable spot-cleaning guidance.
18. Button-Trimmed Pincushion
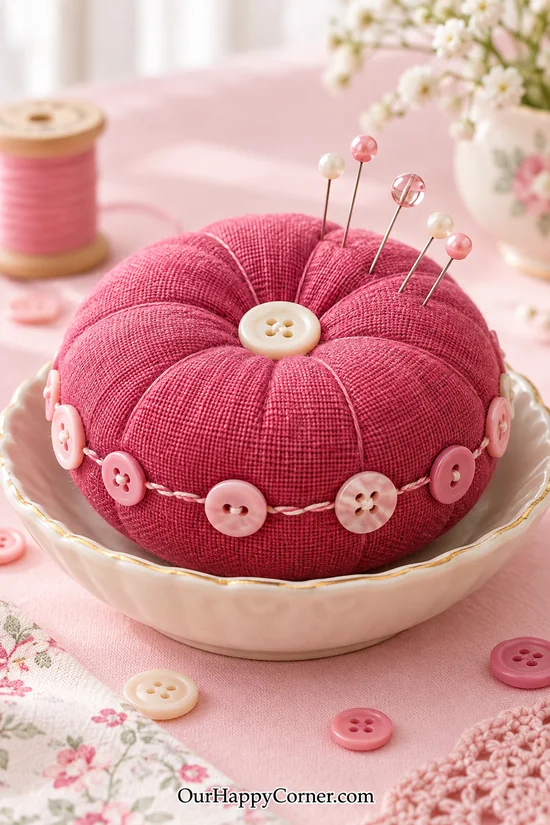
A raspberry pincushion makes a cheerful gift for someone who enjoys sewing. The center button creates a soft tuft, while smaller buttons decorate the sides.
Leave the upper fabric areas available for pins. The side trim supplies detail without crowding the working surface.
Firm stuffing helps the pincushion hold its rounded shape. Pair it with a shallow saucer as styling, or sell the cushion on its own with its dimensions listed.
What you’ll need: Linen or tightly woven cotton, fiberfill, strong thread, needle, one center button, and small side buttons.
How to make it:
1. Cut two matching fabric circles and sew them together with right sides facing, leaving an opening. Turn the cushion right side out.
2. Fill it firmly with fiberfill and stitch the opening closed. Keep the filling evenly distributed around the edge.
3. Use strong thread to make several evenly spaced wraps from the center around the sides, creating soft segments. Secure an ivory button over the center stitches.
4. Sew small decorative buttons around the side, keeping the top sections clear. Check that all knots are secure before adding pins for presentation.
19. Button Flower Zipper Pouch
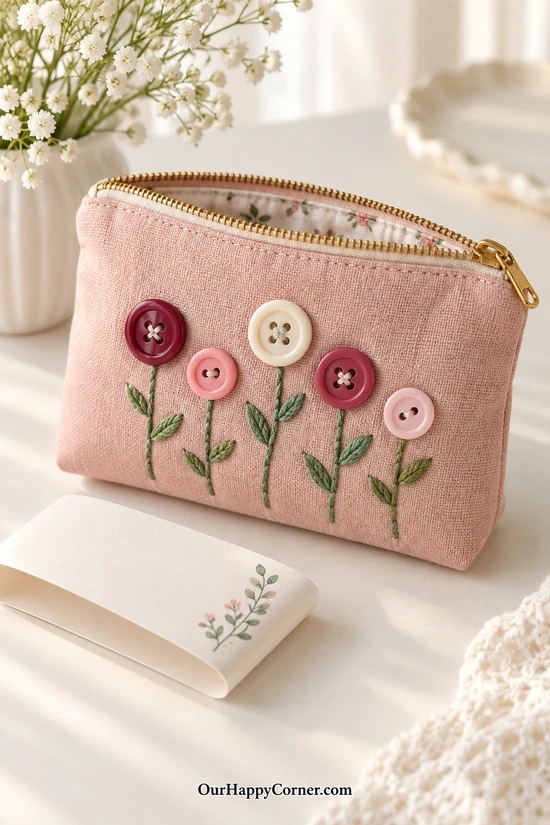
A blush zipper pouch gives button flowers a useful home. Burgundy and ivory blooms add contrast while the simple stems keep the arrangement light.
The buttons stay below the zipper so they do not interfere with opening the pouch. A small lining print adds another thoughtful detail.
Decorating a ready-made pouch keeps this project approachable. Use a design that leaves room for the pouch to flex during normal use.
What you’ll need: Plain fabric zipper pouch, buttons, embroidery floss, sewing needle, thread, and removable fabric marker.
How to make it:
1. Mark five flower positions on the front below the zipper. Check that the design remains away from the side seams.
2. If the pouch is lined, open a short section of the lining seam to access the outer fabric. Embroider stems and leaves through the front fabric only.
3. Sew each button securely onto the outer fabric. Keep knots small and ensure no thread catches the zipper or opposite side.
4. Close the lining opening neatly and remove the fabric marks. Open and close the zipper, then package the pouch with the button front protected.
20. Linked Button Chain Belt
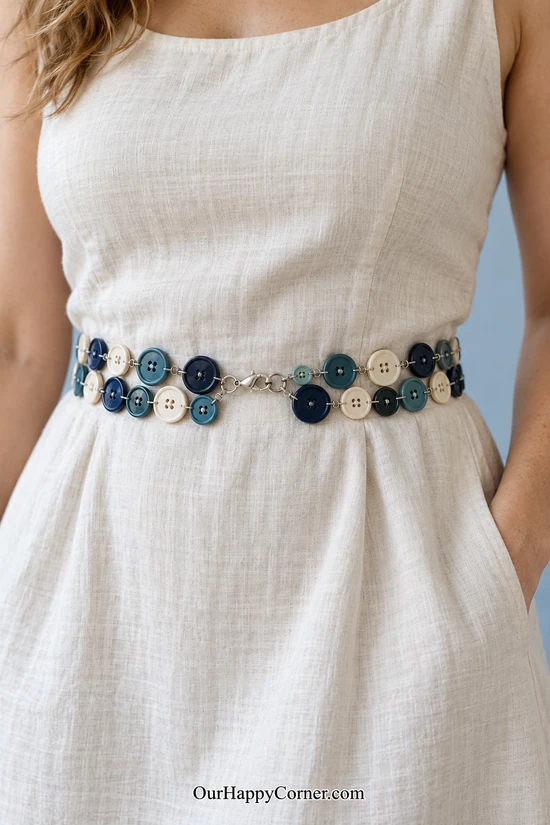
An openwork chain belt lets the buttons become the accessory itself. Navy, teal, and ivory pieces sit against the dress with no fabric belt beneath them.
Small wire links connect the buttons, and a clasp brings the ends together. Treat it as a decorative waist accessory rather than a belt intended to hold up pants.
This is the most detailed jewelry-style project in the collection. Make a short sample first so you can establish comfortable spacing and smooth connections.
What you’ll need: Sturdy flat buttons, flexible jewelry wire that fits their holes, round-nose and chain-nose pliers, flush cutters, connector rings, and a lobster clasp.
How to make it:
1. Measure the waist over the intended outfit and plan two rows of buttons, allowing for the clasp. Lay the rows flat and distribute colors before making connections.
2. Form short wire links between neighboring buttons, threading each wire through a button hole and closing it with a wrapped loop. Keep the wire tails trimmed and tucked away from the skin.
3. Connect the two rows at intervals with additional smooth wire links, allowing the buttons to move. Join the row ends to connector rings and attach the clasp and its receiving ring.
4. Try the belt over the dress and check its curve, movement, and closure. Adjust links that twist or snag, and inspect every connection before packaging.
Final Thoughts
The nicest button crafts combine a clear design with details that hold up to everyday handling. Start with one project you enjoy, refine the finish, and build a small collection around the colors and materials you love.
Whether you choose personalized art, useful accessories, or little gift sets, take your time with the sample and price the finished work thoughtfully. A consistent, well-made collection gives your handmade shop a lovely place to begin.