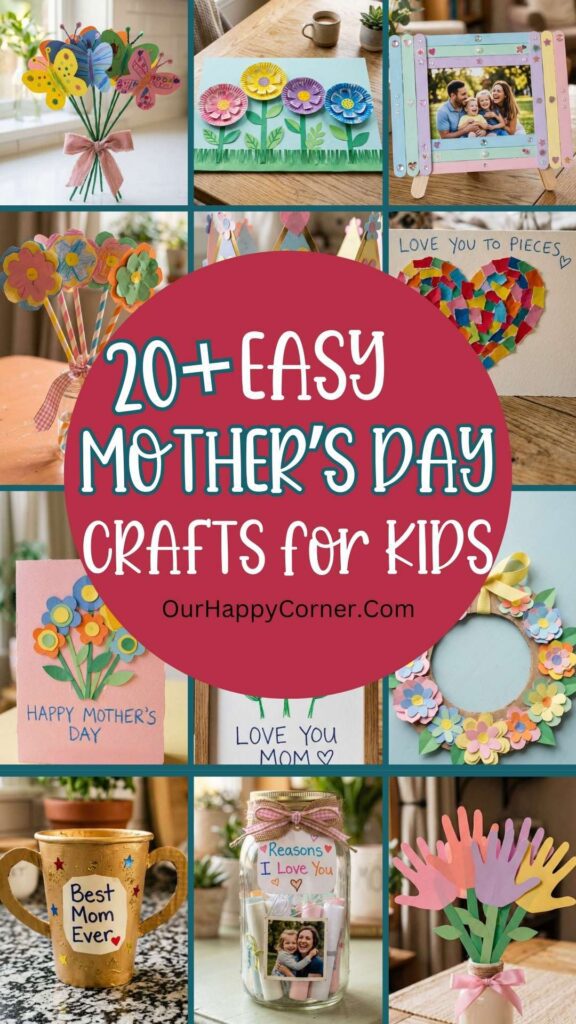
Looking for fun Mother’s Day crafts for kids you can do with your little one’s?
Every year, without fail, the gift that gets me is never the one from a store.
It’s the card with the backwards letters. The painted rock that somehow made it home in one piece. The little jar stuffed full of reasons why I’m loved, written in crayon by a hand that still hasn’t quite figured out how to hold a pencil properly.
Those are the things I photograph, frame, and keep in a box that I’ll probably ugly-cry over when my kids are teenagers.
If you’re looking for Mother’s Day crafts that your kids can actually make you’re in exactly the right place. I’ve put together my favorites: crafts that are genuinely doable, use supplies you mostly already have at home, and result in something Mom will truly want to keep.
The instructions you’ll find here are the real deal, no vague “decorate as desired” steps that leave you staring blankly at a pile of pipe cleaners.
Some of these are quick enough for a rainy afternoon. Others make a gorgeous gift when you spend a little more time on them. All of them are made better by the fact that a child made them.
Mother’s Day Crafts for Kids
Handprint Flower Bouquet
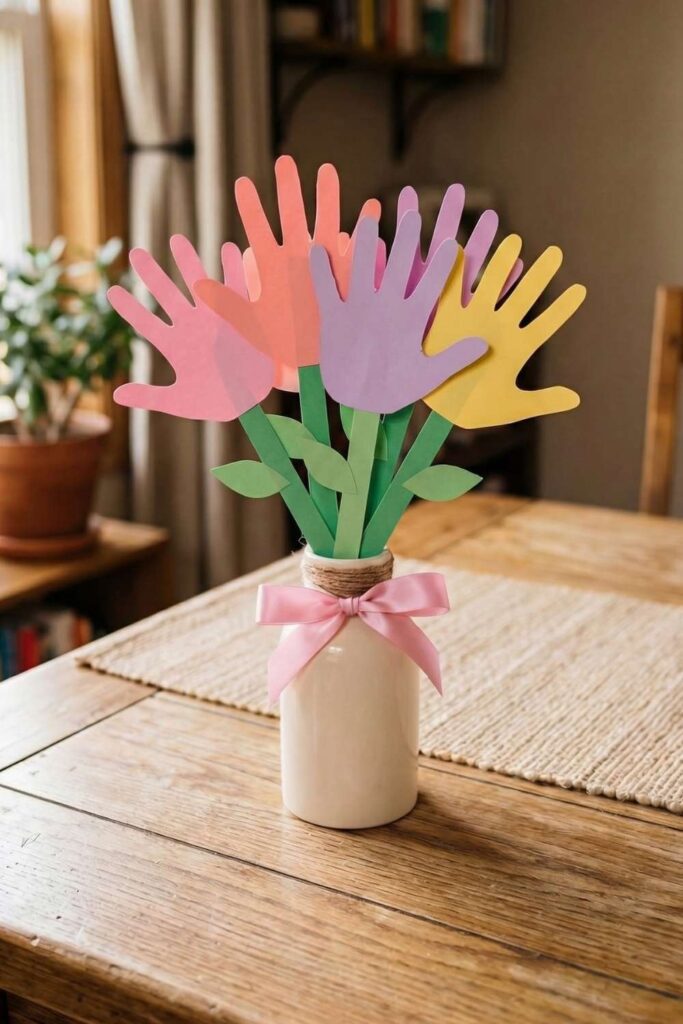
There’s a reason handprint crafts are a Mother’s Day classic. They capture a moment in time that passes so quickly.
This handprint flower bouquet is one of those gifts moms tuck away and pull out years later, marveling at how small those hands once were.
The flowers are simply traced handprints cut out in pastel colors, mounted on green paper stems with little leaf accents. Gathered together in a small ceramic vase tied with a pink ribbon, this bouquet looks every bit as charming as fresh flowers, and it lasts forever.
How to make it:
Step 1 – Trace and cut the handprints. Have your child place their hand flat on a piece of colored paper and trace around it. Cut out the handprint shape. Repeat with different colors, you’ll want at least 4 to 5 “flowers.”
Step 2 – Make the stems. Cut long, narrow strips of green paper for the stems. For a fuller look, make the stems slightly different heights so the bouquet has natural variation.
Step 3 – Add leaves. Cut simple leaf shapes from green paper and glue them onto the stems at an angle.
Step 4 – Assemble the flowers. Glue or tape each handprint to the top of a stem. The fingers point upward like petals. No additional shaping needed.
Step 5 – Arrange the bouquet. Gather the stems together and place them inside a small jar or vase. Wrap the vase with twine and tie a ribbon bow around it for a finished, gift-ready look.
Paper Plate Flower Garden
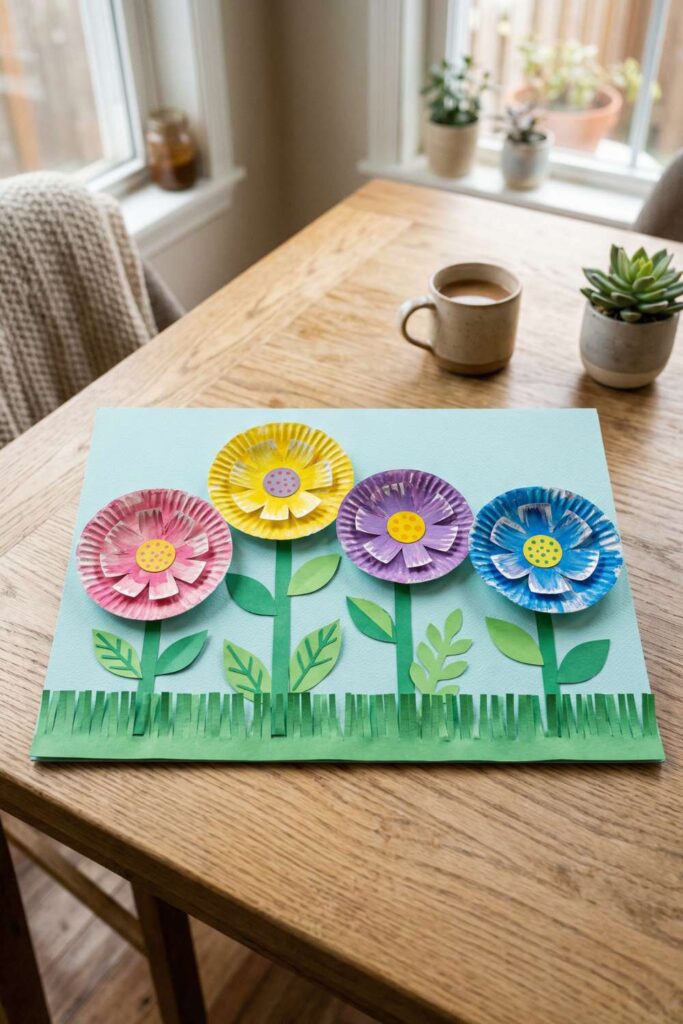
Mother’s Day crafts that turn humble paper plates into a vibrant flower garden scene.
It’s one of those projects that looks impressively detailed without being too complicated for kids to put together. The layered look, with painted plates, paper stems, cut-out leaves, and fringed grass, gives it a real wow factor.
How to make it:
Step 1 – Paint the plates. Let kids paint each paper plate a different flower color. A second coat gives a richer finish. Set aside to dry completely.
Step 2 – Add petals. Once dry, cut small “V” shapes or petal slits around the outer edge of each plate. Gently bend the petals outward slightly to give the flowers dimension.
Step 3 – Make the flower centers. Cut small circles from yellow or orange cardstock and decorate them with dots using a contrasting color of paint. Glue one circle to the center of each plate.
Step 4 – Create the stems and leaves. Cut long strips of green cardstock for stems. Cut leaf shapes and score them lightly down the middle so they bend slightly for a realistic look.
Step 5 – Make the grass. Cut a strip of green paper and fringe the top by cutting small slits partway up. This will sit along the bottom of the background like a lawn.
Step 6 – Assemble the scene. Glue the grass strip along the bottom of your blue background. Attach the stems above the grass, and glue the leaves onto the stems. Finally, glue the flower plate heads at the top of each stem. Arrange the flowers at slightly different heights for a natural, garden look.
Fingerprint Butterfly Card
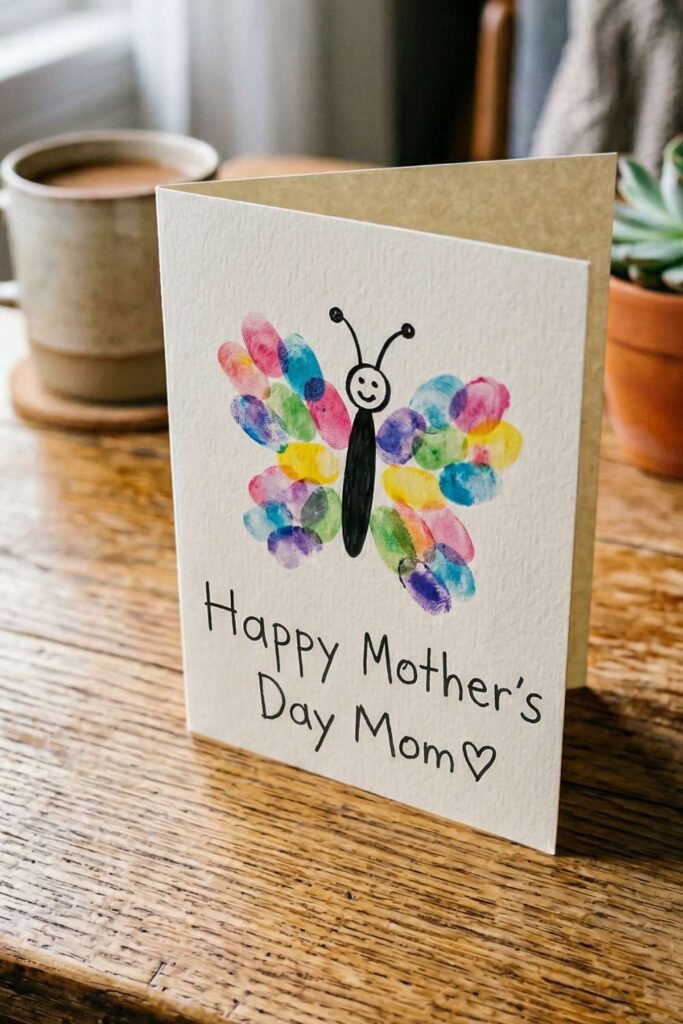
This fingerprint butterfly card is one of my absolute favorites because it looks like a proper piece of art and yet it’s entirely made from little fingertips dipped in paint.
The rainbow of fingerprints creates the most beautiful, speckled butterfly wings, and the handwritten message makes it personal every single time.
How to make it:
Step 1 – Set up your paint stations. Squeeze small amounts of different paint colors onto a paper plate. Have your child wash their finger between colors or use a different finger for each.
Step 2 – Create the wings. Draw or lightly pencil the outline of two butterfly wings on the card, a larger upper pair and a smaller lower pair. Your child then fills the wings entirely with fingerprints, pressing and overlapping different colors to create a vibrant, layered effect. The more colors, the better.
Step 3 – Let it dry completely. This is important, wet fingerprints smear easily.
Step 4 – Draw the butterfly body. Once dry, use a fine black marker to draw an oval body down the center of the wings and two curving antennae with small dots at the tips. Add a simple smiley face to the body.
Step 5 – Add the message. Write “Happy Mother’s Day Mom” or let older kids write it themselves below the butterfly. Add a small heart for a finishing touch.
Torn Paper Heart Card
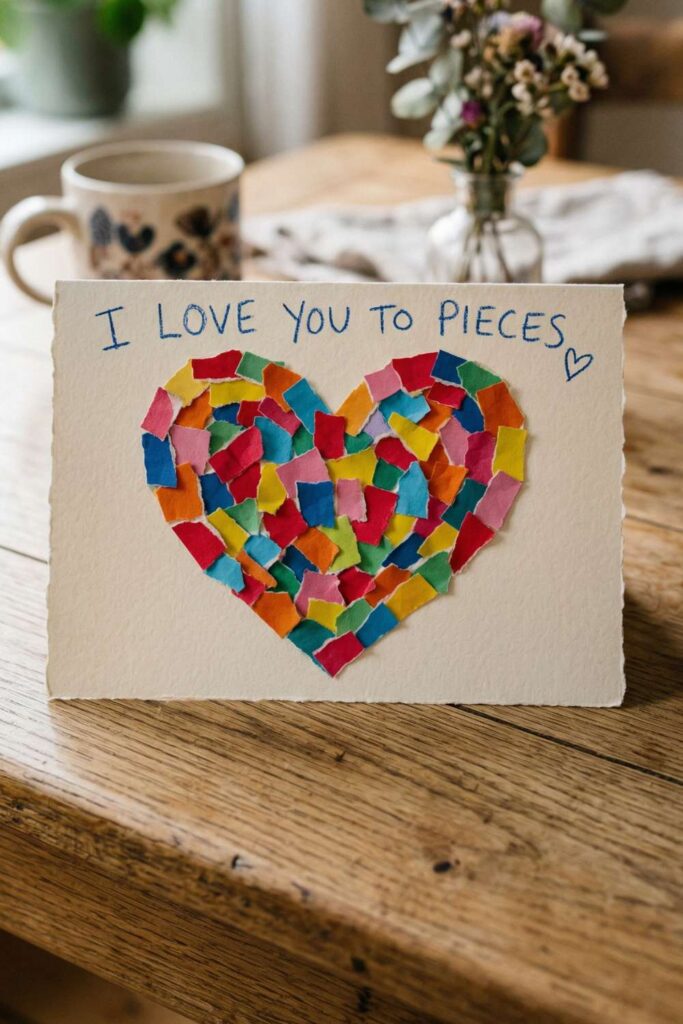
For Mother’s Day crafts that are both fun and meaningful and the wordplay is just perfect.
Kids tear small pieces of colorful paper and fill in a heart shape, and the finished result looks like a beautiful mosaic.
It’s a lovely activity for even the youngest crafters, since no scissors are needed for the heart filling.
How to make it:
Step 1 – Draw the heart. Lightly pencil a large heart shape onto the center of the cardstock. It doesn’t need to be perfect, rustic is charming.
Step 2 – Tear the paper pieces. Let kids tear small, irregular pieces of colorful paper in lots of different colors. Aim for pieces roughly the size of a thumbnail small enough to fill the heart densely, but not so tiny they’re frustrating to handle.
Step 3 – Fill in the heart. Have your child glue the torn pieces inside the heart outline, overlapping them slightly as they go. The goal is to fill the entire heart with no white gaps showing through. The messier and more colorful, the better.
Step 4 – Let it dry. Give the glue time to set fully before moving the card.
Step 5 – Write the message. Using a marker, write “I Love You to Pieces” above or beside the heart. Add a small hand-drawn heart with an open outline for a sweet finishing touch just like in the photo.
Popsicle Stick Picture Frame
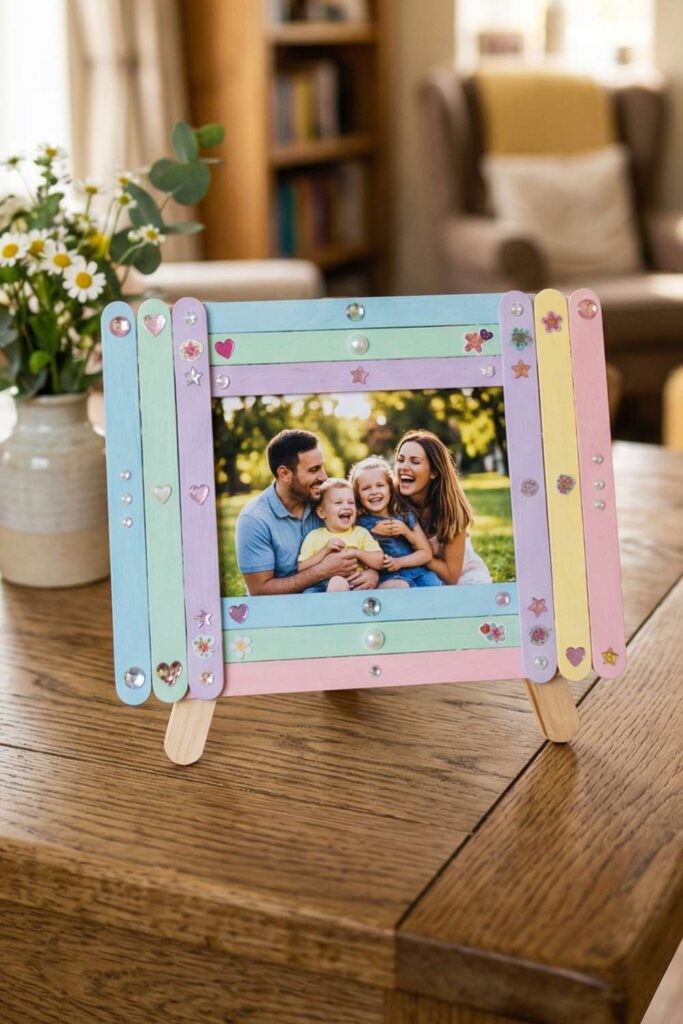
A handmade frame is one of the most timeless gifts a child can give and this popsicle stick version, decorated in soft pastel colors with gems and stickers, is genuinely beautiful.
It stands up on its own, which makes it easy to display on a dresser or desk without needing a wall hook.
How to make it:
Step 1 – Paint the sticks. Paint the popsicle sticks in various pastel colors and let them dry completely. You can do alternating colors or a rainbow progression, both look great.
Step 2 – Build the frame. Lay the sticks horizontally, side by side, until you have a square or rectangular shape large enough to frame your photo. Glue them together by placing two sticks vertically across the back (top and bottom), and pressing the horizontal sticks down firmly. Let this dry completely.
Step 3 – Decorate. Press gem stickers, foam heart and flower stickers, and pearl accents onto the front of the frame. Scatter them evenly so the decoration feels balanced.
Step 4 – Attach the photo. Trim your photo to fit the front of the frame and glue it to the back, centering it so it shows through from the front.
Step 5 – Make the easel stand. Glue two popsicle sticks in a V-shape to the back of the frame, angled outward at the bottom and a third stick that balances it just like frames. These act as legs so the frame stands upright.
Cupcake Liner Flowers
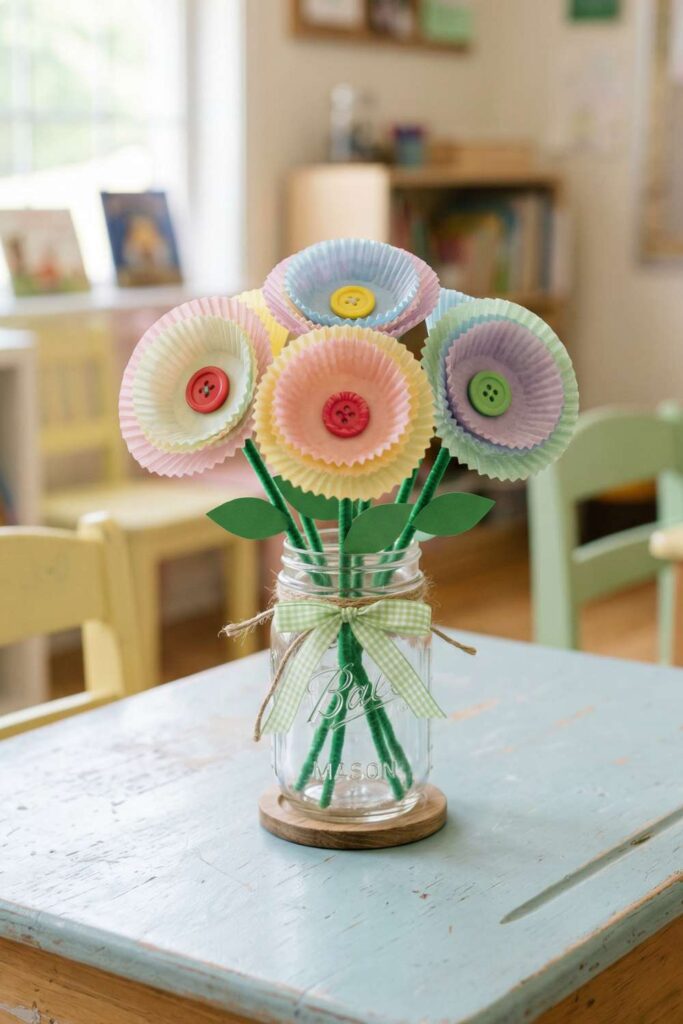
If you’ve got a pack of pastel cupcake liners in your baking drawer, you’re already halfway to this craft.
These cupcake liner flowers look incredibly sweet gathered into a little mason jar bouquet and the button centers give them such a charming, handmade quality.
How to make it:
Step 1 – Layer the cupcake liners. Stack two or three cupcake liners in different sizes on top of each other in the same or complementary colors for each flower. This layering gives the flowers a full, ruffled look.
Step 2 – Attach the button center. Glue a large colorful button to the center of the top liner. Let it dry.
Step 3 – Make the stems. Twist a green pipe cleaner through the base of the layered liners and fold the end back up to secure it. The pipe cleaner acts as the stem.
Step 4 – Add leaves. Cut simple leaf shapes from green cardstock or foam. Pinch the base of each leaf and twist it around the pipe cleaner stem, securing with a dab of glue.
Step 5 – Arrange the bouquet. Place the finished flowers into a mason jar. Wrap twine around the jar neck and tie a gingham or satin ribbon bow for a polished, gift-ready look.
Salt Dough Heart Keepsake
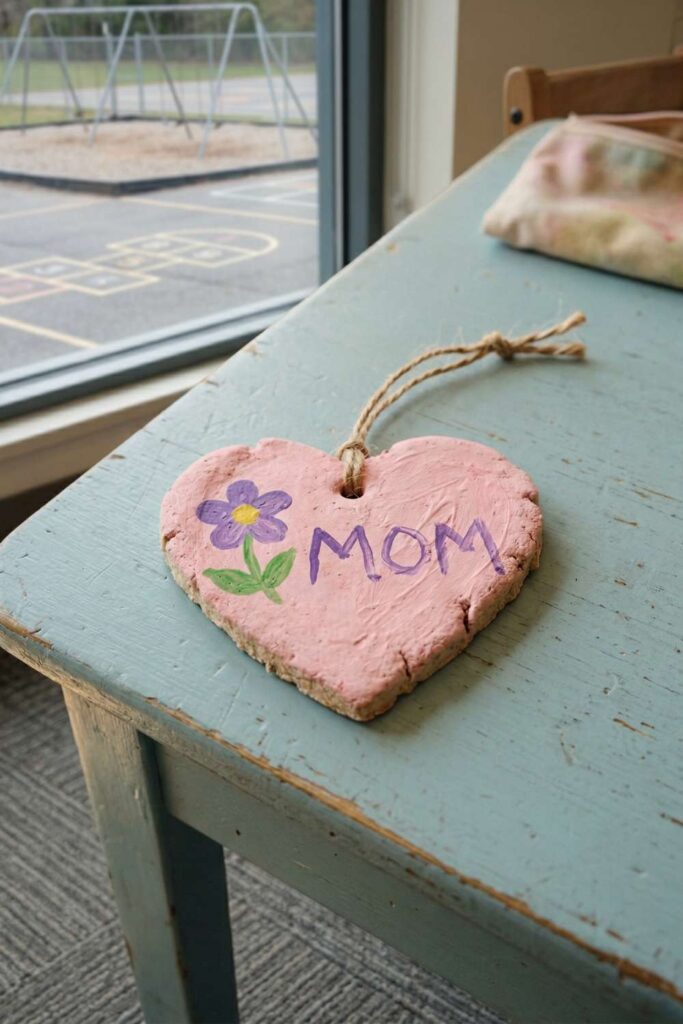
Salt dough Mother’s Day crafts are one of those things that never go out of style and for good reason. They last for years, they’re incredibly satisfying to make, and there’s something about a hand-painted ornament that feels genuinely precious.
This sweet pink heart painted with a flower and the word “MOM” is exactly the kind of gift that ends up hanging somewhere special for a very long time.
How to make it:
Step 1 – Make the dough. Mix the flour and salt together in a bowl, then gradually add the water and stir until a smooth dough forms. Knead it for a few minutes until it’s no longer sticky.
Step 2 – Roll and cut. Roll the dough out to about 1cm thickness on a lightly floured surface. Use a cookie cutter or hand-cut a heart shape. Smooth the edges with damp fingers.
Step 3 – Make the hanging hole. Before baking, use a straw or skewer to poke a hole near the top of the heart. This is easy to forget — don’t skip it!
Step 4 – Bake. Place the heart on a lined baking tray and bake at 200°F for 2–3 hours, or until completely hard and dry. Thicker pieces take longer. Allow to cool completely.
Step 5 – Paint the base. Paint the entire heart pink (or your child’s color of choice). Let it dry, then apply a second coat for an even finish.
Step 6 – Decorate. Let your child paint a simple flower on one side and write “MOM” beside it. Even if the lettering is wobbly, it’s perfect, that’s the whole point.
Step 7 – Seal and hang. Once completely dry, brush on a coat of clear varnish or Mod Podge to protect the paint. Thread a length of twine through the hole and knot it for hanging.
Painted Flower Pot
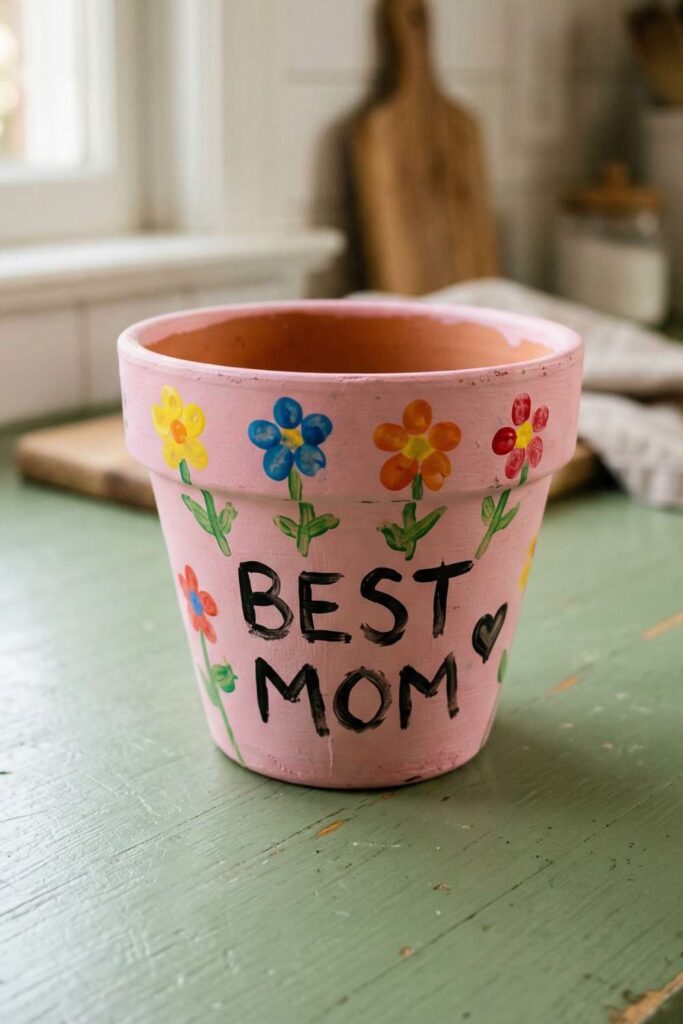
If Mom loves plants or herbs, this painted flower pot is the perfect gift, something she can actually use, decorated entirely by the child who loves her.
This cheerful pink pot is painted with bright little fingerprint flowers and the words “BEST MOM,” and it makes a wonderful home for a small succulent, herb, or flowering plant.
How to make it:
Step 1 – Apply the base coat. Paint the entire outside of the pot with a bright base color, pink works beautifully. Let it dry, then apply a second coat. Allow to dry fully.
Step 2 – Paint the stems. Using a fine brush and green paint, paint thin vertical stems evenly spaced around the pot.
Step 3 – Add fingerprint flowers. Dip a finger or cotton swab into a bright paint color and press five dots in a circle at the top of each stem to form petals. Use a different color for each flower. Allow each color to dry slightly before adding the next.
Step 4 – Add flower centers. Dip a fingertip or the end of a pencil eraser into a contrasting color and press a single dot into the center of each flower cluster.
Step 5 – Write the message. Once all the flowers are dry, use a fine brush or black marker to write “BEST MOM” (or any loving message) in large letters on the pot. Add a small heart for a finishing touch.
Step 6 – Seal the pot. Apply a coat of clear varnish or Mod Podge over the entire painted surface to protect it from watering and outdoor use.
Mother’s Day Crown
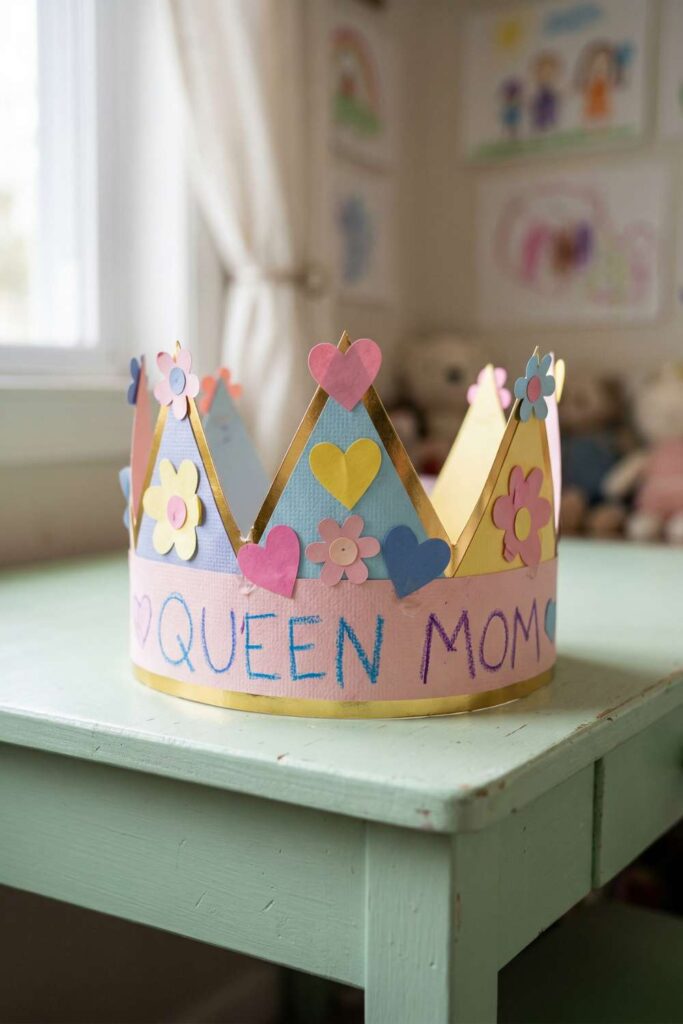
Every mom deserves to feel like royalty on Mother’s Day and this gorgeous paper crown makes that happen in the most charming way.
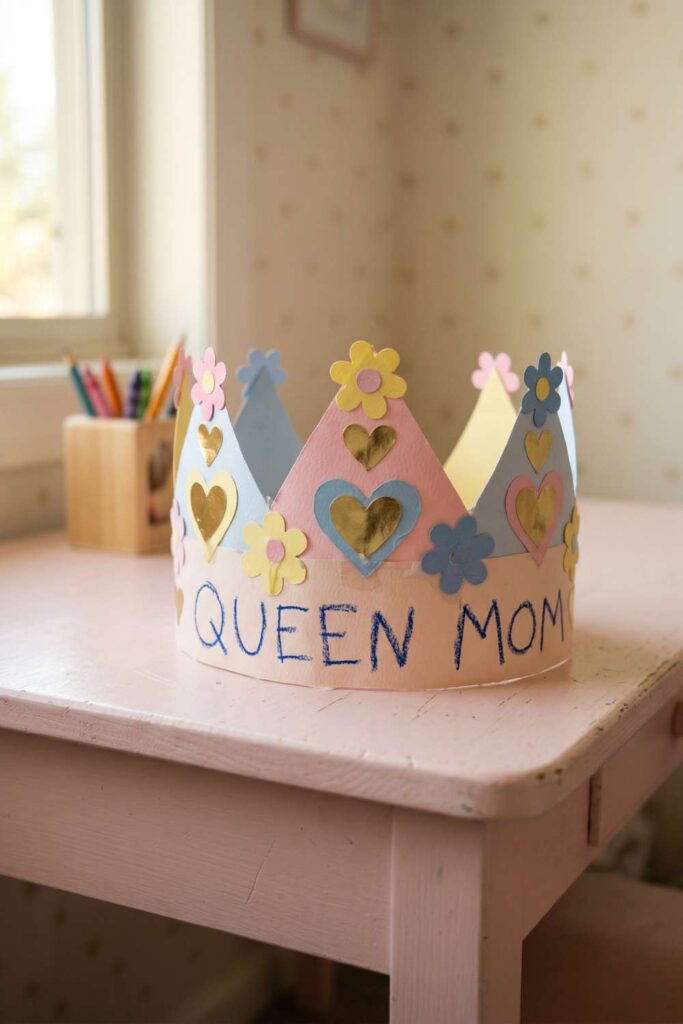
What I love about this version is how much detail the kids can pour into it: the gold-edged points, the layered paper hearts and flowers, and “QUEEN MOM” written across the band in crayon. It’s over-the-top in the best possible way.
How to make it:
Step 1 – Cut the crown band. Cut a long strip of pink cardstock approximately 6–7cm wide and long enough to fit around an adult’s head (roughly 55–60cm). This is the base of the crown.
Step 2 – Add the gold trim. Run a strip of gold cardstock or gold washi tape along the bottom edge of the band for a regal finishing touch.
Step 3 – Cut and attach the crown points. Cut large triangular points from blue or grey cardstock. Edge each triangle with a strip of gold cardstock or gold tape along the two diagonal sides. Glue the points along the top of the pink band, evenly spaced.
Step 4 – Make the paper hearts and flowers. Cut hearts in various sizes from pastel paper. For the flowers, cut a simple daisy shape and glue a small circle to the center. Let kids make as many as they like, the more the better.
Step 5 – Decorate the crown. Glue hearts and flowers onto the triangular points and along the band. Layer different sizes for a full, decorative look.
Step 6 – Write the message. Using crayons or markers, have your child write “QUEEN MOM” (with little hearts on either side) along the pink band.
Step 7 – Size and close. Wrap the crown around Mom’s head to size it, then staple or tape the ends together at the back.
Button Flower Art
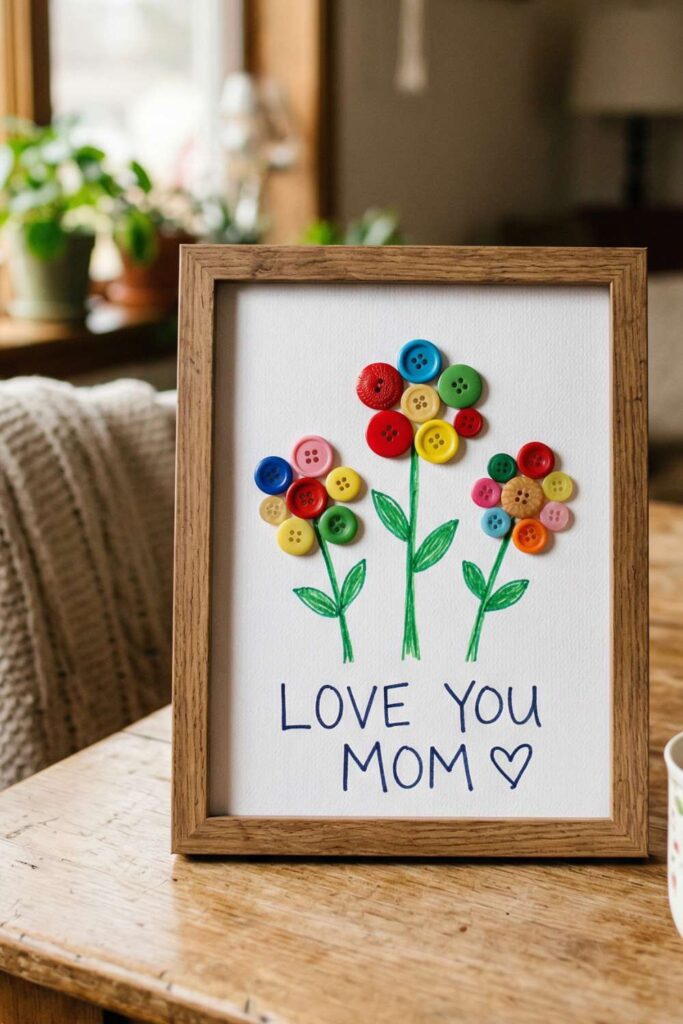
Mother’s Day crafts that look like they belongs in a boutique gift shop framed, displayed, and genuinely beautiful.
Three cheerful button flowers in a rainbow of colors, with green marker stems and leaves, and “LOVE YOU MOM” written below. It’s simple, sweet, and something Mom will actually want to hang on her wall.
How to make it:
Step 1 – Draw the stems and leaves. Using a green marker or fine brush with green paint, draw three flower stems of slightly different heights in the center of the paper. Add two or three pointed leaves branching off each stem.
Step 2 – Plan the flower heads. At the top of each stem, help your child arrange buttons into a flower shape before gluing — one large button in the center surrounded by medium buttons as petals, with smaller buttons filling any gaps. Mix colors freely for a vibrant look.
Step 3 – Glue the buttons. Once happy with the arrangement, glue each button in place. Start with the outer “petal” buttons, then finish with the center button on top. Press firmly and allow to dry completely, this takes longer than you’d expect with craft glue, so patience is key.
Step 4 – Write the message. Below the flowers, write “LOVE YOU MOM ♡” in large, friendly letters using a dark marker.
Step 5 – Frame it. Slip the artwork into a frame for a finished, gift-worthy presentation.
Paper Straw Flower Bouquet
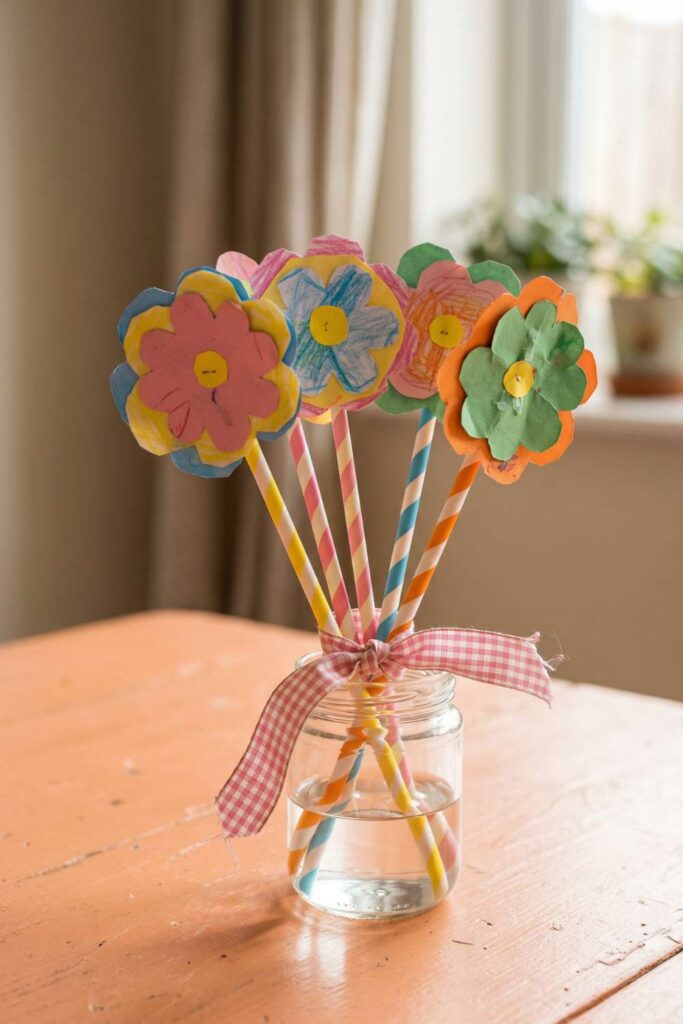
This Mother’s Day crafts is such a fun one for kids to make every flower is a little different, layered with two different-colored paper petals and a button center, and the striped paper straws make the most cheerful stems.
Bundled together with a gingham ribbon in a little glass jar, it looks like something from a market stall.
How to make it:
Step 1 – Cut the flower shapes. For each flower, cut two petal shapes from different colored cardstock. A larger base shape and a slightly smaller top layer. A simple rounded petal flower with 5–6 petals works well. Kids can also draw and color the petals with crayons for extra texture and personality, as seen in the photo.
Step 2 – Layer and glue. Glue the smaller petal layer on top of the larger base layer, slightly offset so both layers are visible.
Step 3 – Add the button center. Glue a button to the center of each layered flower. Let dry.
Step 4 – Attach to the straw. Apply a generous blob of glue to the back of each flower and press a paper straw firmly against it. Hold in place until set. You can also poke the straw through a small hole in the center for extra security.
Step 5 – Arrange and display. Stand all the finished flowers in a small glass jar. Tie a gingham ribbon around the jar neck for a sweet finishing touch.
Painted Rock Heart
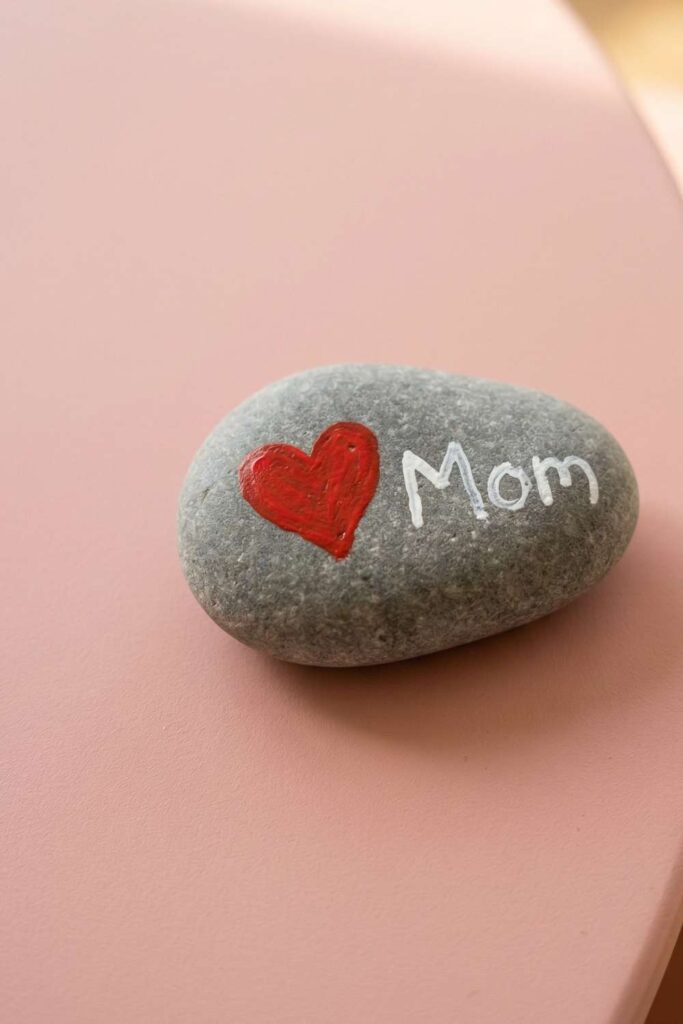
There’s something wonderfully simple about a painted rock, it takes almost nothing to make, and yet it becomes a little treasure.
This one is beautifully understated: a smooth grey stone with a bold red heart and the word “Mom” written in white. It’s the kind of gift that sits on a bedside table or windowsill indefinitely, and Mom will always know exactly who made it.
How to make it:
Step 1 – Clean and dry the stone. Give the stone a good wash and let it dry completely. Paint adheres much better to a clean surface.
Step 2 – Paint the heart. Using a medium brush and red paint, paint a bold heart shape on one side of the stone. It doesn’t need to be geometrically perfect, a hand-painted heart has its own charm. Apply a second coat once dry for a rich, solid color.
Step 3 – Write “Mom.” Once the heart is fully dry, use a fine brush and white paint to write “Mom” beside the heart in a simple, neat script. Younger kids might need a grown-up to do this part, but older kids can write it themselves.
Step 4 – Let it dry and seal. Allow the paint to dry completely, then apply a coat of clear varnish or Mod Podge to protect the design.
Paper Flower Card
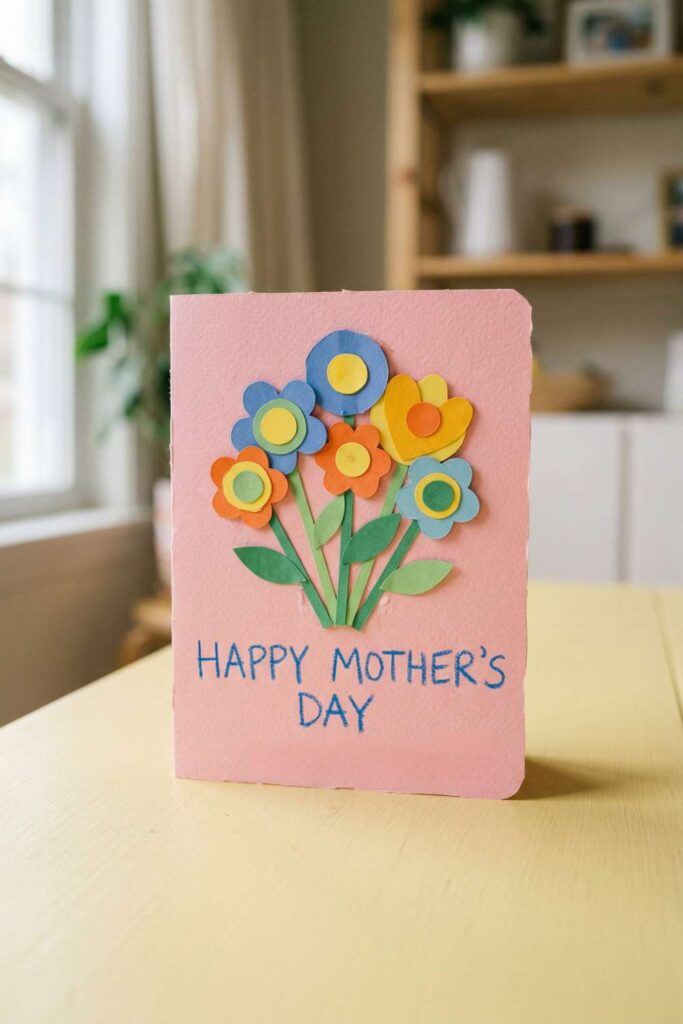
This paper flower card is one of the most beautiful in the whole collection and it’s genuinely impressive that it’s made entirely from cut paper.
The layered flowers in bold blues, oranges, and yellows pop beautifully against the pink card, and the hand-lettered message signed with the child’s name and age makes it something Mom will keep forever.
RELATED: Free Printable Mother’s Day Cards
How to make it:
Step 1 – Fold the card. Fold a piece of pink cardstock in half to create the card. Trim if needed for a neat edge.
Step 2 – Cut the flower shapes. For each flower, cut a petal shape from one color of cardstock (a rounded daisy or scalloped circle works well). Then cut a slightly smaller circle from a contrasting color for the inner ring, and an even smaller circle from a third color for the center. Stack and glue these three layers together.
Step 3 – Make the tulip/heart shape. For variety, cut one flower as a heart or tulip shape (as seen in the yellow flower in the photo) for a playful mixed-bouquet look.
Step 4 – Cut stems and leaves. Cut narrow strips of green cardstock for the stems and simple leaf shapes to branch off them.
Step 5 – Assemble the bouquet. Arrange the stems on the lower half of the card front, fanning them out slightly. Glue them down, then glue the leaves onto the stems. Finally, glue the layered flower heads at the top of each stem, overlapping slightly for a full bouquet effect.
Step 6 – Write the message. In the lower third of the card, write “Happy Mother’s Day”.
Handprint Butterfly Art

While the fingerprint butterfly card is perfect for little ones, this handprint butterfly painting is a bigger, bolder piece of wall art the kind that deserves a frame.
Two full handprints in contrasting colors form the wings, with a painted body and antennae in the middle and little decorative swirls and dots dancing around the wings. It’s vibrant, joyful, and completely unique every time.
How to make it:
Step 1 – Print the wings. Paint one hand fully in a color of your choice and press it palm-down onto the left side of the paper, fingers pointing outward. Clean the hand well, then paint it another color and press it onto the right side, mirroring the first print. The two handprints form the butterfly’s upper and lower wings.
Step 2 – Paint the body. Down the center between the two handprints, paint a long oval body using bold paint with a bright stripe down the middle. Add a round head at the top.
Step 3 – Add the face and antennae. Paint two small black eyes on the head. Using black paint and a fine brush, paint two curving antennae arching upward from the head, with small orange dots at the tips.
Step 4 – Add decorative details. Using a fine brush, paint small colored dots, swirls, and dashes scattered across the wings reds, greens, and oranges work well. These little details bring the butterfly to life.
Step 5 – Let it dry completely. Lay flat to dry before framing or gifting.
DIY Photo Jar
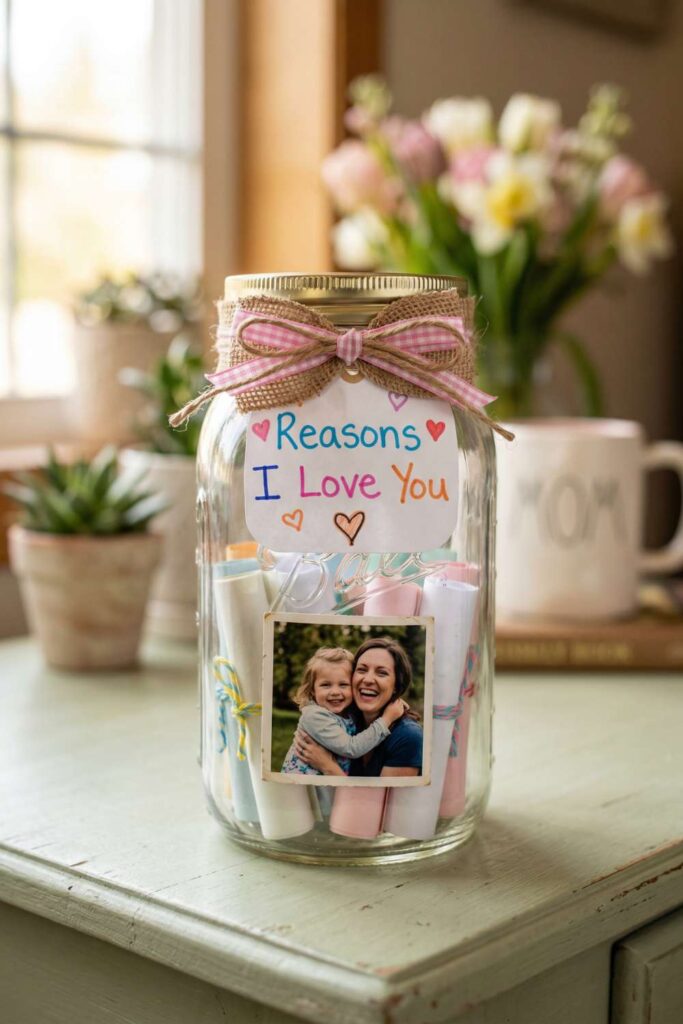
This one is simply Mother’s Day crafts that keep record of mom’s greatness but because of what goes inside it.
A mason jar filled with rolled-up notes, each one listing a reason the child loves their mom, with a photo tucked in and a sweet handmade tag on the outside. It’s the gift that keeps giving long after Mother’s Day is over.
How to make it:
Step 1 – Write the reasons. Sit down with your child and brainstorm all the reasons they love Mom. Write each one on a strip of pastel paper, things like “because you give the best hugs.” Even simple ones from very young children are precious. Roll each strip into a scroll and tie with a small piece of twine or leave loose.
Step 2 – Add the photo. Print a small photo of the child and mom together. Tuck it inside the jar so it’s visible against the glass.
Step 3 – Fill the jar. Fill the jar with all the rolled notes. Pack them in generously, a full jar looks much more impressive than a half-empty one.
Step 4 – Decorate the lid. Cut a circle of burlap fabric slightly larger than the lid and place it over the top before screwing on the band. Tie twine around the neck of the jar.
Step 5 – Make the tag. On a small square of white cardstock, write “Reasons I Love You” in colorful letters and decorate with hand-drawn hearts. Punch a hole in the corner and attach it to the twine around the jar neck.
Step 6 – Finish with a ribbon. Tie a gingham ribbon bow over the twine for a beautiful, layered presentation.
Egg Carton Flowers
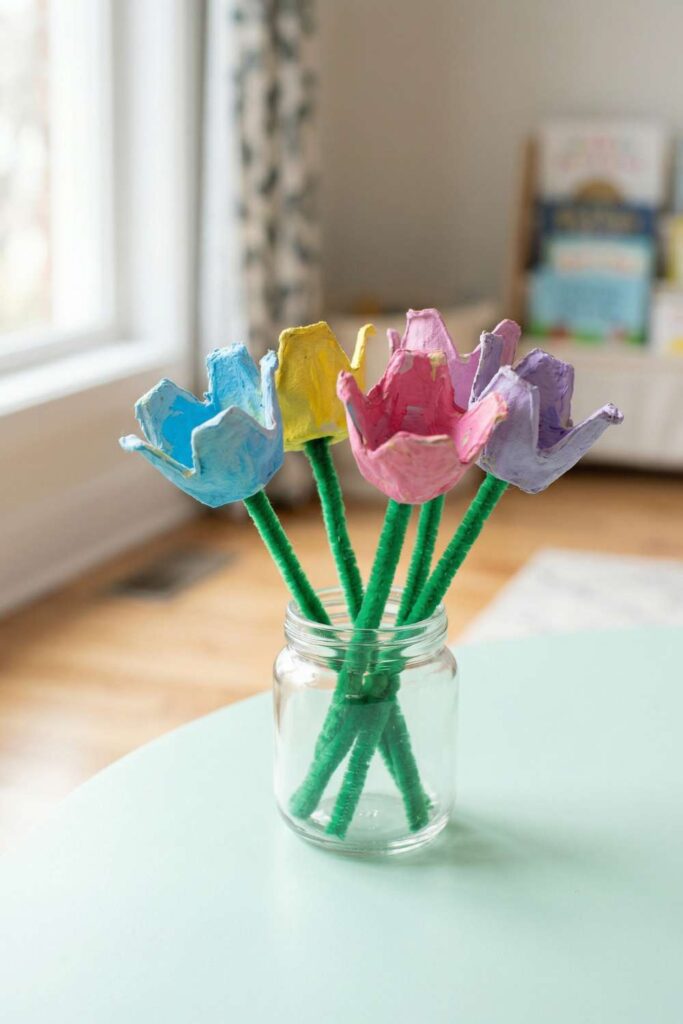
This is one of those Mother’s Day crafts that feels almost magical. You start with something that was heading for the recycling bin and end up with a vase full of lovely little blooms.
Each egg carton cup becomes a flower head when cut out and painted, and green pipe cleaner stems give them just the right amount of bendable charm.
How to make it:
Step 1 – Cut the egg cups. Cut the individual egg cups apart from the carton. Trim any rough edges so each cup is neat and roughly even.
Step 2 – Shape the petals. Using scissors, cut petal shapes into the sides of each egg cup by snipping down from the rim at regular intervals and trimming each section into a rounded or pointed petal shape. Four to six petals per flower works well. Gently curl the petals outward slightly with your fingers.
Step 3 – Paint the flowers. Paint each flower cup in a different pastel color. Apply two coats for good coverage and allow to dry completely between coats.
Step 4 – Attach the stems. Use a pencil or skewer to poke a small hole in the bottom of each painted flower. Thread a green pipe cleaner through the hole and bend the end inside the cup to secure it. The pipe cleaner acts as the stem, you can bend it for a natural curve.
Step 5 – Arrange in a vase. Stand all the finished flowers in a small glass jar or vase and fan them out at slightly different heights for a natural bouquet effect.
Pom-Pom Flower Bouquet

This pom-pom bouquet Mother’s Day crafts are absolutely irresistible big, fluffy yarn pom-poms, each one attached to a green pipe cleaner stem and bundled together with a sweet blue gingham bow.
It looks like something from a luxury gift shop, and yet it’s entirely made from yarn and pipe cleaners. Kids who enjoy repetitive, tactile activities will love making the pom-poms, and even little ones can help choose the colors.
How to make it:
Step 1 – Make the pom-poms. Wrap yarn generously around a pom-pom maker or around two fingers (for a smaller pom-pom) or a wider piece of cardboard (for a larger one). The more yarn you wrap, the fuller and fluffier the pom-pom will be. Slide the wound yarn off carefully, tie a separate piece of yarn tightly around the very center, and then cut through all the loops on both sides. Fluff and trim any uneven ends into a round shape.
Step 2 – Attach the stems. Thread a green pipe cleaner through the center knot of each pom-pom and twist it back on itself to secure. The pipe cleaner becomes the stem and you can give it a gentle curve for a natural look.
Step 3 – Make a full bouquet. Make as many pom-pom flowers as you like. Varying the sizes slightly adds charm.
Step 4 – Bundle and tie. Gather all the pipe cleaner stems together and tie them with a gingham ribbon bow near the base of the pom-poms. The bouquet can be displayed lying flat on a table or stood upright in a vase.
Mother’s Day Trophy
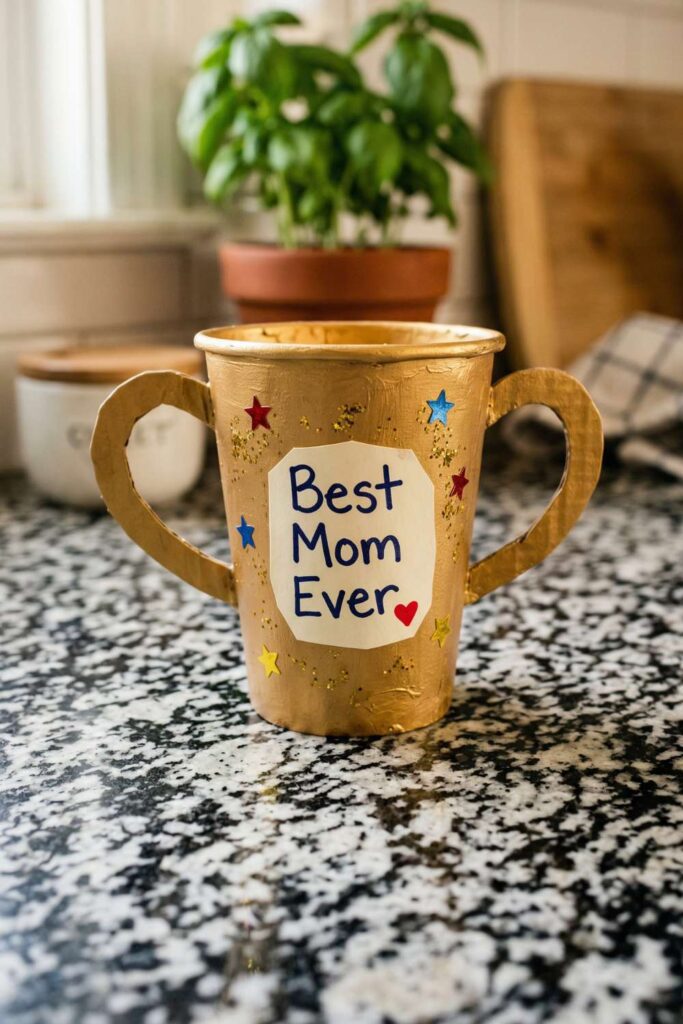
Every mom deserves an award and this golden trophy makes that official. It’s made from a large paper cup painted gold, with two cardboard handle “arms” on the sides and a label reading “Best Mom Ever” on the front.
Scattered star stickers and gold glitter make it suitably celebratory, and honestly? It looks remarkably like a real trophy.
tep 1 – Paint the cup gold. Apply two coats of gold acrylic paint all over the outside of the cup, including the rim. Let each coat dry fully. The coverage doesn’t need to be completely perfect, a slightly textured, brushstroke-visible finish looks authentically hand-crafted.
Step 2 – Make the handles. Cut two identical handle shapes from thick cardboard, a simple curved “C” shape. Paint them gold on both sides and allow to dry. Glue one handle firmly to each side of the cup, holding in place until set (a glue gun speeds this up considerably).
Step 3 – Add the glitter. While the paint is still slightly tacky, or using a layer of craft glue, brush or sprinkle gold glitter over the cup surface. Shake off the excess and let it dry.
Step 4 – Add star stickers. Press star stickers in red, blue, and yellow scattered around the cup for a festive touch.
Step 5 – Make and attach the label. Cut a small pentagon or shield shape from white cardstock (to mimic a classic trophy plaque). Write “Best Mom Ever ♡” on it in a dark marker. Glue it to the front center of the cup.
Flower Wreath Craft
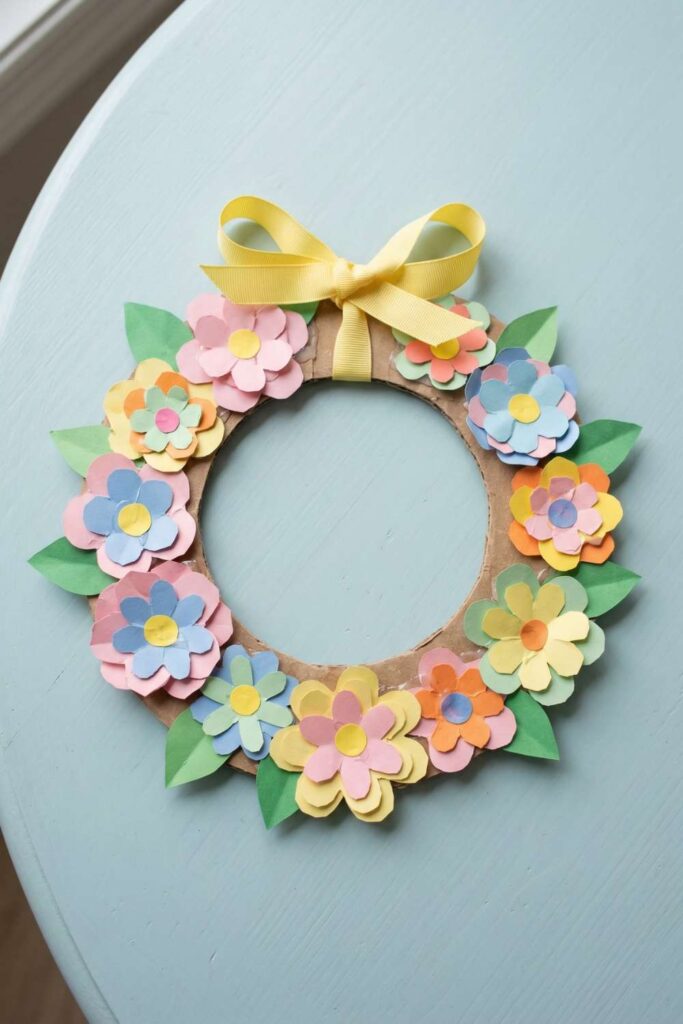
This paper flower wreath is one of the most beautiful Mother’s Day crafts in the whole collection, and it genuinely looks like something you’d buy at a spring market.
The cardboard ring base is completely covered with layered pastel paper flowers in pinks, blues, yellows, and oranges, with green leaf accents tucked in between, and a cheerful yellow ribbon bow at the top for hanging. It’s a wonderful afternoon project and a gift that can go straight onto Mom’s front door or wall.
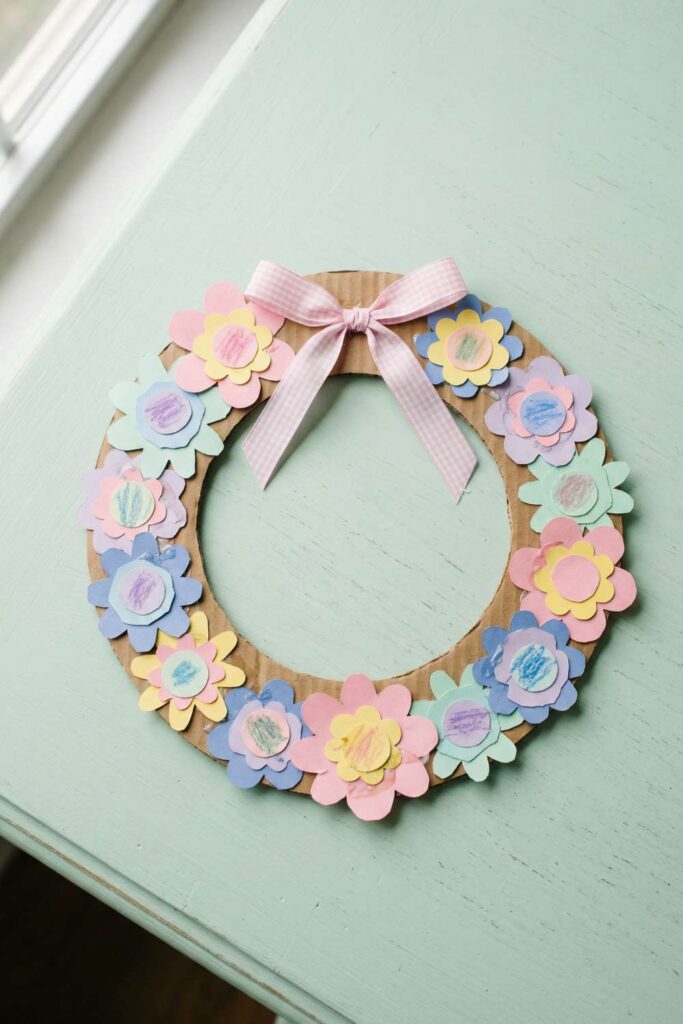
How to make it:
Step 1 – Cut the wreath base. On the cardboard, draw a large circle (roughly 25–30cm diameter) and a smaller circle inside it (roughly 12–15cm). Cut out the ring shape. This is the wreath base.
Step 2 – Cut the flowers. For each flower, cut a petal layer from one color (a rounded daisy or scalloped circle) and a slightly smaller circle from a contrasting color for the inner ring. Cut a small circle in a third color for the center. Layer and glue these together to make each flower head.
Step 3 – Cut the leaves. Cut simple pointed leaf shapes from green cardstock. These will be tucked between the flowers for a lush, full effect.
Step 4 – Assemble the wreath. Working around the cardboard ring, glue the flowers one by one, slightly overlapping, until the entire ring is covered. Tuck leaves between the flowers as you go, pointing outward at various angles. Build up layers, some flowers can sit on top of others for depth.
Step 5 – Add the bow. Tie a generous ribbon bow and glue or staple it to the top of the wreath. Loop a piece of ribbon behind it for hanging.
DIY Mom Beaded Bracelet
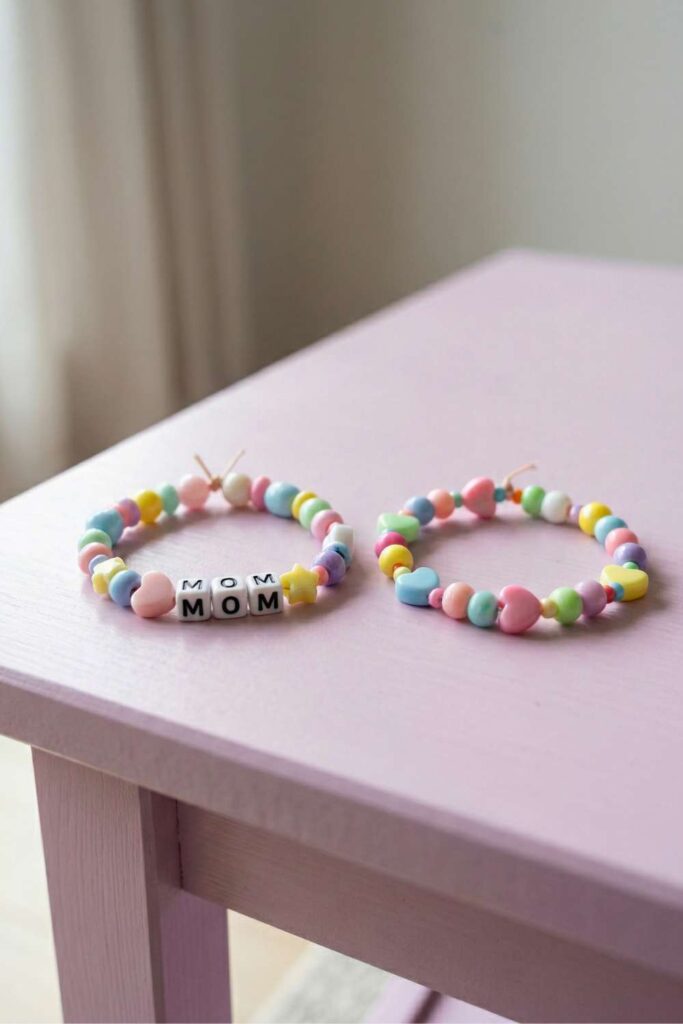
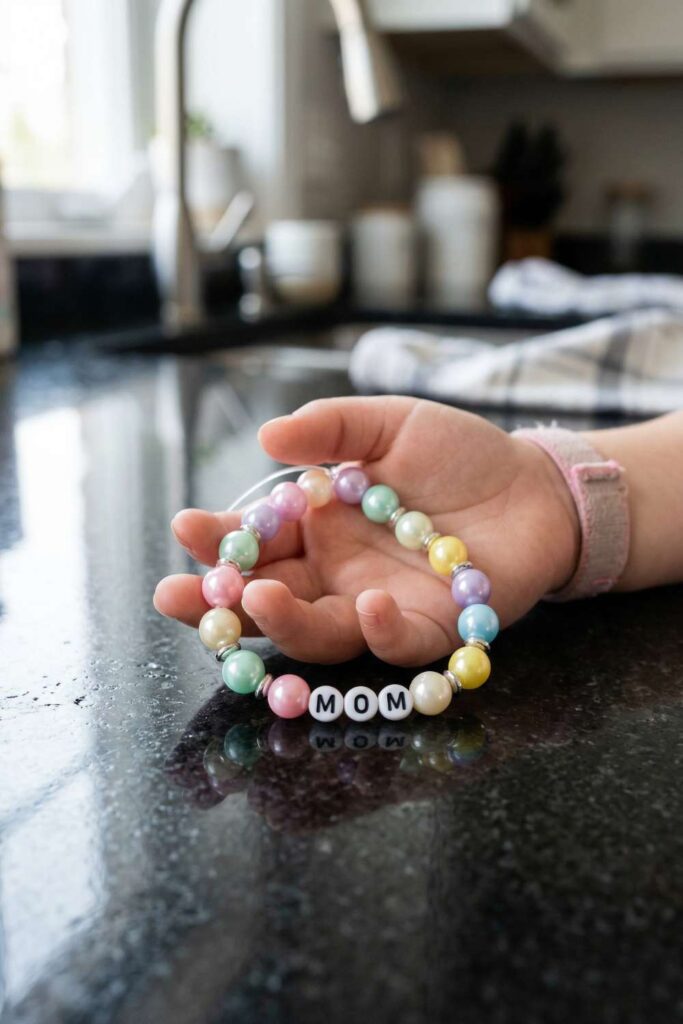
This bracelet is one of those Mother’s Day crafts that kids can make entirely independently and they will be so proud of the result.
They string together colorful pony beads, heart-shaped beads, and letter beads spelling “MOM.” It’s simple, wearable, and completely made with love.
How to make it:
Step 1 – Measure the cord. Cut a length of elastic cord about 25–30cm long; longer than you need, so there’s plenty to tie off. Tie a knot at one end (or tape it to your bead mat) so beads don’t fall off while stringing.
Step 2 – Plan the pattern. Before stringing, lay the beads out in order on the bead mat. For the “MOM” bracelet: alternate colorful pony beads and heart shapes, then add the “M,” “O,” “M” letter beads in the center, with a star bead on each side as an accent. For the all-heart version, simply alternate heart beads and round pony beads in a rainbow sequence.
Step 3 – String the beads. Thread the beads onto the elastic cord in the planned order.
Step 4 – Tie off and finish. Once all beads are strung and the bracelet fits around a wrist comfortably, tie the two ends of the elastic together in a double knot. Pull firmly to secure, then trim the excess cord close to the knot. Tuck the knot inside a bead so it’s hidden.
Paper Butterfly Bouquet
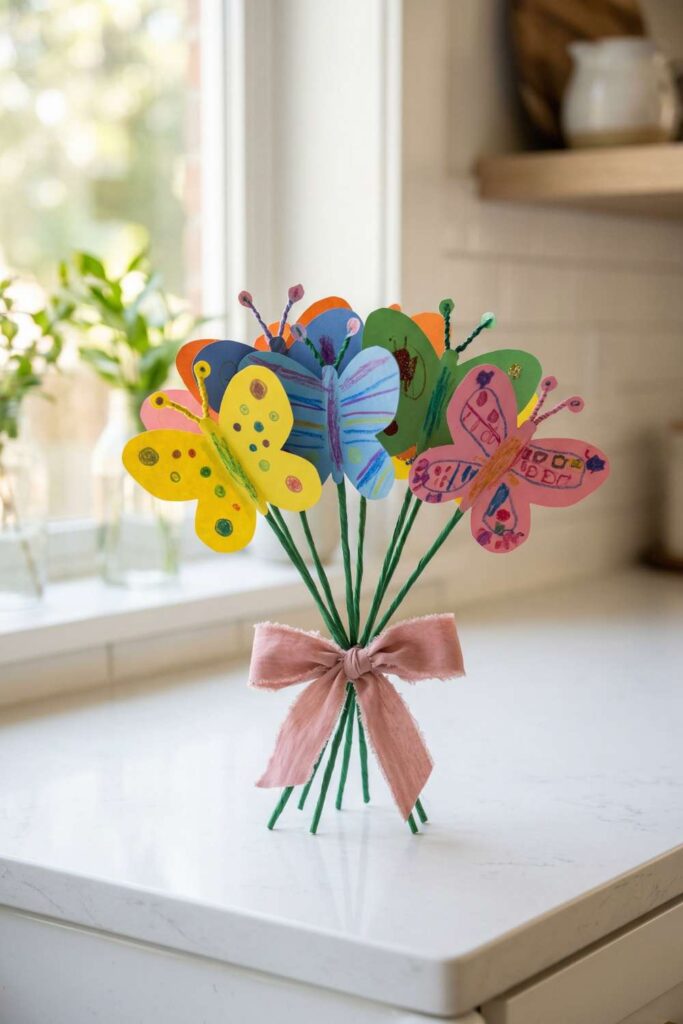
Instead of flowers, these Mother’s Day crafts are made entirely from butterflies and it is so charming. Each child decorates their own paper butterfly with crayons, markers, glitter, and dots, giving every butterfly its own personality.
They’re then attached to green pipe cleaner stems and bundled together with a dusty pink ribbon. What I especially love about this one is that if you have multiple children, each sibling can make a butterfly, and the bouquet becomes a collective gift from all of them.
How to make it:
Step 1 – Cut the butterfly shapes. Fold a piece of colored cardstock in half and draw half a butterfly wing shape along the fold. Cut it out and unfold, you’ll have a perfectly symmetrical butterfly. Make one per child in different colors.
Step 2 – Decorate the wings. Let each child go wild decorating their butterfly with crayons, markers, dots, stripes, swirls, and glitter glue. The more personal and expressive, the better.
Step 3 – Add antennae. Cut a short piece of pipe cleaner (around 10cm) and fold it in half. Twist the folded end together to form the antennae base, then curl the tips slightly. Glue or tape this to the back of the butterfly’s body between the wings.
Step 4 – Attach the stems. Glue or tape a green pipe cleaner to the back of each butterfly along the center body line, running down as the stem.
Step 5 – Bundle the bouquet. Gather all the butterfly stems together, fanning the butterflies out so they’re all visible. Tie a ribbon bow around the stems to hold everything together. The bouquet can stand in a vase or be presented as a hand-tied bunch.
Best Mom Ever Sign
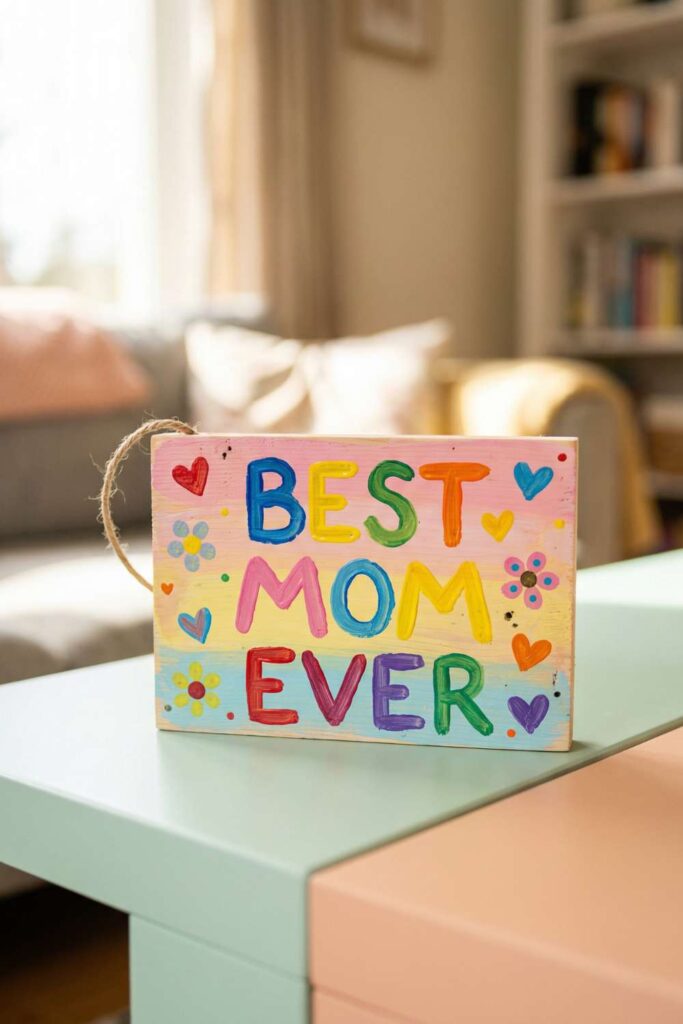
A small wooden plank painted with a pastel rainbow background: pink at the top fading through yellow to light blue at the bottom covered in hand-painted rainbow letters spelling “BEST MOM EVER,” with little hearts, flowers, and dots scattered all around it.
A loop of twine at the top means Mom can hang it wherever she likes. It’s bold, colorful, and guaranteed to make her smile every time she sees it.
How to make it:
Step 1 – Paint the background. Paint the top third of the wood in pink, the middle third in yellow, and the bottom third in light blue. While still slightly wet, blend the edges where the colors meet to create a soft gradient. Let it dry completely.
Step 2 – Sketch the letters. Lightly pencil “BEST,” “MOM,” and “EVER” in large block or bubble letters across the three sections of the sign, one word per color zone.
Step 3 – Paint the letters. Using a fine brush, paint each letter in a different bold color, alternating colors across each word for a rainbow effect. Two coats will give solid, vibrant coverage.
Step 4 – Add the details. Once the letters are dry, use a fine brush to paint small hearts, simple daisy flowers, and tiny dots scattered in the spaces around the letters.
Step 5 – Add the hanging loop. Use a drill or a heated skewer to make a small hole in the top left corner of the sign. Thread a length of twine through, knot it at the back, and tie the other end into a loop for hanging.
Step 6 – Seal the sign. Brush on a coat of clear varnish to protect the paint and give the sign a finished look. Allow to dry fully before gifting.
Final Thoughts
Here’s what nobody tells you about handmade Mother’s Day crafts: they get better with time in a way that nothing else does. A candle gets burned. Chocolates get eaten. But that salt dough heart with the wobbly painted flower? That gets carried from house to house, tucked carefully into moving boxes, and pulled out every spring like an old friend.
So clear the table, put down some newspaper, and don’t worry about how these Mother’s Day crafts will turn out. The glue smudges and the uneven letters are not mistakes, they’re the whole point. They’re proof that your child sat down and made something, with their own hands, just for you.
More Ideas You May Love
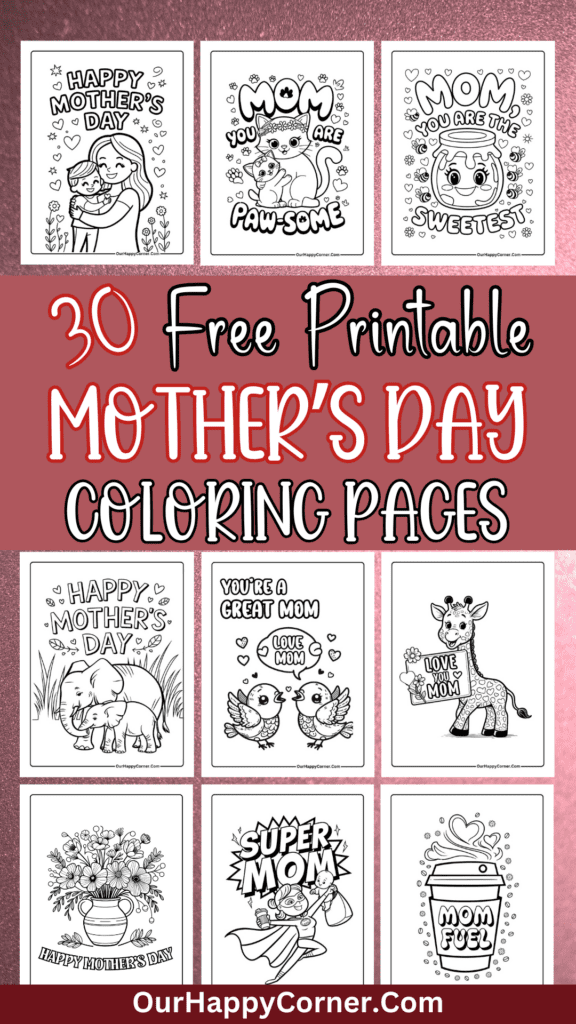
Free Printable Mother’s Day Coloring Pages