This post may contain affiliate links. If you make a purchase through these links, I may earn a small commission at no extra cost to you. Thank you so much for your support.
Mushroom painting ideas can be as simple as one rounded cap and a few grass strokes, or as detailed as a tiny woodland cottage. That’s what makes them such a lovely subject when you want a creative project that fits your mood.
You might feel like painting a small watercolor in warm browns today, then reach for pink, teal, or a deep blue background next time. The same basic mushroom shape gives you plenty of room to try different colors and styles.
Below, you’ll find simple studies and repeating patterns mixed in with fuller floral paintings and storybook scenes. You can choose a quick project without scrolling past every detailed design first.
Start with the one you would enjoy having on your shelf or giving to a friend. You can always simplify the foliage, leave out a few little accents, or change the palette to make it feel more like you.
Choose Your Paint and Surface
Acrylic works well for the canvas designs, especially the bold patterns, dark backgrounds, and layered woodland scenes. A ready-primed canvas or canvas panel gives you a convenient starting surface without needing to prepare a raw one yourself.
For softer washes and botanical studies, use watercolor on watercolor paper. Gouache is another lovely option on suitable paper when you want more opaque shapes, pale spots, or small illustrations with plenty of open space.
Gather your chosen surface, a pencil and eraser, a medium brush for larger shapes, a smaller round brush for leaves and gills, a palette, water, and a cloth or paper towel.
Start with the colors listed for your favorite design rather than buying a large new paint set.
Start With the Main Mushroom Shapes
Lightly plan the cap, its oval underside, and the stem before adding anything around them. If you’re painting a group, vary the heights and cap widths so the arrangement feels relaxed rather than like a row of identical shapes.
Paint the larger areas first, then add the shadows, gills, spots, and greenery in manageable stages. With acrylic or gouache, let a layer dry before adding details you want to stay separate; with watercolor, leave pale areas open and deepen the washes gradually.
For the simpler mushroom painting ideas, a few broad gill strokes and one darker edge may be all you need.
If you choose a fuller scene, get the mushrooms and background working together before spending time on tiny flowers, stones, or leaves.
Mushroom Painting Ideas
The designs below move between simple subjects and more detailed compositions, so you can pick what suits your time and experience. The suggested medium is a starting point; focus on the arrangement and colors, then adapt the brushwork to the materials you enjoy using.
1. Classic Red Toadstools With a Leafy Border
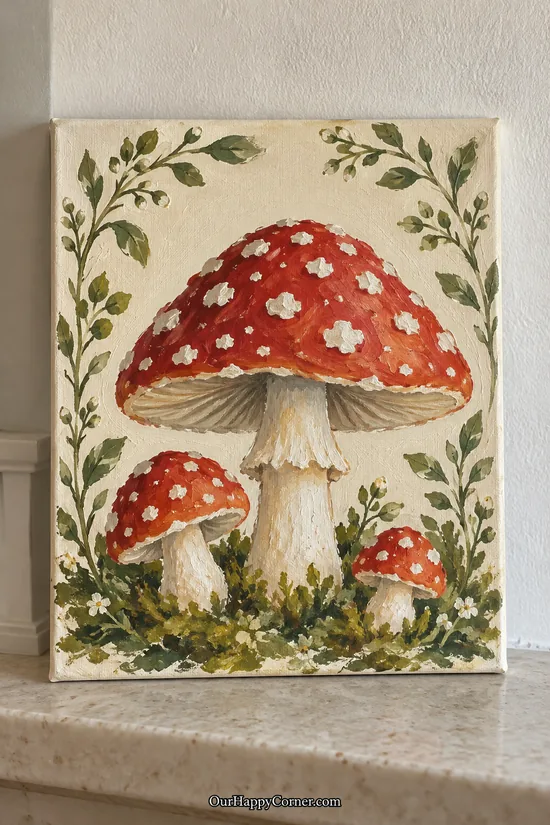
Suggested medium: Acrylic on canvas.
Paint colors: Brick red, cream, warm brown, olive green, and sage.
Red caps and cream stems are such a lovely place to begin if you enjoy a classic woodland look. A leafy border gives the painting a finished feel without needing a full forest behind it.
Sketch the largest mushroom first, then place two smaller ones near its base. Keeping their heights different helps the group feel natural and gives your eye a clear place to land.
Paint the cream background and main mushroom shapes before the smaller details. Add a little warm brown under the caps and along one side of each stem to suggest depth.
Use short curved strokes for the gills, then dab pale spots over the dried red caps. Build the moss and border from clusters of simple leaf strokes rather than drawing every little plant.
You can simplify these mushroom painting ideas by leaving out the border on your first try. The three mushrooms will still make a pleasing arrangement with just a small patch of greenery underneath.
2. A Simple Sepia Mushroom
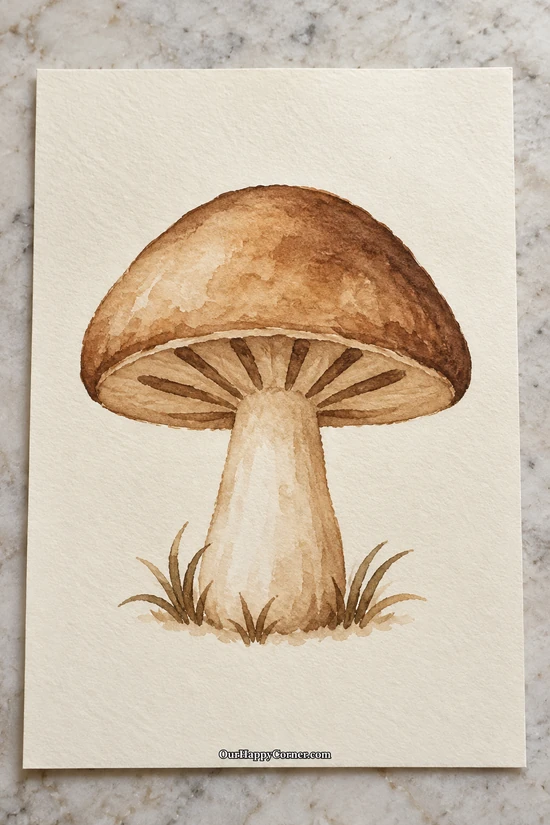
Suggested medium: Watercolor on watercolor paper.
Paint colors: Light tan and deep warm brown.
One mushroom and a little grass are enough for a satisfying painting session. Working in two browns lets you concentrate on the cap, stem, and a few shadows without choosing lots of colors.
Sketch a broad rounded cap with an oval underside and a sturdy stem. Leave plenty of paper around it so the single shape feels intentional.
Paint a pale tan wash over the cap and stem, then let it dry. Add deeper brown along one cap edge and beneath it, keeping the opposite side lighter.
Use a few thick gill marks that point toward the stem, then finish with two or three grass tufts. The strokes can stay loose rather than perfectly even.
This is one of the simplest mushroom painting ideas to try when you’re getting comfortable with watercolor. You can repeat the same shape later in another color and see how much the mood changes.
3. A Red Mushroom Cottage
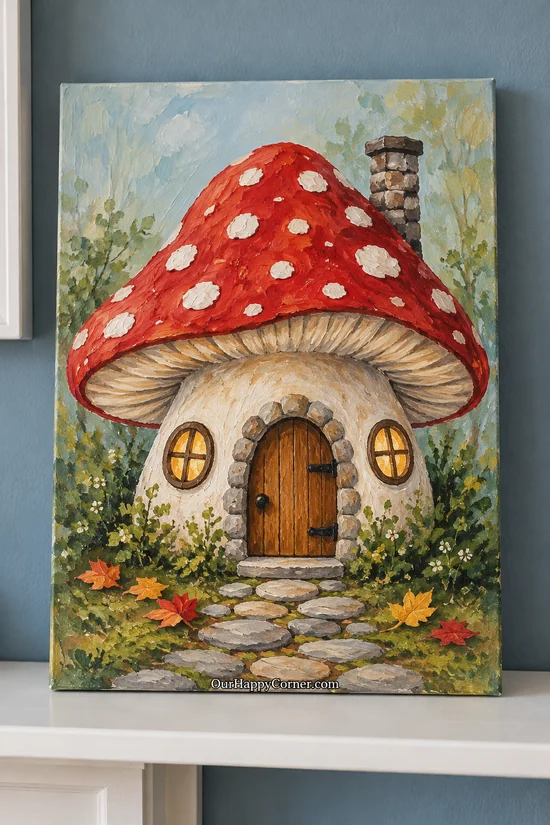
Suggested medium: Acrylic on canvas.
Paint colors: Red, cream, ochre, brown, olive, gray, and pale blue.
A mushroom cottage is a lovely choice when you’re in the mood for a little storybook painting. The door, windows, and path give you plenty of ways to make the scene feel personal.
Begin with the broad cottage silhouette: a large red cap over a rounded cream base. Add the sky and simple greenery around it before painting the smaller building details.
Sketch an arched door and two small round windows, checking their spacing before filling them in. Warm ochre behind the window bars gives them a welcoming look.
Build the path from a few uneven gray stepping stones, making the nearer stones larger. Finish with loose green dabs, cap spots, and a few warm leaves near the bottom.
Of these mushroom painting ideas, this one rewards a slower afternoon. Paint the house clearly first, then treat the plants and little stone details as extras you can add gradually.
4. Minimal Mushroom Outlines With Warm Shapes
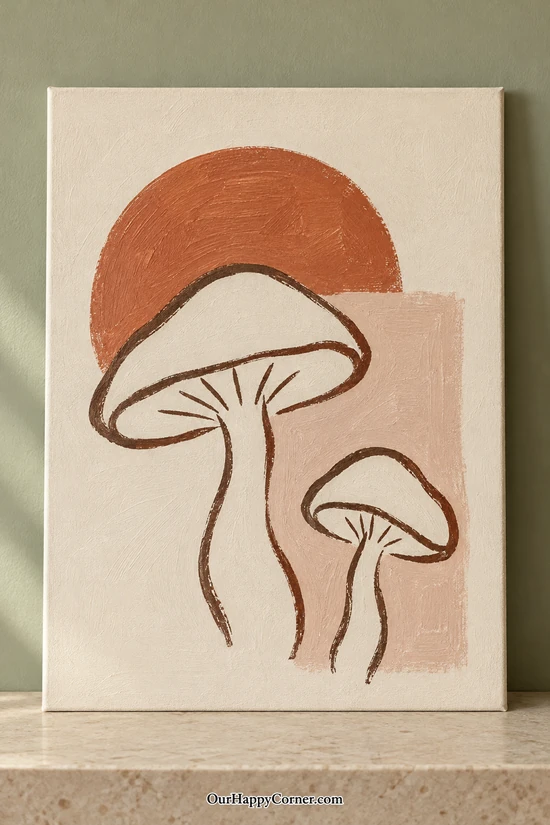
Suggested medium: Acrylic on canvas or acrylic paper.
Paint colors: Dark brown, terracotta, blush, and ivory.
Two brown outlines over warm geometric shapes make a calm, modern painting. It’s a useful choice when you want to focus on shape and spacing rather than shading.
Paint the ivory base, then add a broad terracotta half circle and a blush rectangle. Let those shapes dry before putting the mushroom outlines over them.
Draw two caps at different heights with gently curved stems underneath. Trace the lines with a small round brush, turning the surface when a curve feels awkward.
Add only a handful of short gill strokes beneath each cap. Keep the remaining space open instead of filling it with grass or extra motifs.
The design works because of those clear shapes and quiet gaps. If your first outline wobbles a little, leave it until the paint dries before deciding whether it needs a small correction.
5. Pink Mushrooms in a Wildflower Meadow
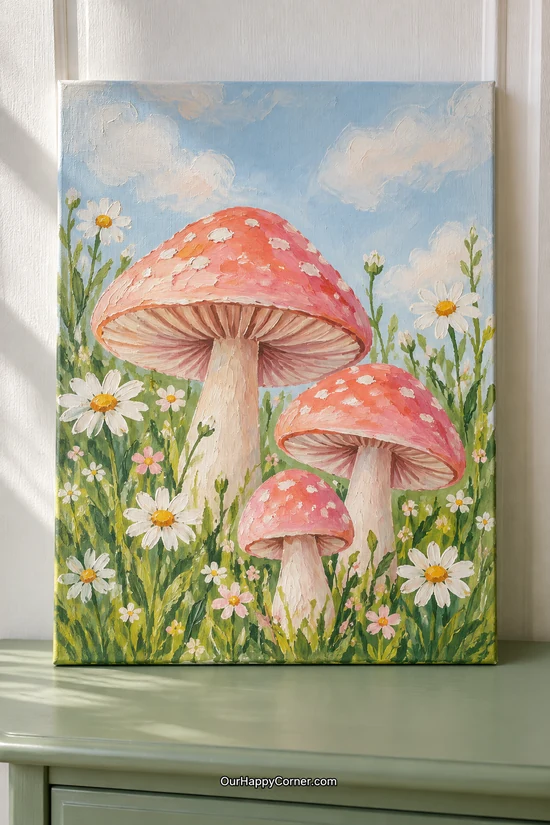
Suggested medium: Acrylic on canvas.
Paint colors: Coral pink, pale pink, cream, mustard, sage, and sky blue.
Pink mushrooms among daisies feel cheerful and a little unexpected. This is a lovely project when you want to spend time adding color and small touches around a few large shapes.
Paint the pale sky first, then block in the mushrooms at different heights. Leave the biggest cap enough room so the flowers don’t hide its outline.
Add pale stems and a darker pink beneath each cap, letting the brushstrokes curve toward the stem. A few light marks over the caps will suggest texture without requiring smooth blending.
Build the meadow with loose green strokes, then place the larger daisies before the smaller flowers. Let some grasses overlap the stem bases so the mushrooms feel rooted in the scene.
Keep one or two areas quieter instead of filling every gap with a bloom. That little bit of breathing room helps the whole painting stay readable from across the room.
6. Violet Mushrooms in a Moonlit Forest
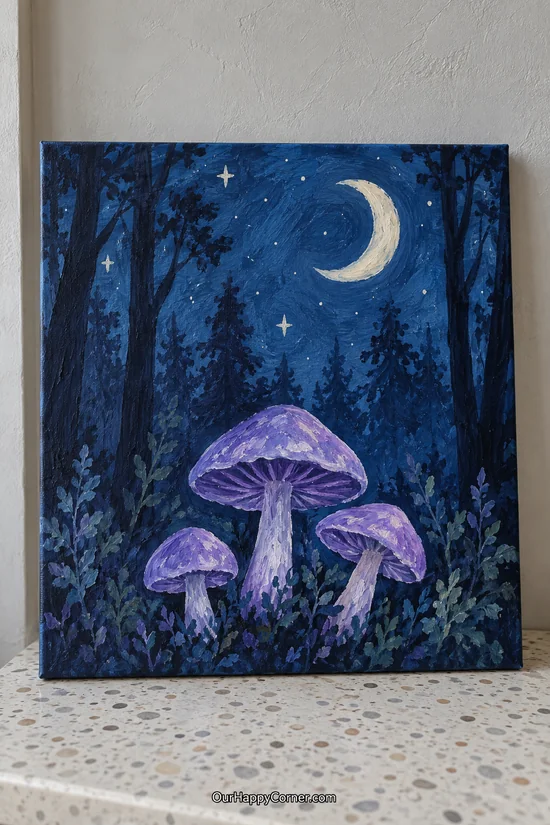
Suggested medium: Acrylic on canvas.
Paint colors: Navy, deep blue, violet, lavender, cream, and muted blue-green.
A moonlit forest gives mushroom painting ideas a completely different mood. Lavender caps stand out beautifully when the rest of the scene stays within a darker blue palette.
Start with the blue background and block in distant trees using a slightly lighter shade than the foreground trunks. Broad branching silhouettes are enough to suggest a woodland.
Paint three violet mushrooms across the lower part of the canvas, varying their heights. Keep the lighter lavender mostly on the cap tops and stem edges so they separate from the background.
Add a cream crescent and a few small stars after the sky is dry. Use a restrained handful of pale leafy strokes around the mushrooms to bring the foreground together.
This one gives you room to practice layering, so take it in sections. You can begin with fewer trees and add more only where the scene needs a stronger frame.
7. A Row of Pastel Mushrooms
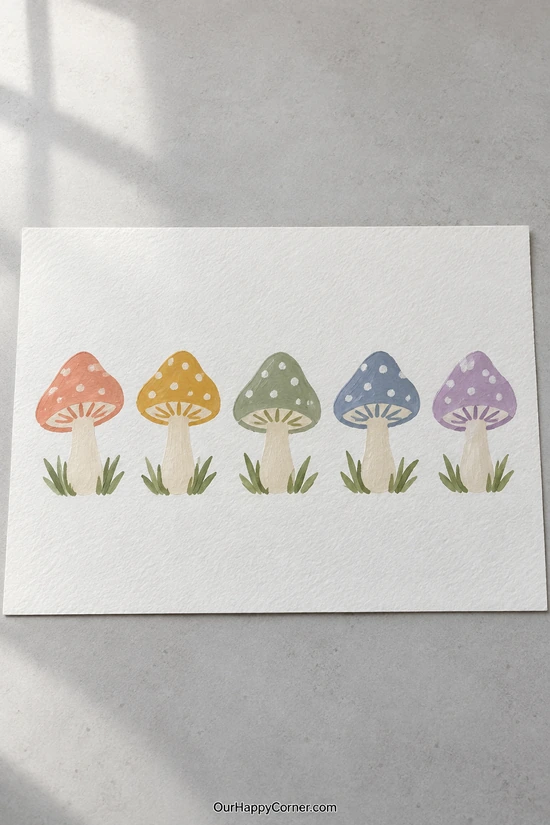
Suggested medium: Gouache on watercolor paper.
Paint colors: Peach, mustard, sage, dusty blue, lilac, and cream.
Five little mushrooms in different colors make a cheerful row with very little background work. It’s a lovely design for practicing cap shapes and finding a palette you enjoy.
Mark a loose baseline and space the mushrooms across the paper before adding paint. Keep a little variation in their heights while leaving enough room between the caps.
Paint the caps in peach, mustard, sage, dusty blue, and lilac, then add the pale stems. You can keep the colors flat and let the paper texture show through the brushwork.
Add a few pale cap dots, short gill marks, and small grass tufts underneath. Use the same style of grass across the row so the different colors still feel connected.
If one mushroom turns out a little wider than the others, let it stay that way. The repeated idea is what holds the painting together, and small differences give the row its charm.
8. Soft Brown Botanical Watercolor
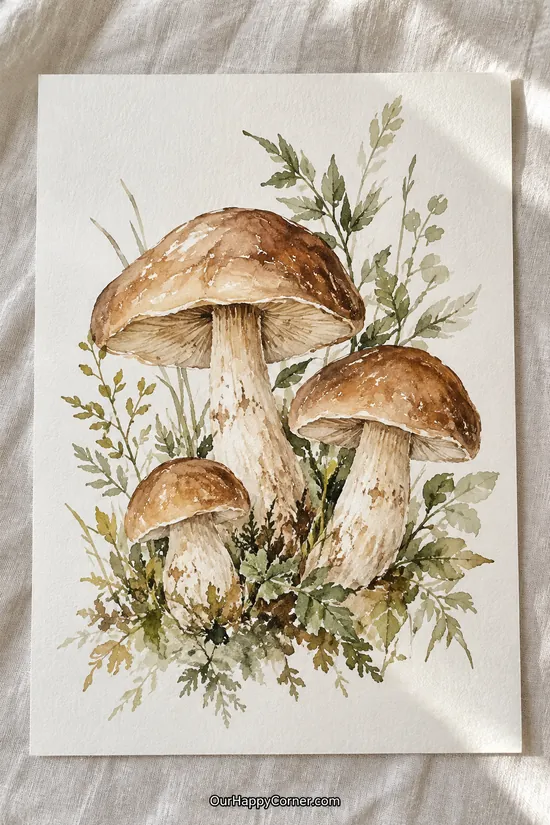
Suggested medium: Watercolor on watercolor paper.
Paint colors: Burnt sienna, raw umber, yellow ochre, and olive green.
A botanical study feels calm and timeless, especially when the mushrooms sit against plenty of unpainted paper. Transparent brown washes let you build the forms without covering their natural warmth.
Draw three caps and stems lightly, making one mushroom taller than the others. Leave a little space between the main shapes before adding the foliage.
Lay down a pale tan wash and let it dry, then deepen the cap edges and shaded undersides. Keep a lighter area on each cap so it doesn’t become one solid brown shape.
Use a smaller brush for a few gill lines and narrow stem marks. Add olive sprigs with a light touch, allowing some leaves to stay much paler than others.
If you prefer quieter mushroom painting ideas, this is a lovely palette to return to. Start with fewer leaves if you want to concentrate on the washes and mushroom shapes first.
9. Pink Mushrooms With a Strawberry
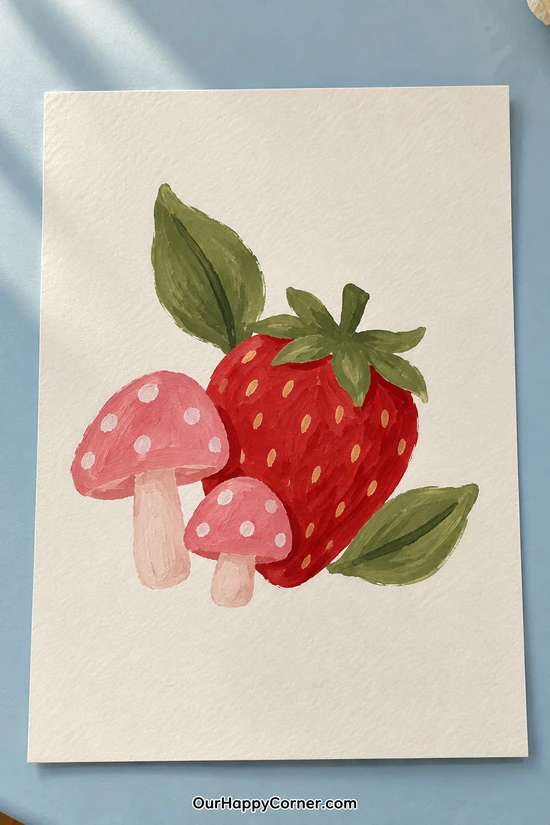
Suggested medium: Gouache on watercolor paper.
Paint colors: Pink, red, cream, mustard, and olive green.
Two little pink mushrooms beside a red strawberry make a cheerful, simple arrangement. The broad shapes are easy to sketch, and you can leave the background mostly untouched.
Place the strawberry first so you know how much room remains for the mushrooms. Paint the fruit as a rounded heart shape and add a leafy green top.
Make the mushrooms from soft triangular caps and short pale stems. Keep them different sizes so they feel like a pair rather than two repeated stamps.
Add cream spots to the caps and a few small seed marks to the strawberry once the base colors are dry. Finish with two or three broad leaves, leaving open paper around the group.
If you enjoy painting fruit as much as flowers, this is a fun combination to revisit. Our terracotta pot painting ideas offer another surface for using a cheerful palette around your home.
10. Autumn Mushrooms and Fallen Leaves
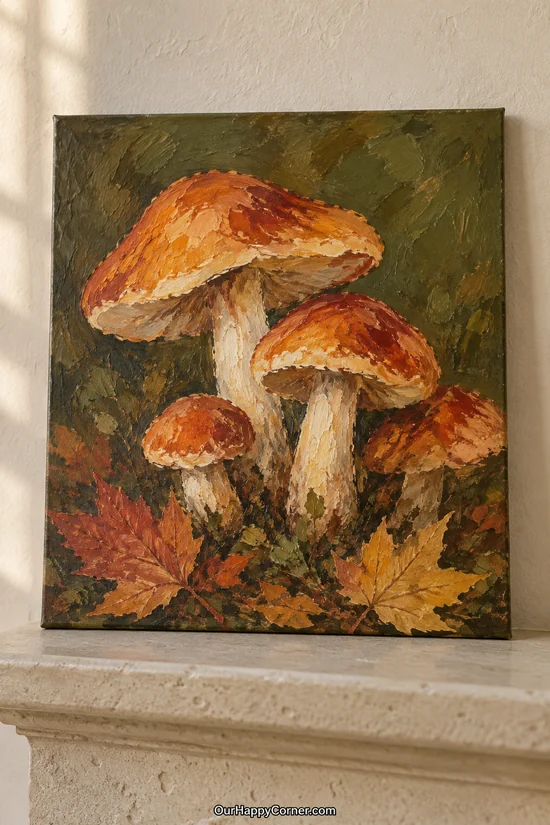
Suggested medium: Acrylic on canvas.
Paint colors: Orange, rust, ochre, cream, deep olive, and warm brown.
Orange mushrooms against deep olive have such a cozy autumn feel. Broad patches of warm color let the painting feel lively without needing carefully blended surfaces.
Paint the dark background first, then place a taller mushroom beside a few shorter ones. Keep the caps different widths so the cluster doesn’t feel too evenly spaced.
Fill the caps with ochre and orange, then add rust along selected edges. Use cream on the stems and a little brown beneath the caps for contrast.
Place a few larger fallen leaves across the bottom rather than scattering dozens of tiny ones. Their pointed outlines and one central vein will do most of the work.
Try using a slightly larger brush than you normally would for the first layers. It encourages those loose patches of color and keeps you from getting caught in details too early.
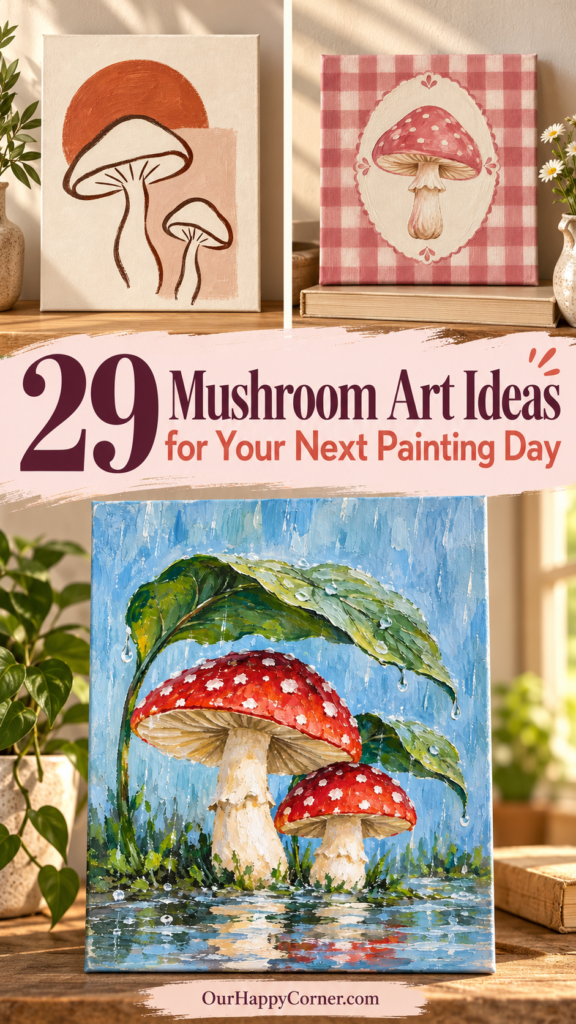
11. Toadstools on a Rainy Day
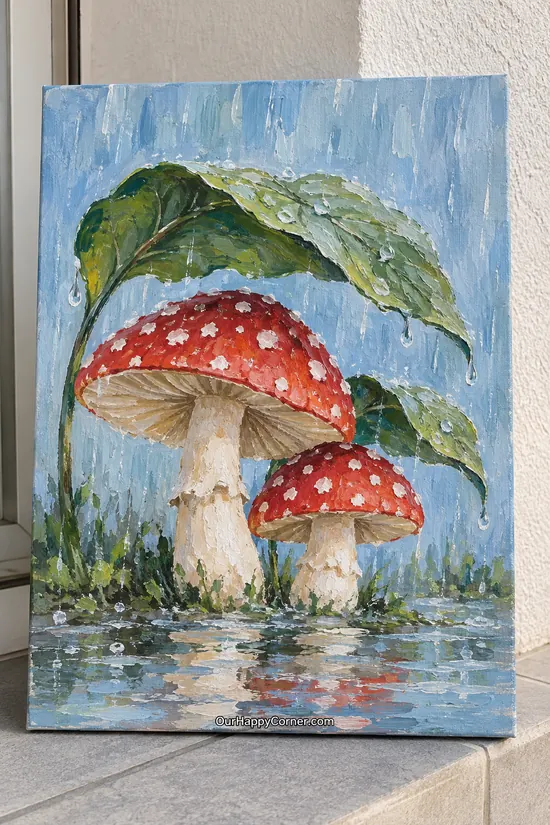
Suggested medium: Acrylic on canvas.
Paint colors: Red, cream, leaf green, dusty blue, gray, and brown.
A rainy scene gives familiar red toadstools a fresh setting. The large leaves overhead and a few reflected colors below make it feel like a small moment in the woods.
Paint the pale blue background and place the two mushrooms before adding the leaves. Keep their main outlines clear so they don’t disappear into the greenery.
Use broad green strokes for the sheltering leaves, with one darker side to suggest a fold. Add cream stems and short warm-gray gill marks under the red caps.
Suggest the puddle with broken horizontal strokes of blue, cream, and red. A few thin downward rain marks will create the weather without covering the whole painting in lines.
This is one of the mushroom painting ideas where less detail can help. Keep the reflections loose and let the big leaf shapes tell most of the rainy-day story.
12. A Simple Mushroom and Leaf Wreath
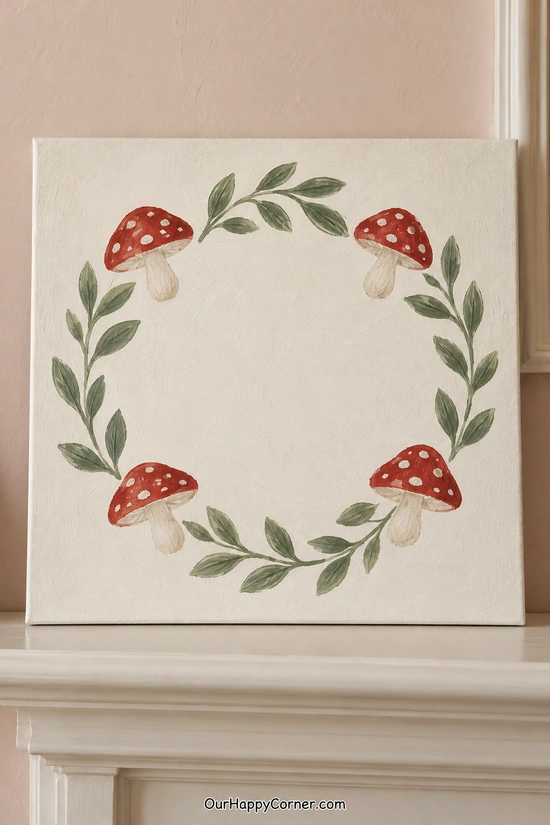
Suggested medium: Acrylic on canvas.
Paint colors: Red, cream, sage, and warm tan.
A wreath gives you a clear plan before you start painting: four little mushrooms with leafy sprigs between them. The open middle keeps the finished piece light and uncluttered.
Lightly mark a circle and place the mushrooms at four points around it. Tilt them slightly to follow the curve instead of keeping every stem upright.
Paint the red caps and cream stems, then add a few broad spots after the caps dry. Keep the details similar across the four mushrooms so none becomes much busier than the others.
Connect the spaces with curved sage branches and paired oval leaves. Leave small breaks between the sprigs rather than making a solid green ring.
You can use a plate as a loose drawing guide for the circle, then put it aside before painting. The brushwork will feel more relaxed if you follow the overall shape without trying to make it perfectly symmetrical.
13. Dusty Pink Mushrooms on Charcoal
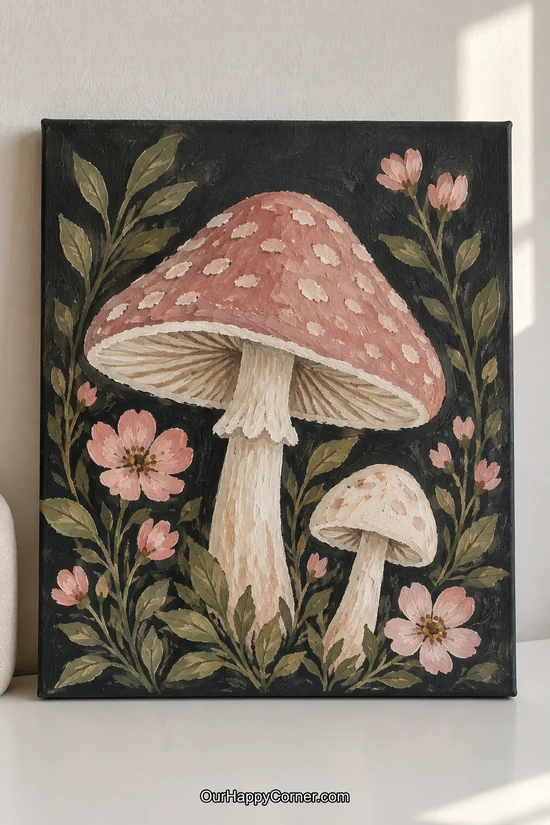
Suggested medium: Acrylic on canvas.
Paint colors: Charcoal, dusty rose, cream, muted pink, olive, and tan.
Dusty pink looks especially lovely against charcoal, and the dark background gives this painting a decorative feel. A taller pink mushroom beside a smaller cream one makes a balanced central pair.
Cover the canvas with charcoal and let it dry before lightly marking the main shapes. Keep the mushrooms large enough to paint comfortably with a medium brush.
Paint the caps and stems, then add soft tan undersides and a few pale gill lines. Allow the cap spots to vary instead of making every dot the same size.
Frame the pair with simple pink blossoms and olive branches, working outward from the largest flowers. Leave small pockets of dark background between the leaves.
The palette would also suit a painted keepsake box. Our jewelry box painting ideas offer more ways to use a dark base with soft floral details.
14. A Single Golden Ochre Mushroom
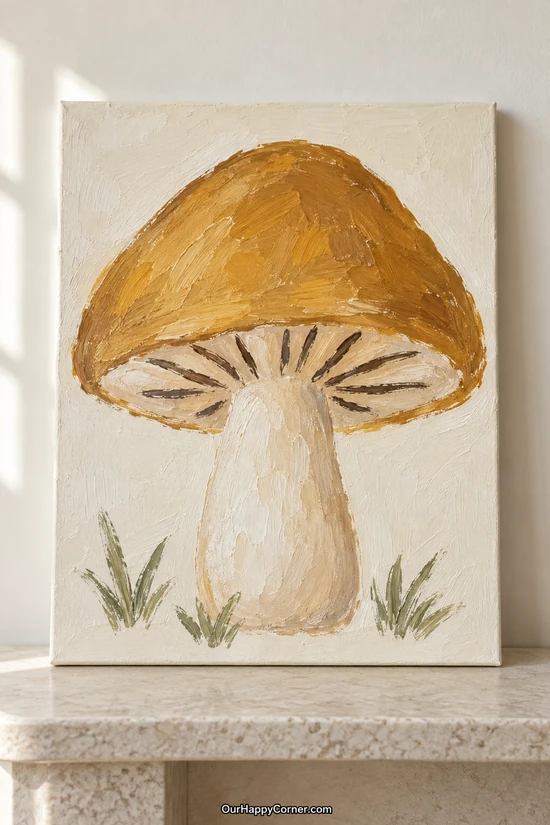
Suggested medium: Acrylic on canvas.
Paint colors: Golden ochre, cream, warm brown, and sage.
One golden cap and a broad pale stem make a lovely uncomplicated subject. The warm palette works well when you want a small painting that doesn’t need many details around it.
Paint the ivory background and lightly mark the cap outline, oval underside, and stem. Keep the cap wider than the stem so the main shape stays clear.
Fill the cap with ochre, then add one darker edge and a lighter patch near the top. Let the individual strokes show instead of blending them until the texture disappears.
Use short brown gill marks under the cap and a few loose sage strokes for grass. A pale cream stroke down one side of the stem will keep it from looking completely flat.
You can finish this in stages without a complicated plan. Get the main shapes right first, then decide whether the simple shadows are enough for the look you want.
15. Lavender Mushrooms and a Fairy Door
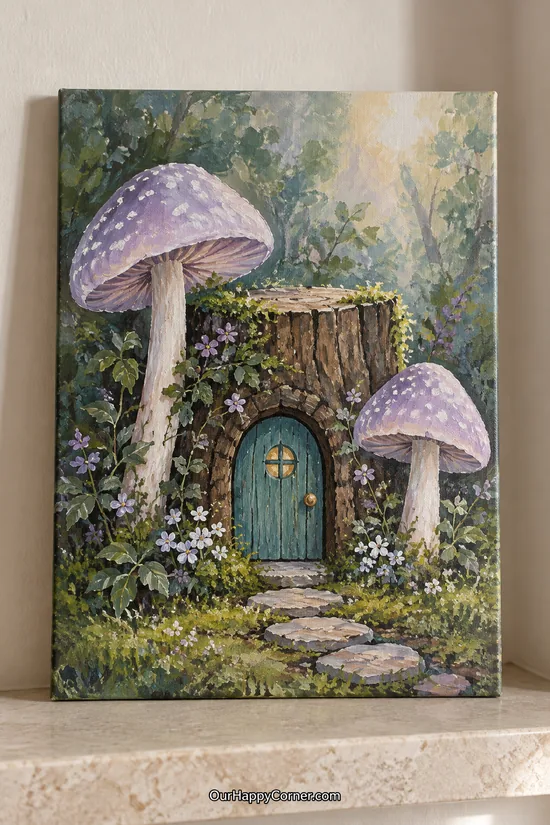
Suggested medium: Acrylic on canvas.
Paint colors: Lavender, violet, cream, teal, brown, olive, and gray.
A tiny teal door tucked into a stump makes this woodland scene feel like the beginning of a story. Lavender mushrooms frame it without needing any characters in the painting.
Block in the stump, door opening, and two mushroom shapes before adding the surrounding plants. Check that the door has enough space around it so the frame stays readable.
Paint the mushrooms with pale tops and slightly darker undersides, then add simple bark strokes to the stump. Use a deeper teal along one edge of the door for a little definition.
Lay down a short path of irregular stones and build greenery around the outside. Small flower dabs can come last, once the larger shapes are working together.
This is a more detailed choice, so give yourself permission to leave out some of the flowers. A clear door, two mushrooms, and a few stones will still carry the idea beautifully.
16. A Simple Teal Mushroom Trio
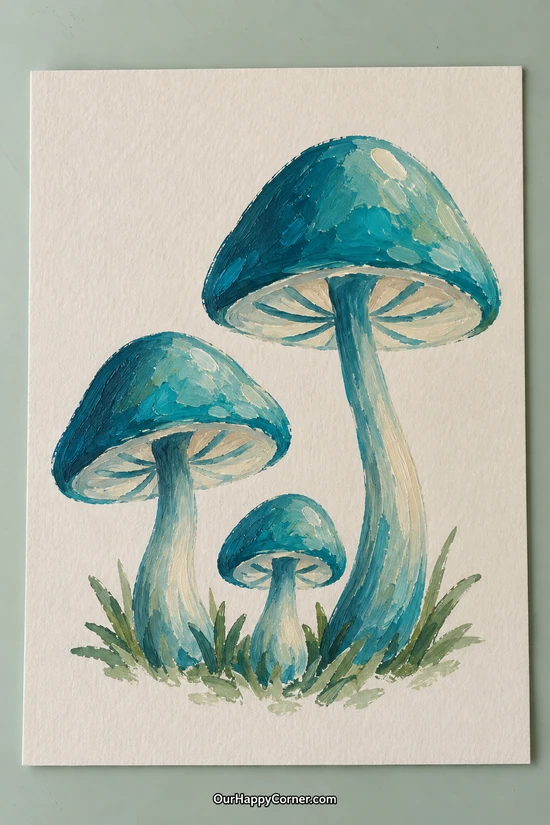
Suggested medium: Gouache or acrylic on suitable paper.
Paint colors: Turquoise, deep teal, cream, and sage.
Teal gives a small group of mushrooms a bold look without requiring a busy background. Two larger caps and one little mushroom create a clear arrangement on open ivory paper.
Sketch the tallest mushroom to one side, a medium one opposite it, and a smaller one near the front. Let the stems curve slightly so the group feels relaxed.
Fill the caps and stems with turquoise, then use deep teal beneath the caps and along selected edges. Add cream in broad strokes where you want the lightest areas.
Keep the gill marks thick and limited, then add a few sage grass strokes at the base. Leave the rest of the paper open so the color remains the main feature.
These mushroom painting ideas are easy to adapt to blue, purple, or green once you’ve tried the shapes. Stick with one darker color and one lighter color so the shading stays manageable.
17. Cobalt Blue Folk Mushrooms
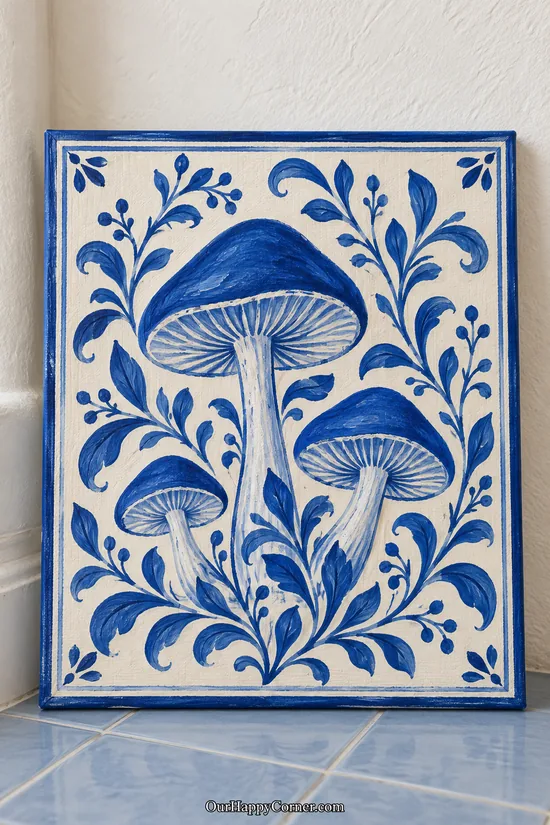
Suggested medium: Acrylic on canvas.
Paint colors: Cobalt blue, pale blue, and ivory.
Cobalt and ivory make a striking pair when you want decorative mushroom painting ideas without a large palette. Curving leaves and a narrow border give the piece a lovely folk-art feel.
Paint the ivory base, then plan three mushrooms with one taller cap in the middle. Lightly map a few sweeping branches around them before adding any small leaves.
Fill the main shapes with cobalt and use paler blue or ivory strokes to separate the gills and stems. Keep the contrast clear rather than trying to blend several shades.
Add paired leaves along the curving branches, finishing with a handful of round buds. Paint the outer border last so you can judge how much space the inside pattern needs.
For a simpler version, use one mushroom and two leafy branches. The strong two-color palette will still give it the same decorative character.
18. A Tiny Mouse Beside a Coral Mushroom
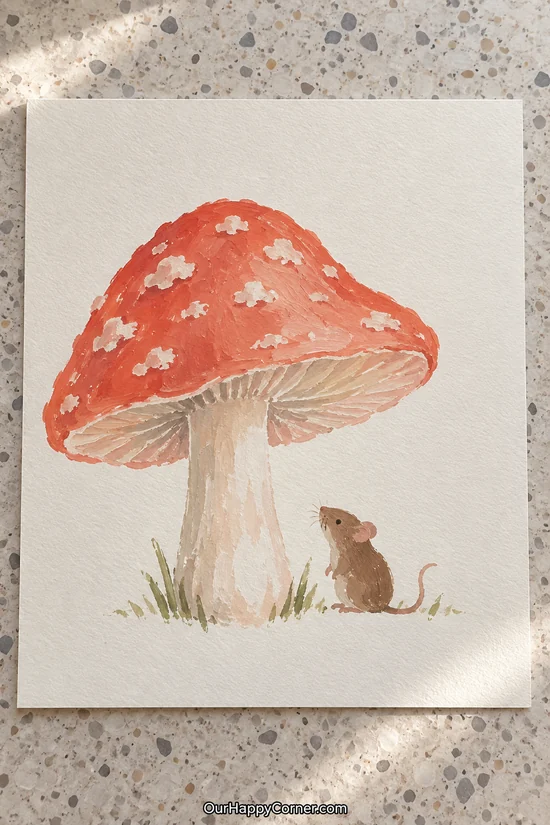
Suggested medium: Gouache on watercolor paper.
Paint colors: Coral, cream, pale pink, warm brown, and sage.
A tiny mouse looking up at a large mushroom feels sweet without needing a detailed woodland scene. Most of the paper stays open, so the two subjects get all the attention.
Paint a broad coral cap and a pale stem, keeping the mushroom slightly to one side. A few light cap spots and underside strokes are enough to suggest its form.
Make the mouse from a rounded brown body and a smaller pointed head. Add one ear, a tiny dark eye, and a curved tail after the main shape dries.
Put a few short grass strokes near their bases so both subjects sit on the same ground. Keep the whiskers short and simple rather than trying to paint lots of fine lines.
This is a lovely choice when you want a small illustration to finish in a few stages. Practice the mouse silhouette on scrap paper before adding it beside the mushroom.
19. Rose-Pink Mushroom on Gingham
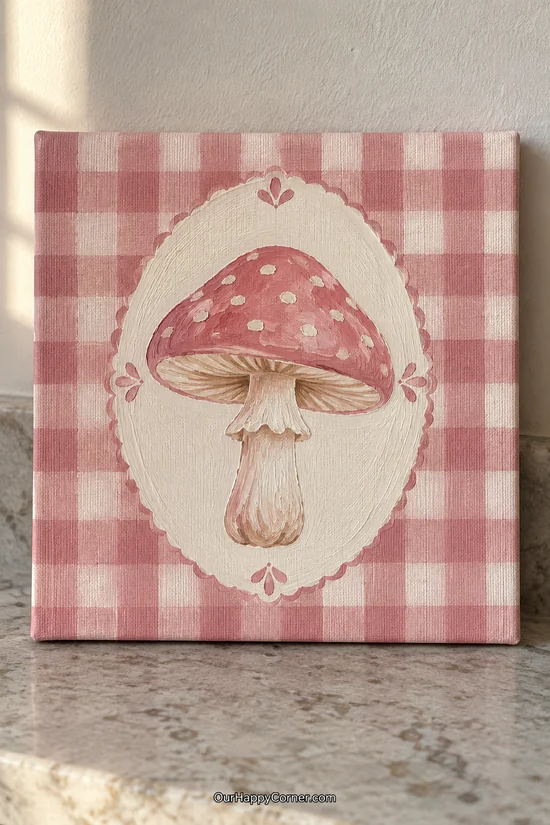
Suggested medium: Acrylic on canvas.
Paint colors: Dusty rose, pale pink, cream, and warm tan.
A pink mushroom inside a cream oval feels like a little piece of cottage wall art. The gingham makes the background part of the design rather than just an empty space.
Paint the light base and plan broad horizontal and vertical bands for the checks. Use a deeper rose where the bands cross, keeping the pattern soft enough that it doesn’t compete with the center.
Mark a generous oval over the dried checks and fill it with cream. A softly scalloped edge is a pretty extra, but a plain oval works well too.
Place one pink mushroom in the middle, then add a tan underside and cream stem. A handful of pale cap spots and a few curved gill strokes are enough to finish it.
Take your time with the checks before moving on to the center. Once that repeating background is ready, the single mushroom becomes a much smaller painting task.
20. Mushroom Silhouettes at Sunset
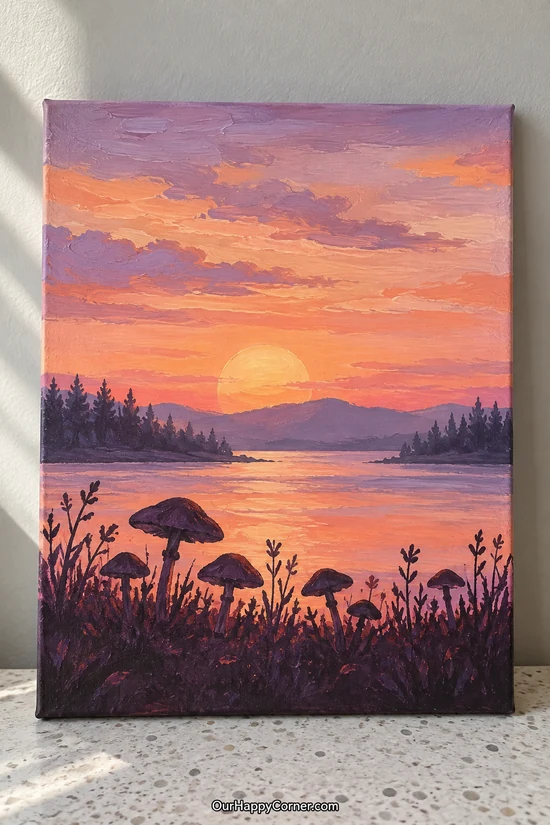
Suggested medium: Acrylic on canvas.
Paint colors: Peach, coral, lilac, plum, soft yellow, and cream.
A sunset lets you enjoy color mixing while keeping the foreground shapes fairly simple. Dark mushrooms along the bottom stand out against a warm sky and a quiet stretch of water.
Paint the broad sky bands first, moving from peach and coral near the sun into lilac higher up. You can keep visible horizontal brushstrokes instead of blending every transition away.
Add a pale setting sun, low distant land shapes, and a narrow waterline. Keep the distant trees smaller and softer than the plants in front.
Use deep plum for the mushroom caps, slender stems, and a few surrounding grasses. Break the water reflections into short horizontal marks rather than long perfect lines.
If you’re choosing mushroom painting ideas to practice backgrounds, this is a useful one. You can finish the sky first and add the foreground on another day without losing the overall plan.
21. Purple Mushrooms and a Peach Circle
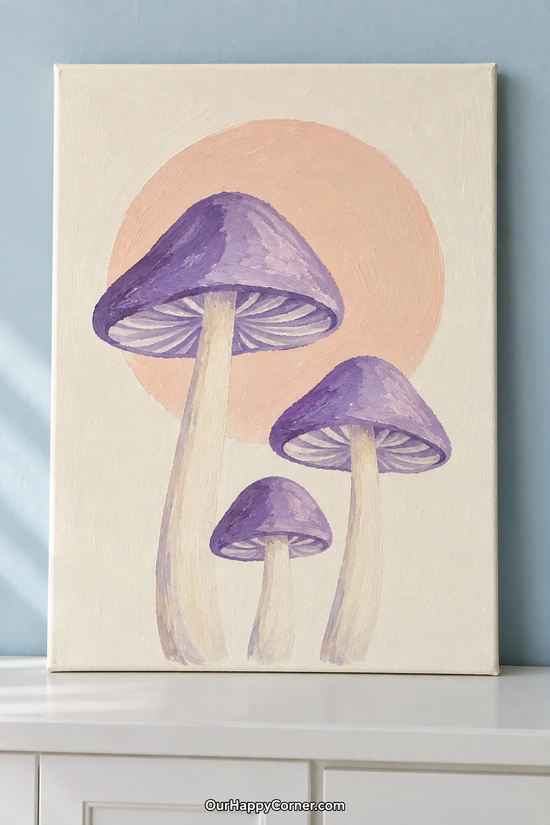
Suggested medium: Acrylic on canvas.
Paint colors: Lilac, violet, cream, and pale peach.
A peach circle behind three purple mushrooms gives a simple painting a lovely focal point. You get the feeling of a dreamy scene without painting a forest or a sky.
Paint the ivory base and a broad peach circle, then let them dry. Place one tall mushroom and two shorter ones so their caps sit at different heights.
Fill the caps with lilac and add violet along one side or beneath them. Use cream on the stems, with just a narrow purple shadow if you want more definition.
Paint a few broad pale gill strokes under the caps and stop before the lines become crowded. You can leave the lower edge plain rather than adding grass.
For quieter mushroom painting ideas, a few large shapes can be more satisfying than a full background. Change the circle to blush or pale blue if peach isn’t a color you use at home.
22. Slender Brown Mushrooms With Ferns
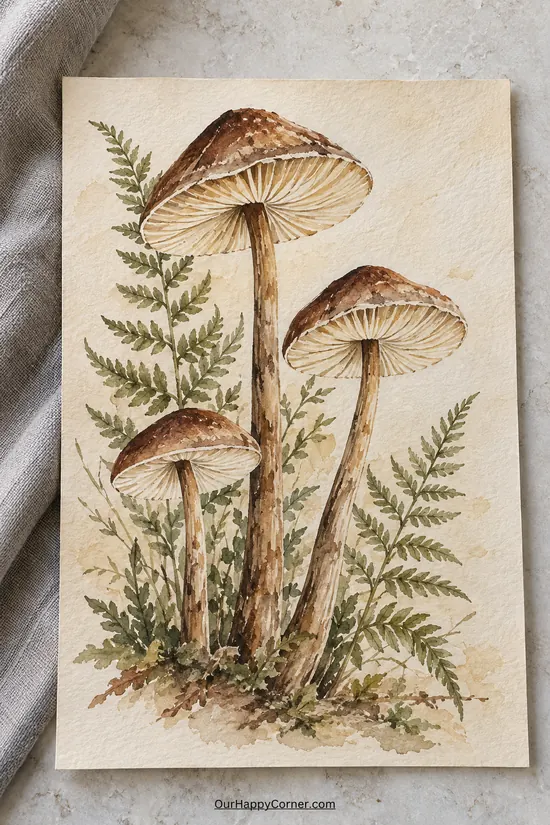
Suggested medium: Watercolor on watercolor paper.
Paint colors: Warm brown, ochre, cream, olive, and muted green.
Slender stems and soft fern fronds give this botanical painting a quieter woodland mood. The warm paper tones make the brown caps feel gentle rather than heavy.
Sketch the three mushrooms with different stem lengths and slightly angled caps. Keep the pencil light, especially where you want the pale washes to remain visible.
Use a light tan wash first, then build the darker cap edges after it dries. Leave a pale strip on each stem instead of filling the whole shape with the same brown.
Paint the ferns as a curved center line with short leaf marks on either side. Let the marks become smaller toward the tip, and leave space between the fronds.
You can begin with one fern and add another only if the composition needs it. A few well-placed leaves will do more for the painting than a dense background of tiny details.
23. A Little Snail Beside a Toadstool
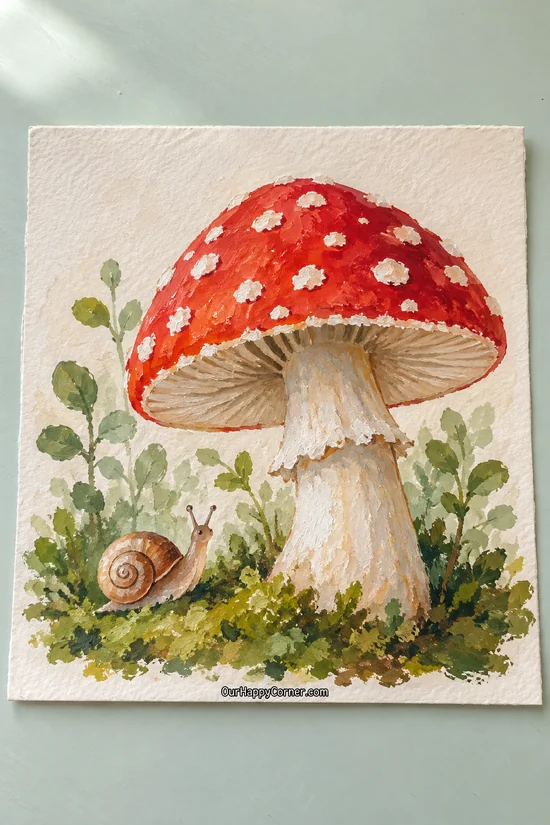
Suggested medium: Gouache on watercolor paper.
Paint colors: Red, cream, warm brown, tan, moss green, and sage.
A tiny snail gives one large mushroom a sweet little story without needing a full landscape. Their difference in size makes the arrangement feel playful straight away.
Place the mushroom slightly to one side, leaving a clear spot near the base for the snail. Paint the red cap and pale stem before building the greenery around them.
Make the snail’s shell from a rounded brown shape and a lighter spiral. Add a short curved body and two small feelers, keeping those marks large enough to control.
Use loose green dabs for the moss and a few simple leafy stems behind the mushroom. Leave the upper paper mostly open so the little subjects don’t feel crowded.
You can simplify the foliage to just a grassy patch if you prefer. The snail and mushroom are enough to make the painting feel complete on their own.
24. An Easy Spotted Mushroom Pattern
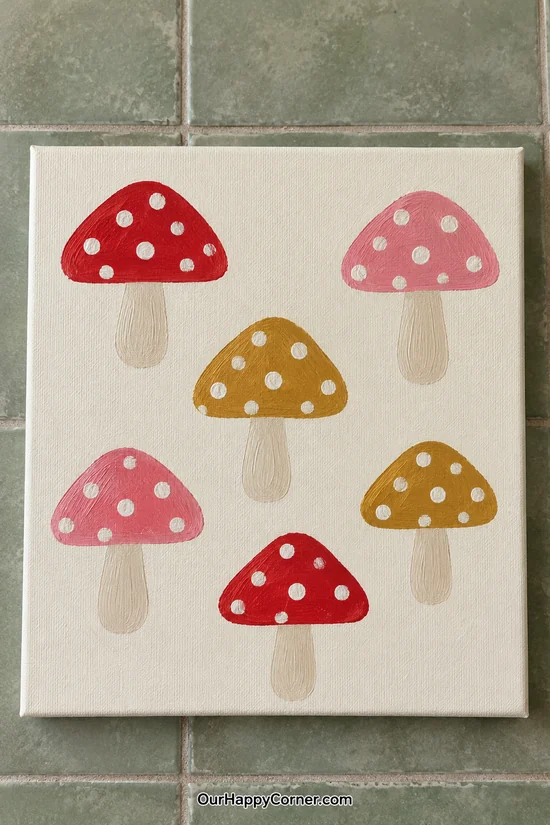
Suggested medium: Acrylic on canvas.
Paint colors: Red, pink, mustard, cream, and pale tan.
A scattered mushroom pattern gives you a chance to practice the same small shape several times. Three cap colors keep it lively while the cream background ties everything together.
Plan six simple mushrooms across the canvas with clear gaps between them. Stagger their positions so the pattern doesn’t look like two stiff rows.
Paint each cap as a rounded triangle or soft dome and add a short pale stem below it. Keep the shapes flat rather than adding lots of shadow.
Use the tip of a brush or a dotting tool for the white cap spots once the colors dry. Let the spot sizes vary slightly and avoid placing them in exact lines.
This is a good design to try on a small canvas before making a larger version. Once you’re comfortable with the repeated shape, you can change the spacing or palette without changing the basic process.
25. Snow-Capped Red Toadstools
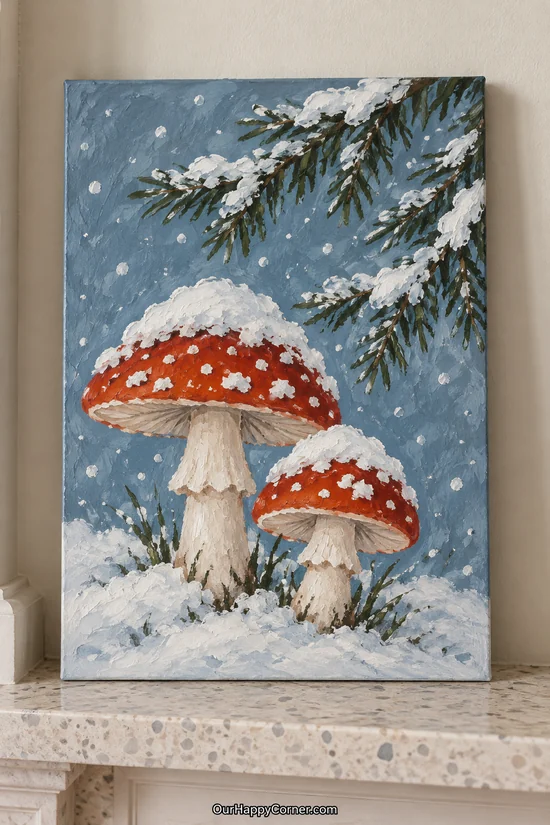
Suggested medium: Acrylic on canvas.
Paint colors: Dusty blue, brick red, cream, white, pine green, and brown.
Snow on red mushroom caps makes a cozy winter painting without needing a whole snowy village. A few evergreen branches overhead give the scene a clear seasonal setting.
Paint the dusty blue background, then block in the two mushrooms. Keep the caps fairly broad so there’s room for both the red paint and the snow above it.
Add pale stems and shaded undersides before laying white snow over the cap tops. Let the snow edge stay uneven, with a little red still visible underneath.
Use short dark-green strokes for the evergreen needles and add a few pale dabs of snow on the branches. Finish with scattered snow dots of different sizes.
Try to keep the bottom snow shapes broad instead of drawing every mound. Those simple white areas help the red caps remain the main focus.
26. Four Separate Mushroom Studies
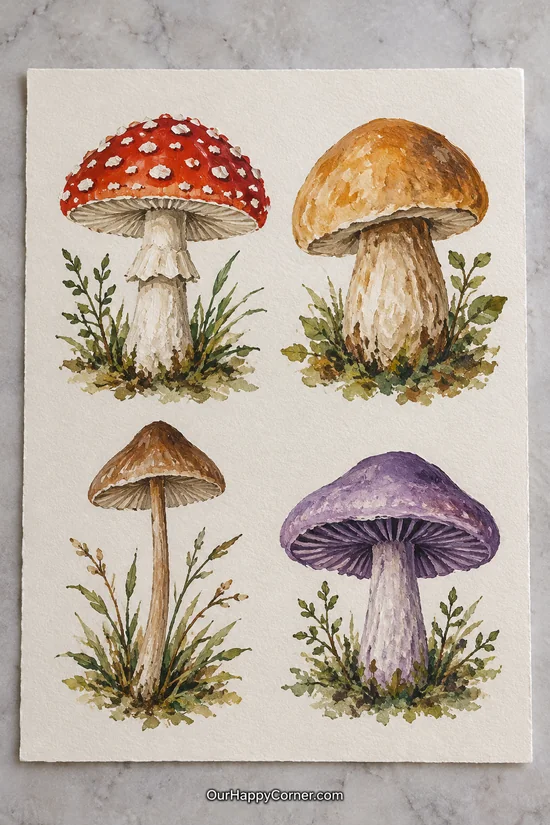
Suggested medium: Gouache on watercolor paper.
Paint colors: Red, ochre, brown, violet, cream, and olive.
Four small studies are a lovely way to try different mushroom shapes without fitting them into one scene. You can paint each little section whenever you have a spare bit of time.
Divide the page lightly into four areas, leaving open paper between them. Give each mushroom a different cap shape or stem length so the exercise feels varied.
Paint the red spotted cap, rounded ochre cap, slender brown mushroom, and purple mushroom one at a time. Use the same cream on the stems to help the page feel connected.
Add a few gill marks and a small patch of greenery under each subject. Keep those additions modest so the four studies remain separate and easy to read.
If you like collecting mushroom painting ideas in a sketchbook, this arrangement is especially useful. It gives you several shapes and palettes to borrow from when planning a bigger painting later.
27. Retro Mushrooms With Daisies and Waves
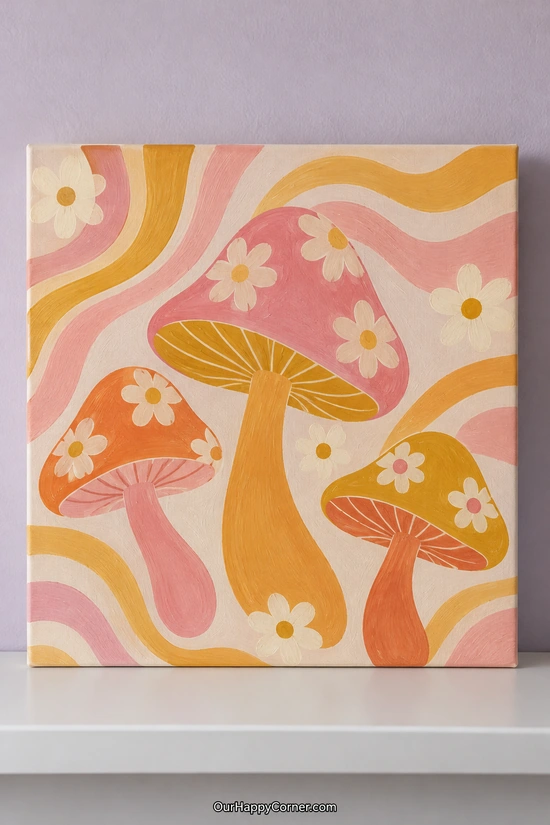
Suggested medium: Acrylic on canvas.
Paint colors: Pink, orange, mustard, cream, and pale peach.
Curvy stems, warm colors, and cream daisies give this design a playful retro feel. It’s a lovely break from the more natural woodland palettes in the collection.
Start with the cream background and broad wavy bands, keeping the curves loose. Mark three mushroom shapes over the dried base, with one taller than the other two.
Fill the caps and stems with pink, orange, and mustard, changing the color combinations between mushrooms. You can leave the shading out and let the flat shapes do the work.
Add simple cream daisies with round centers, then paint a few broad underside lines. Avoid squeezing little details into every gap; the wavy background already gives the piece movement.
These mushroom painting ideas can also inspire small motifs on fabric. Our tote bag painting ideas have more examples of building a design from bold shapes and a few favorite colors.
28. A Butterfly Resting on a Mushroom
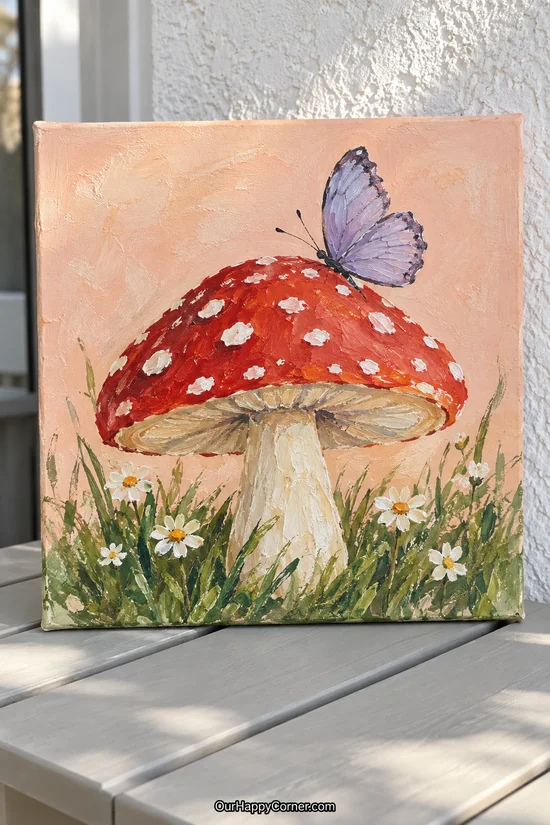
Suggested medium: Acrylic on canvas.
Paint colors: Red, lilac, violet, cream, peach, sage, and mustard.
A lilac butterfly on a red mushroom adds a lovely little moment to a floral painting. The peach background keeps the contrast warm and soft.
Paint the background and mushroom first, leaving clear space above the cap for the wings. Keep the butterfly smaller than the mushroom so their relationship feels balanced.
Use two simple wing shapes with a dark body between them, adding just a few violet marks for definition. You don’t need to paint every tiny marking for it to read as a butterfly.
Place a few daisies and grass strokes around the stem base, varying their height. Keep some peach background showing between the taller plants.
This is a lovely option if you enjoy mushroom painting ideas with a little character. Practice the butterfly shape separately before adding it to the finished cap.
29. Sunflowers and Red Toadstools
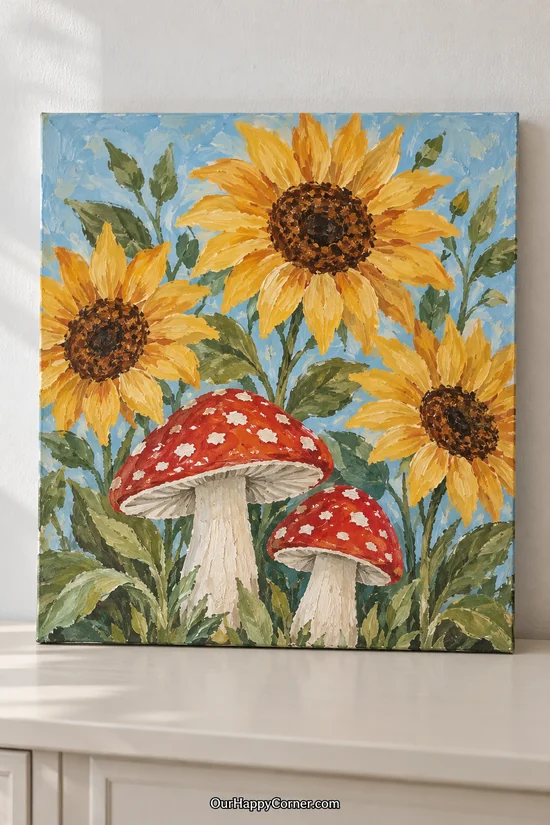
Suggested medium: Acrylic on canvas.
Paint colors: Mustard yellow, red, cream, brown, sage, and sky blue.
Sunflowers bring a bright, generous feel to a pair of red toadstools. Their large centers and broad petals make them a satisfying subject when you want a fuller canvas.
Paint the sky blue base and mark the sunflower centers before placing the mushrooms beneath them. Leave enough space between the flower heads for the leaves to show.
Build the petals from outward yellow strokes, adding a few darker mustard marks near the centers. Use small brown dabs for the seed heads rather than outlining every seed.
Paint the mushrooms with cream stems and red caps, then add the pale spots after the red dries. Connect the larger shapes with sage stems and leaves.
Keep the flowers and mushrooms at different heights so the canvas doesn’t divide into rigid rows. A few broad green strokes along the bottom will settle the whole arrangement into the garden.
Final Thoughts
The best mushroom painting ideas are the ones that make you want to pick up a brush. Choose a simple study when you want a calm starting point, or give yourself a little longer for a leafy woodland scene.
You don’t need to paint every detail to make something worth keeping. Enjoy the colors, let your brushwork show, and finish with a piece that feels like yours.