This post may contain affiliate links. If you make a purchase through these links, I may earn a small commission at no extra cost to you. Thank you so much for your support.
Tote bag painting is a lovely way to turn an ordinary canvas bag into an accessory you actually want to carry.
You can make yours delicate and floral, playful and pink, or bright enough to stand out wherever you go.
You don’t need to be an experienced artist, either. A few well-placed cherries, a large ribbon bow, or simple botanical outlines can look wonderful on natural cotton canvas. Some of these designs are quick enough for a relaxed afternoon; others give you a chance to spend a little longer on the details.
Below are distinct ideas, with colors, supplies, and practical painting steps for every one. Pick the bag you would love to use yourself, then adapt its colors to fit your style.
Before You Paint: Choosing Your Bag
Choose a sturdy, smooth, natural cotton canvas tote with flat panels and securely stitched handles. The smoother the front, the easier it is to add clean details.
A medium-weight bag tends to stay in position better than a thin, loosely woven one. Check the bag’s label before washing; where permitted, prewash without fabric softener and let it dry fully.
Press wrinkles before starting.
Supplies for Tote Bag Painting
Keep your first supply collection simple: a cotton canvas tote, fabric paint (or compatible acrylic paint and fabric medium used according to its label), a flat brush, two round brushes of different sizes, a fine detail brush, a fabric marking pencil, painter’s tape, a palette, paper towels and a piece of cardboard.
You may also want a ruler, stencils and a spare scrap of cotton for testing colors. Slip the cardboard inside the tote before painting so nothing transfers onto the back panel.
A Few Painting Tips That Make a Difference
Lightly sketch the main elements first and paint the largest color areas before the smallest details. Work in thin layers, giving each coat time to dry so colors stay clear and the fabric does not turn stiff.
Test your paint on scrap fabric if you are unsure how opaque a shade will be, particularly white or pale pink. Keep the handles tucked away from wet paint.
Once the design is finished, follow your specific paint product’s curing and heat-setting directions, if required, before using or washing the bag.
Pretty Tote Bag Painting Ideas
1. Wildflower Garden
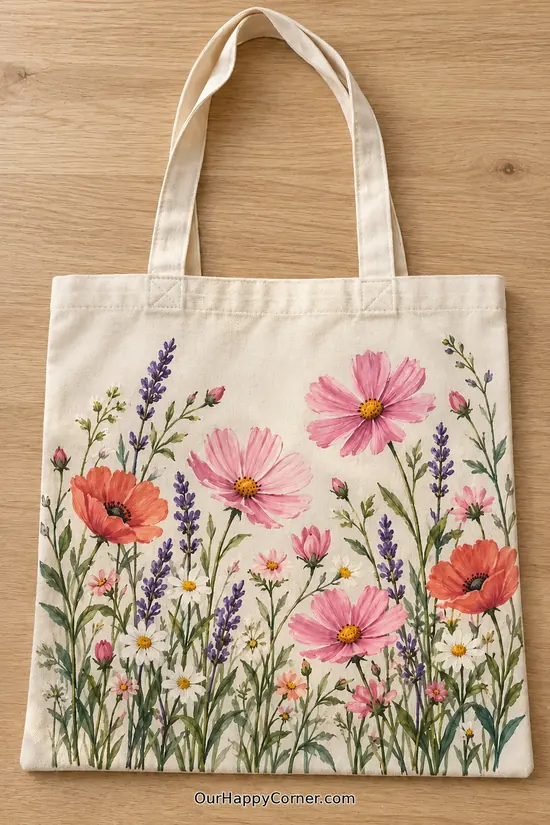
Start the design from the bottom of the bag, where the foliage is fullest. Lightly mark a few different stem heights so the flowers do not end in one straight line.
Paint the larger pink cosmos and coral poppies first, leaving space around their petals. Build the smaller white daisies and lavender spikes between them, then connect everything with slim green stems.
Add little buds at uneven heights to give the garden its loose, natural shape. A fine brush is helpful for the flower centers, but the petals can stay soft and imperfect.
Paint colors: Pink, coral, white, lavender, yellow and olive green.
Supplies: Round and detail brushes; fabric paints in the listed colors.
How to paint it: Sketch the tall stems and positions of the biggest blooms. Paint large petals and let them dry before layering details. Fill gaps with daisies, lavender, buds and thin leaves.
2. Flowers in a Pink Envelope
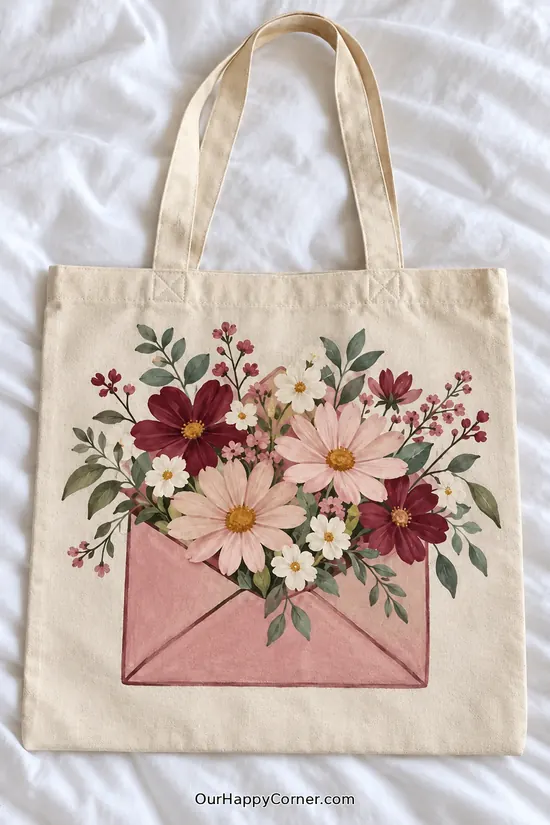
Begin with the envelope so you have a clear base for the floral arrangement. Draw a simple rectangle and its diagonal flap lines, then paint it in muted pink.
Place the largest flowers above the envelope, letting some leaves overlap the upper edge. Use burgundy for contrast beside soft blush blooms and tiny white daisies.
The smaller berry-like sprigs help fill narrow spaces without crowding the design. Keep the envelope edges slightly darker than its center so the folded-paper shape reads clearly.
Paint colors: Dusty pink, burgundy, cream, yellow and sage green.
Supplies: Flat and round brushes; fabric paint; pencil.
How to paint it: Sketch and fill the envelope; define its folds after drying. Paint the largest flower heads above it. Add leaves, white daisies and small clustered buds last.
3. Pink Hibiscus Blooms
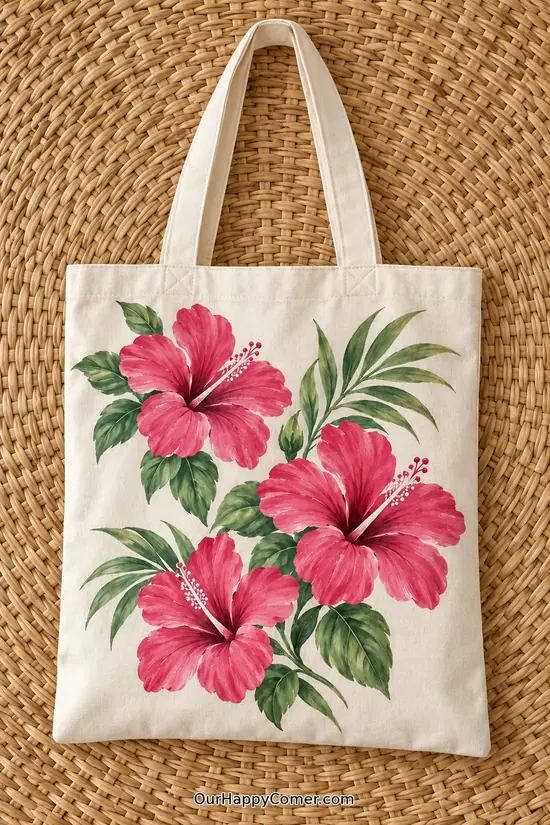
This one makes a statement without requiring dozens of separate flowers. Sketch three hibiscus blooms at different heights so they balance across the front of the tote.
Paint each with five broad petals, brushing deeper rose toward the center and lighter pink toward the outer edge. Add the long stamens with a detail brush once the petals are dry.
Paint broad leaves and a few thin palm-like fronds in the remaining spaces. Keep your dark green strokes concentrated where foliage overlaps; that creates depth without making the design overly complicated.
Paint colors: Hot pink, rose, deep red, white and several greens.
Supplies: Medium round and fine detail brushes; pink and green fabric paints.
How to paint it: Outline three large blooms and block in their petals. Layer darker centers and pale highlights. Paint foliage around them and finish with the white-tipped stamens.
4. Abstract Pastel Flowers
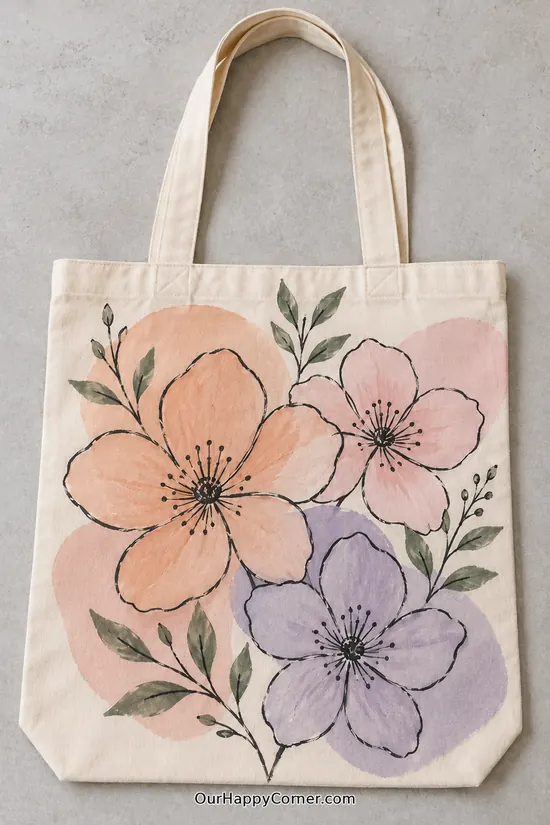
If you like flowers but do not want to work on tiny realistic petals, this is a lovely alternative. Paint three loose pastel patches where your main blooms will sit.
After those patches dry, draw simple five-petal flower outlines over them using a thin detail brush. Add black or charcoal stamens as little lines with dots at their ends. Tuck a few olive and sage leaves around the flowers to connect the arrangement.
The contrast between broad washes and delicate outlines gives this tote its personality, so resist the urge to fill every area with detail.
Paint colors: Peach, blush, lavender, charcoal and sage.
Supplies: Flat brush, detail brush, fabric paint and fabric marking pencil.
How to paint it: Apply three separated pastel color patches. Paint five-petal outlines and dotted centers on top once dry. Add a handful of leafy branches in the open spaces.
5. Cherries with Pink Ribbons
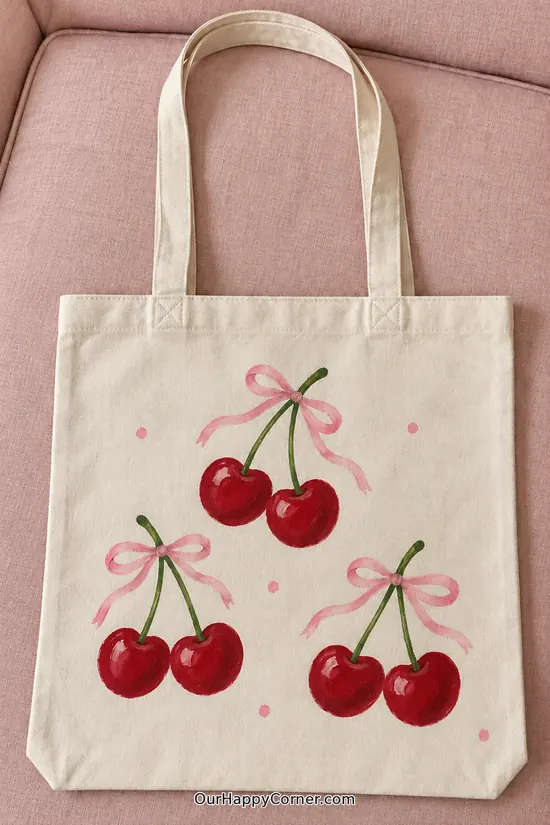
A cherry tote is sweet, playful and much easier to paint than it may first appear. Arrange three pairs of cherries in a triangle to give the design a balanced shape.
Each cherry begins as a rounded red form with a slightly darker side and a small pale highlight. Join each pair with slender green stems and top it with a soft pink ribbon.
Work on the bows after the cherries dry so the edges remain distinct. A few scattered pink dots are enough to finish the design; too many would compete with the fruit.
Paint colors: Cherry red, dark red, pink, pale pink and green.
Supplies: Small round and detail brushes; red, pink and green fabric paint.
How to paint it: Draw three pairs of circles and paint them red. Add shaded sides, highlights and connecting stems. Paint a pink bow above each pair, then place a few dots around the design.
6. Strawberry Vine Border
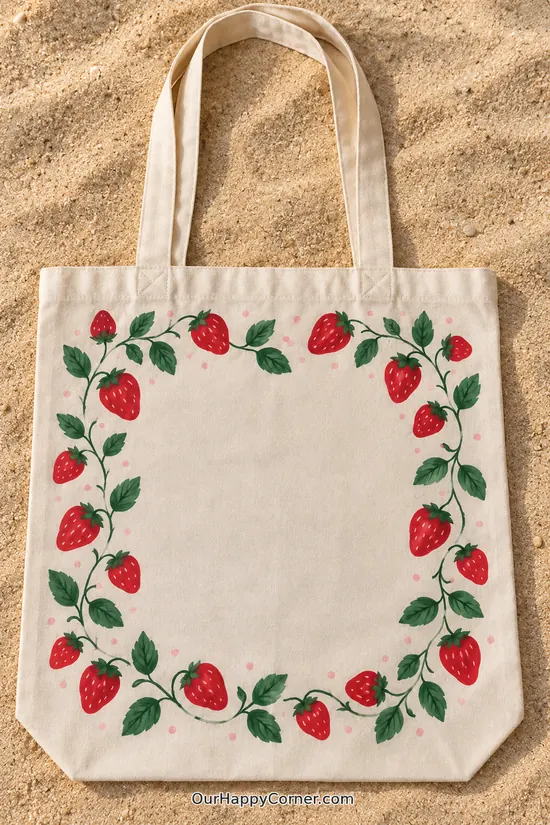
This border design is especially useful if you want a cute tote without putting a large picture in the middle. Lightly mark a rectangle, leaving generous space inside it.
Paint thin winding vines around the outline, then add strawberries at varying intervals. Make each berry a rounded triangular shape with a leafy cap and small pale seed marks.
Alternate the direction of the leaves to keep the vines lively rather than mechanically symmetrical. Finish with a few tiny pink dots and leave the center clear; the empty canvas is part of the design.
Paint colors: Strawberry red, leaf green, dark green, cream and blush.
Supplies: Small round brush and liner brush; fabric paint.
How to paint it: Mark the frame lightly and paint curved vines. Add strawberries and leaf clusters along each side. Dot the berries with pale seeds and scatter a few pink accent dots.
7. Lemon Branch Bouquet
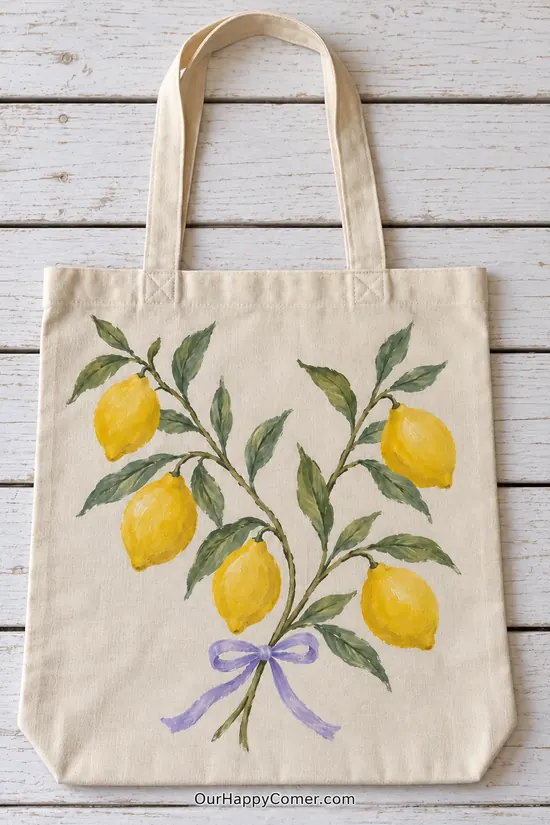
Yellow lemons on natural canvas have a fresh look that works beautifully for spring and summer. Sketch two branching stems that rise from a shared point near the bottom.
Place five oval lemon shapes at different heights, leaving space for their pointed tips. Fill them with warm yellow and add slightly darker ochre along one side for dimension.
Paint elongated leaves in two or three greens, letting a few overlap the fruit. Finish the gathered stems with a loose lavender bow for an unexpected feminine detail.
Paint colors: Lemon yellow, ochre, olive, sage and lavender.
Supplies: Round brushes and liner brush; yellow, green and lilac fabric paints.
How to paint it: Sketch a branching bouquet and five lemons. Paint the fruit and their shaded edges. Fill the branches with leaves and paint a purple ribbon where the stems meet.
8. Pink Gingham and White Daisies
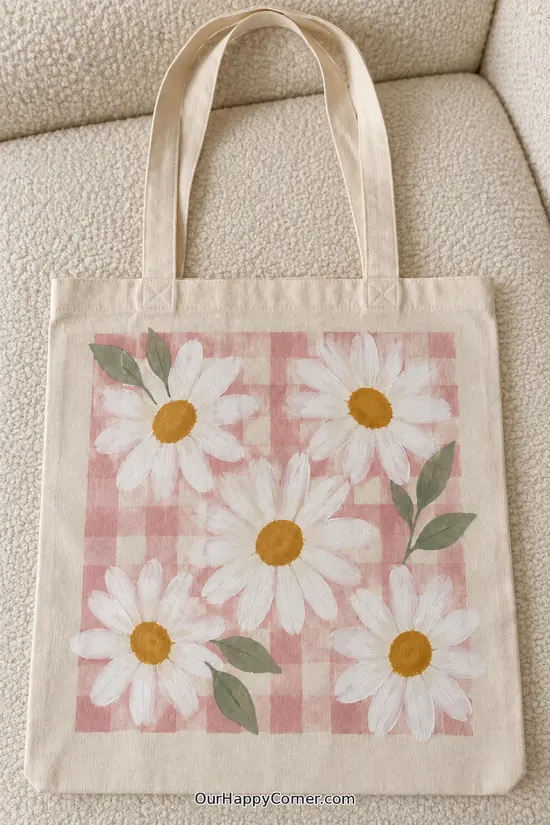
Gingham makes a pretty background, but it helps to build it patiently. Use painter’s tape or very light grid guidelines to mark a square panel on the tote.
Paint alternating dusty pink checks, keeping the layers thin so the canvas remains flexible. When the grid dries, position five large daisies across the panel, with a larger one near the middle.
White fabric paint may need another thin pass to stand out against the pink. Add golden centers and a few muted green leaves to complete the cottage-inspired design.
Paint colors: Dusty pink, white, mustard yellow and sage.
Supplies: Painter’s tape, flat brush, round brush and fabric paint.
How to paint it: Lay out and paint a pink checked square. Once dry, add five white daisies in varied sizes. Finish with mustard centers and a few green leaves.
9. Pastel Butterfly Flight
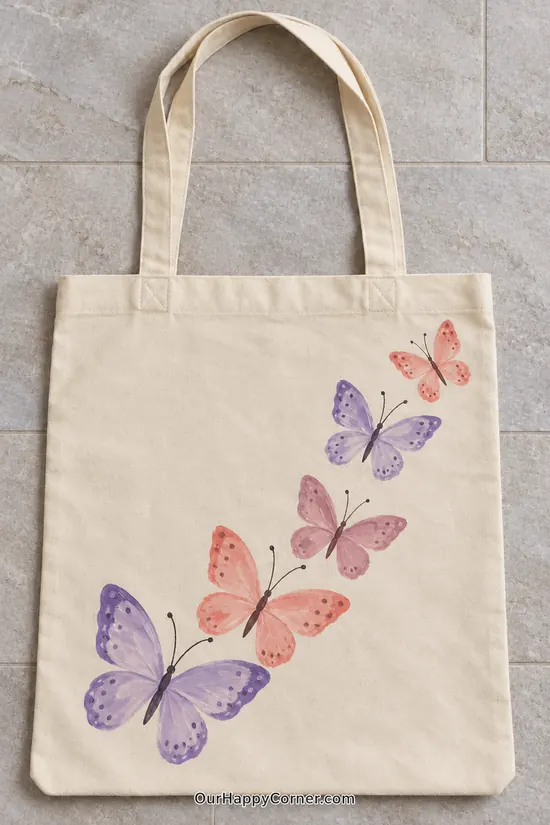
A trail of butterflies gives this bag a sense of movement while keeping plenty of the natural canvas visible. Sketch the largest butterfly near the lower left and make each butterfly a little smaller as the trail rises.
Use two broad upper wings and two smaller lower wings for an easy, repeatable shape. Alternate soft purple and peach-pink paints so neighboring butterflies stand apart. Once dry, add thin bodies, antennae and dotted wing markings with a fine brush.
Leave space between each butterfly instead of turning them into one connected pattern.
Paint colors: Lavender, lilac, peach, dusty rose and charcoal.
Supplies: Small round and detail brushes; pastel fabric paints.
How to paint it: Mark a diagonal flight path. Paint five butterflies, changing their sizes and colors. Add bodies, antennae and small wing dots after drying.
10. Pink Ribbon Monogram
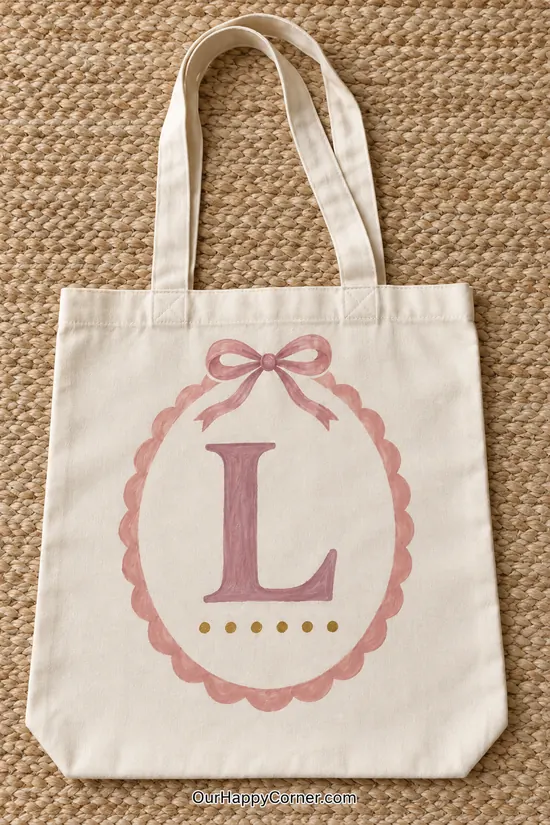
A monogram makes a simple canvas tote feel personal and would be a lovely handmade gift. Draw a central oval first, then add a scalloped border by repeating small curved bumps around its edge.
Choose one large serif letter and sketch it lightly inside. Fill the letter with dusty mauve, leaving its shape crisp and readable.
Paint a bow at the top and a short row of gold dots beneath the initial for a finished look. Change the letter to suit the person receiving it; there is no need to copy the L unless it is your initial too.
Paint colors: Dusty pink, mauve and muted gold.
Supplies: Pencil, optional letter stencil, round and detail brushes.
How to paint it: Sketch the oval and scalloped border. Center and paint your chosen initial. Add the top ribbon and a row of small gold dots once dry.
A handmade monogram also works beautifully on a matching small pouch. If you have leftover cotton from another project, explore these fabric scraps ideas for more useful handmade accessories.
11. Books and a Cup of Tea
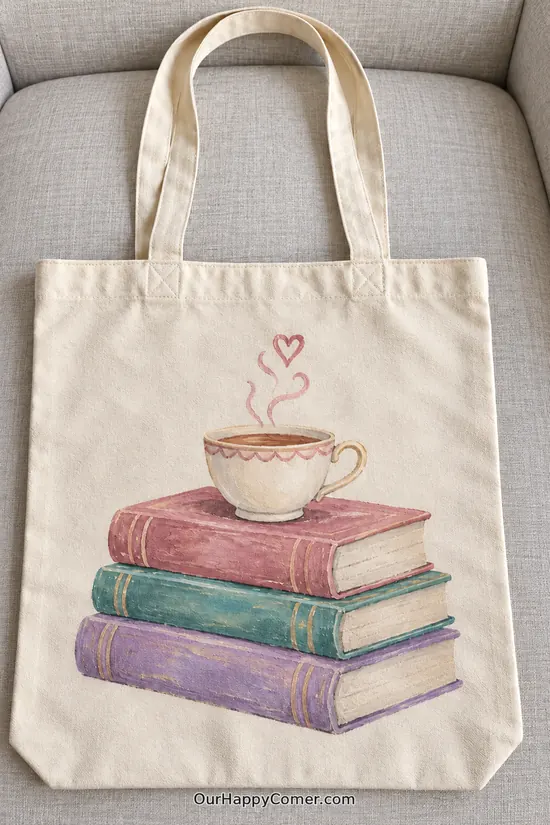
If your favorite way to relax involves a good book and something warm to drink, this design is for you. Start by sketching three stacked books, slightly offset so each spine remains visible.
Paint the covers in different muted colors and leave pale strips for the pages. Add a little gold linework along the book spines once the covers are dry.
Draw the teacup resting on the upper book, then give it a curved handle and a scalloped rim. Finish with light pink steam rising into a small heart for a cozy detail that pulls everything together.
Paint colors: Dusty rose, teal, lavender, cream and pale gold.
Supplies: Flat, round and fine brushes; pastel fabric paint.
How to paint it: Sketch and paint three overlapping books. Add page edges, spine lines and the teacup above. Paint its drink surface and finish with curling pink steam.
12. Vintage Teacup Collection
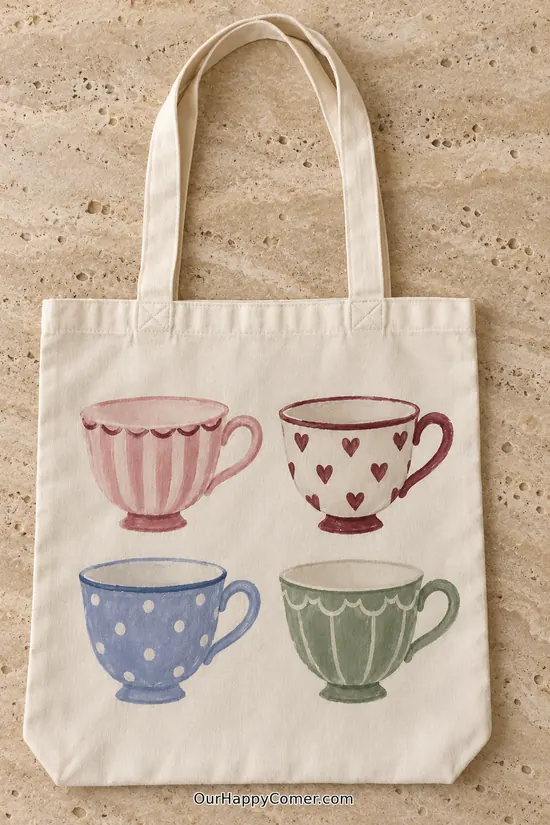
This is a fun idea if you enjoy small motifs and want to practice a few patterns in one project. Divide the tote front into a loose two-by-two arrangement, leaving consistent breathing room between cups.
Sketch all four silhouettes first so their size and handles feel related. Paint one with stripes, one with little hearts, one with polka dots and one with scalloped details.
Using four colors rather than four unrelated shapes makes the arrangement feel coordinated. Keep the paint inside each cup matte and add the tiny decorations only after its base color dries.
Paint colors: Dusty pink, burgundy, blue, sage and cream.
Supplies: Small round and fine brushes; fabric paints in four coordinated shades.
How to paint it: Sketch four matching cup shapes with bases and handles. Fill each with a different color. Add stripes, hearts, dots and scalloped linework after drying.
13. Pastel Seashell Collection
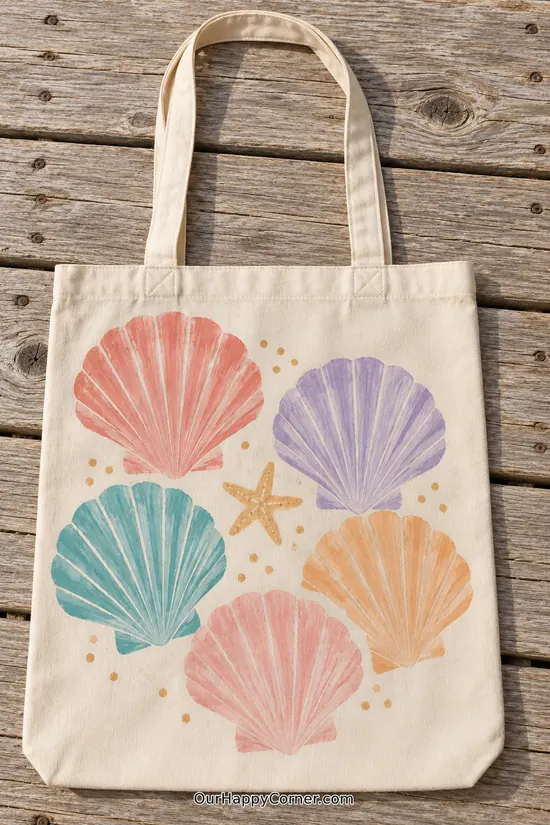
A seashell design brings a beachy feeling to an everyday canvas tote. Draw five fan-shaped shells in a loose cluster, varying their sizes so the composition stays interesting.
Paint each shell in a different soft color, letting the fabric show through slightly for a brushed finish. Add slender pale lines that fan out from each shell base; these make the shapes instantly recognizable.
Place a small golden starfish near the center and use a few dots to fill the remaining gaps. You can keep the entire design flat and graphic, or add one darker stroke near the shell edges for gentle depth.
Paint colors: Coral, lilac, aqua, peach, pale pink and sand gold.
Supplies: Medium round and detail brushes; pastel fabric paints.
How to paint it: Sketch and fill five fan-shaped shells. Add pale radiating ridges once dry. Paint a small starfish and a scattering of sand-colored dots.
14. Checkerboard Heart
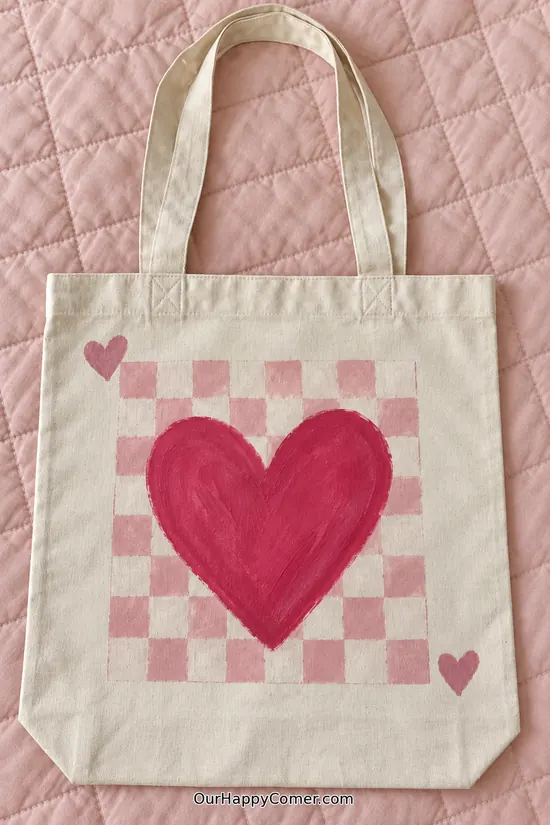
Checkerboard and hearts make a playful combination, particularly if you love pink accessories. Begin by marking a square grid in the middle of the tote and painting every other check pale pink.
Give the checkerboard time to dry before adding the large raspberry-pink heart in the center. A heart stencil can help you keep both sides balanced, although slightly imperfect brush edges look charming here too.
Paint two smaller hearts near opposite corners to carry the color outside the square. If you want a deeper center color, use two thin coats rather than one thick layer.
Paint colors: Pale pink, rose pink and raspberry.
Supplies: Ruler, painter’s tape or grid guide, heart stencil and brushes.
How to paint it: Paint a pale pink checkerboard square. Center a large raspberry heart once dry. Add two small accent hearts at opposite corners.
Love painting smaller gifts too? Try these jewelry box painting ideas for another way to use favorite colors and patterns.
15. Three Lavender Bundles
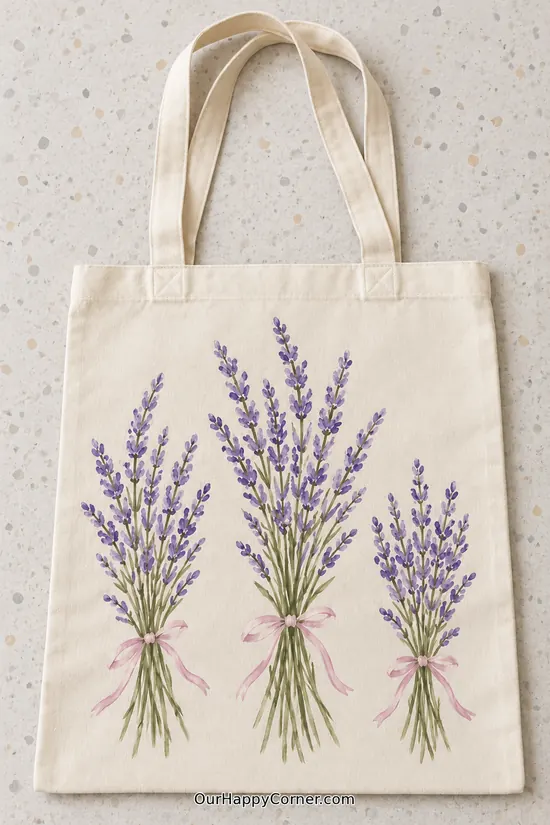
Lavender is a lovely choice when you want something delicate without painting large complicated flowers. Start with three groups of thin green stems, making the central bunch taller and fuller.
Build the lavender spikes by pressing the tip of a small brush repeatedly along each stem. Mix two purples so the tiny marks do not all have the same value.
Add a small pale pink ribbon at the base of each bouquet to keep the individual clusters together. Leaving generous cream canvas between the bunches lets their slender shapes stand out.
Paint colors: Lilac, purple, olive and pale pink.
Supplies: Fine round brush; purple, olive and pink fabric paint.
How to paint it: Paint three bunches of stems, tallest in the middle. Dab small lilac and purple buds up each spike. Finish with a pink bow around each bundle.
16. Oversized Pink Bow
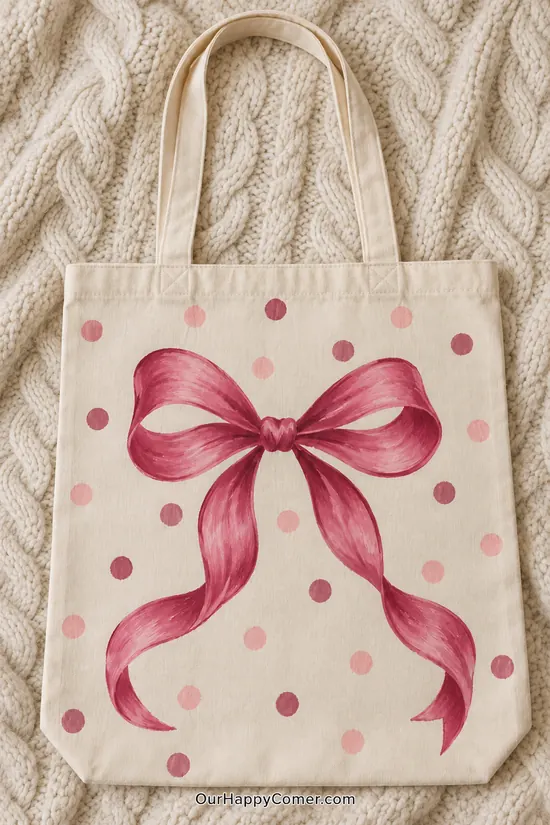
A big ribbon bow can fill a tote beautifully without a busy background or lots of separate elements. Sketch the central knot and two broad loops first, then draw long ribbon tails curling toward the bottom corners.
Fill the entire bow with mid-tone pink. Use deeper raspberry near the folds and pale pink along the upper curves to suggest silky ribbon. The highlights do not have to blend perfectly; a painterly look works well on canvas.
Add scattered dots in two pink shades around the bow, keeping them far enough apart that the ribbon remains the focus.
Paint colors: Rose, raspberry, blush and pale pink.
Supplies: Medium round, flat and detail brushes; pink fabric paints.
How to paint it: Sketch two loops, a center knot and curling tails. Fill the ribbon, then add darker folds and pale highlights. Paint a loose pattern of surrounding pink dots.
Pink bows and hearts are also lovely choices for gift-making. Find more inspiration in these Valentine’s Day crafts for adults.
17. Bluebird on a Branch
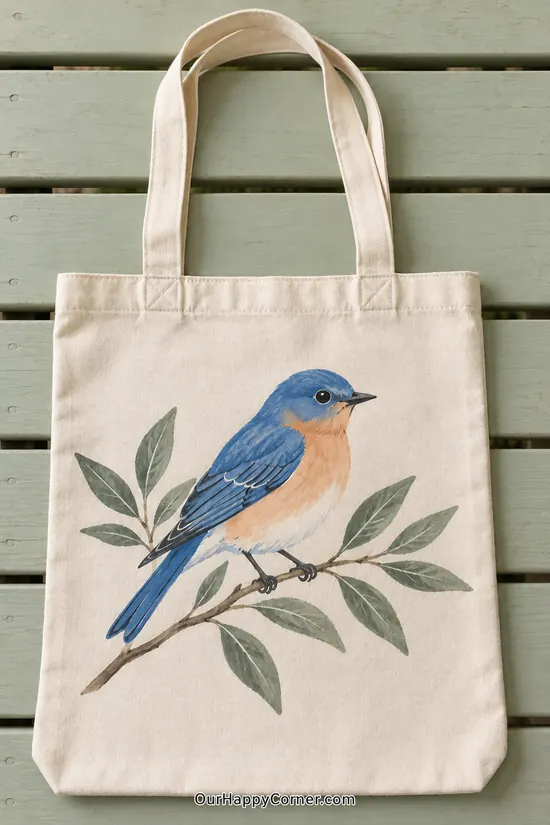
If you enjoy nature-inspired painting, a single bird makes a beautiful centerpiece for a tote. Sketch a rounded body, small head, pointed beak and long tail before working on the surrounding branch.
Fill the back and wings blue and the breast warm peach, leaving a little cream along the belly. Layer darker strokes across the wing to suggest rows of feathers without drawing every one.
Paint a diagonal branch under the feet and add muted sage leaves on both sides. The dark eye and tiny beak are the final details that give the bird its expression.
Paint colors: Sky blue, navy, peach, cream, olive and brown.
Supplies: Round and detail brushes; blue, peach, green and brown fabric paint.
How to paint it: Sketch the bird’s silhouette and supporting branch. Block in blue feathers, peach breast and pale belly. Add wing markings, leaves, feet, eye and beak.
18. Sleepy Cat on a Crescent Moon
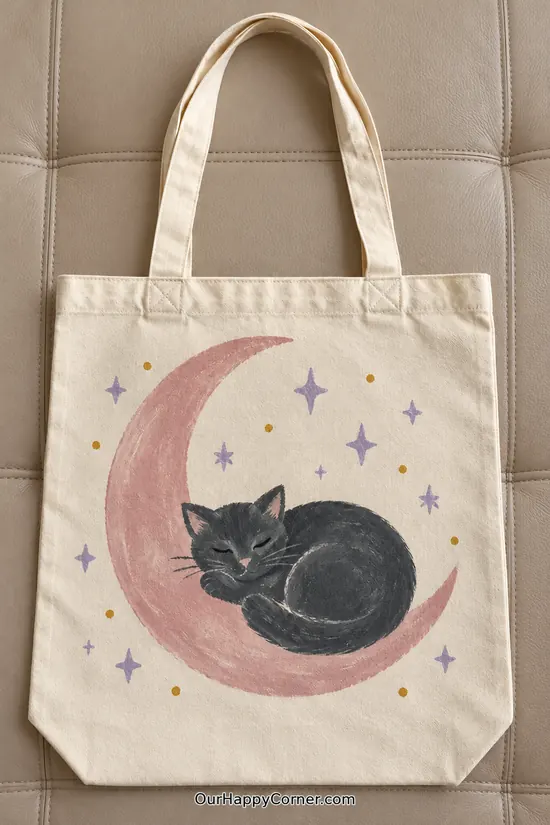
This one is perfect for cat lovers and anyone who likes a softer celestial theme. Draw the pink crescent first, keeping its lower curve wide enough for the cat to sit within.
Sketch the cat as a rounded curled shape with a tucked tail, small ears and resting paws. Paint the body charcoal, then add a few lighter strokes to distinguish its face and curled back.
Closed eyes, whiskers and a tiny nose do more for the expression than lots of intricate fur detail. Scatter lilac starbursts and small gold dots around the moon, leaving a little space between them.
Paint colors: Dusty rose, charcoal, lilac and muted gold.
Supplies: Medium round and fine detail brushes; pink, gray, lilac and gold fabric paints.
How to paint it: Paint a large pink crescent. Sketch and fill the curled cat in charcoal. Add facial details, lavender stars and small gold dots once dry.
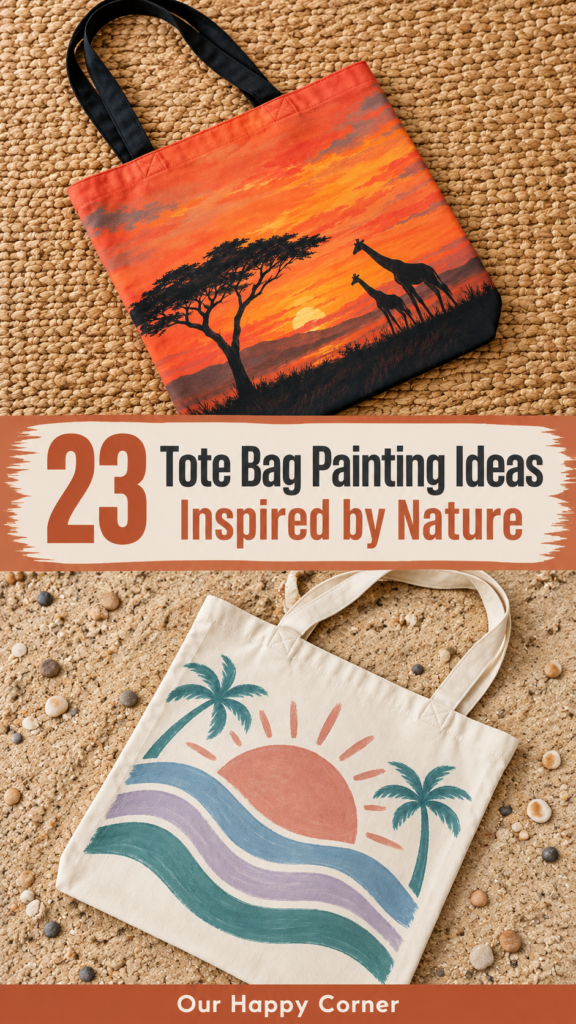
19. Retro Coastal Sunset
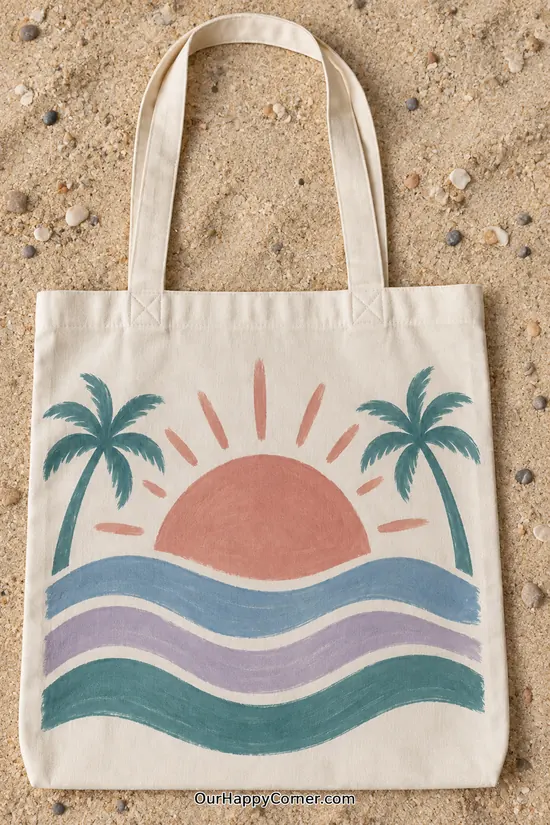
This retro coastal design looks impressive, but it is built from a handful of simple shapes. Mark the lower half of a large sun near the upper center and paint short rays around it.
Add palm trees on either side, keeping their trunks slender and slightly curved. Across the lower half, paint broad wavy bands in muted blue, lavender and teal.
Leave narrow strips of natural canvas between some bands so each color remains distinct. A flat brush is useful for the waves, while the palm fronds are easier with a small pointed brush.
Paint colors: Dusty coral, muted blue, lavender and deep teal.
Supplies: Flat and detail brushes; fabric paints in coastal colors.
How to paint it: Sketch and paint the sun and its rays. Add two palm trees to frame it. Paint wide curved ocean bands across the lower half and leave them to dry separately.
20. Colorful Jewel Mandala
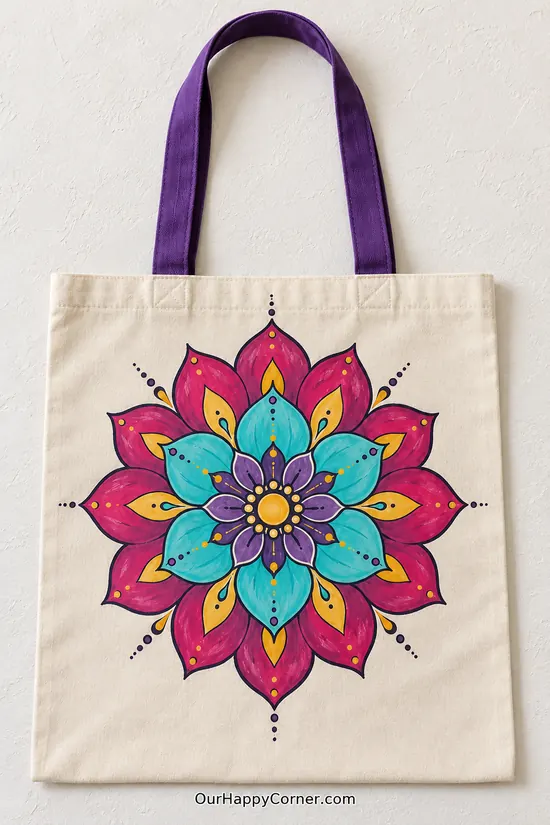
A mandala is a satisfying project when you enjoy repeating shapes and playing with bold color. Find the center of your tote and lightly draw horizontal, vertical and diagonal guidelines.
Start with a small central circle and build outward using repeated petal shapes, keeping corresponding petals the same size. Alternate fuchsia, turquoise, purple and golden accents so every layer is easy to distinguish.
Dark plum outlines and tiny dots will sharpen the finished pattern once the paint dries. There is no need to rush: painting one ring at a time makes symmetry much easier to manage.
Paint colors: Fuchsia, turquoise, purple, yellow and deep plum.
Supplies: Compass or circular stencils, pencil and several detail brushes.
How to paint it: Mark the center and draw concentric guide rings. Paint repeated petals one layer at a time. Add dark outlines and small gold dots when dry.
21. Savanna Sunset
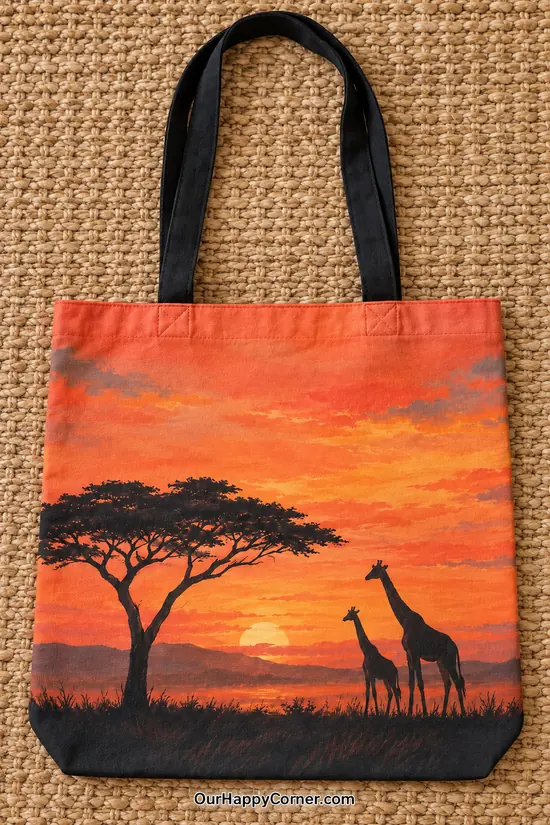
For a tote with a more dramatic look, paint a glowing sunset across nearly the whole front panel. Blend warm coral, orange and golden yellow in horizontal strokes, leaving the brightest color around the low sun.
Add a distant muted ridge line and let this colorful background dry completely. Paint a dark acacia silhouette on the left and two giraffes at different heights on the right.
A fine brush makes the giraffe necks, legs and grass tips much easier to control. Keep the foreground almost black to anchor the scene and make the sunset colors feel even brighter.
Paint colors: Coral, orange, gold, purple-gray and black.
Supplies: Wide flat, small round and fine brushes; sunset-colored and black fabric paints.
How to paint it: Paint layered sunset bands and a low sun. Add distant land and let dry. Paint the acacia, giraffe silhouettes and dark grass in the foreground.
22. Modern Mustard Botanical
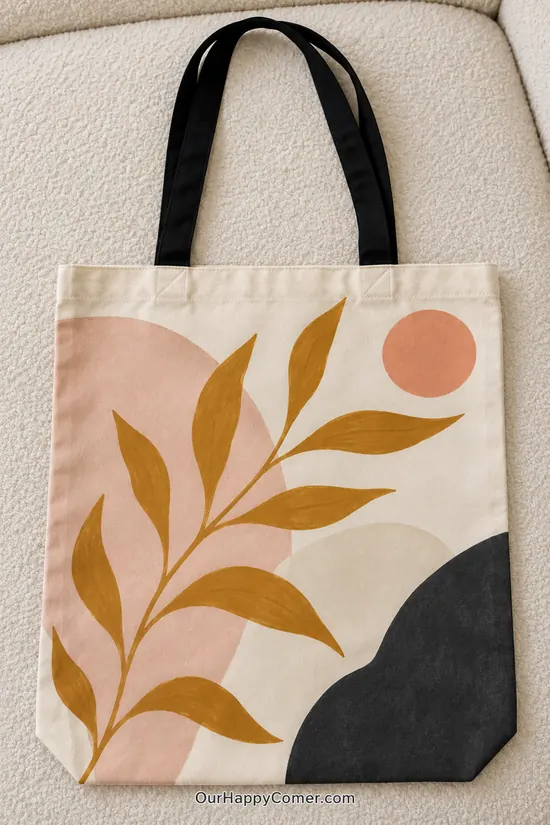
This modern design proves that you can make something striking without painting a realistic picture. Plan a large dusty blush shape on the left, a few pale cream curves and a charcoal shape near the lower right.
Paint those broad sections first and keep their edges slightly organic. Once dry, draw a branching mustard stem diagonally across the front.
Add long tapered leaves of different lengths so the plant feels lively rather than perfectly mirrored. The restrained color palette ties all the separate shapes together and makes the black straps part of the overall look.
Paint colors: Mustard, blush, peach, beige and charcoal.
Supplies: Flat and medium round brushes; painter’s pencil and fabric paints.
How to paint it: Paint the large blush, pale and charcoal background forms. Let them dry. Add the diagonal mustard branch and fill in its long leaves.
23. Sage Monstera Line Art
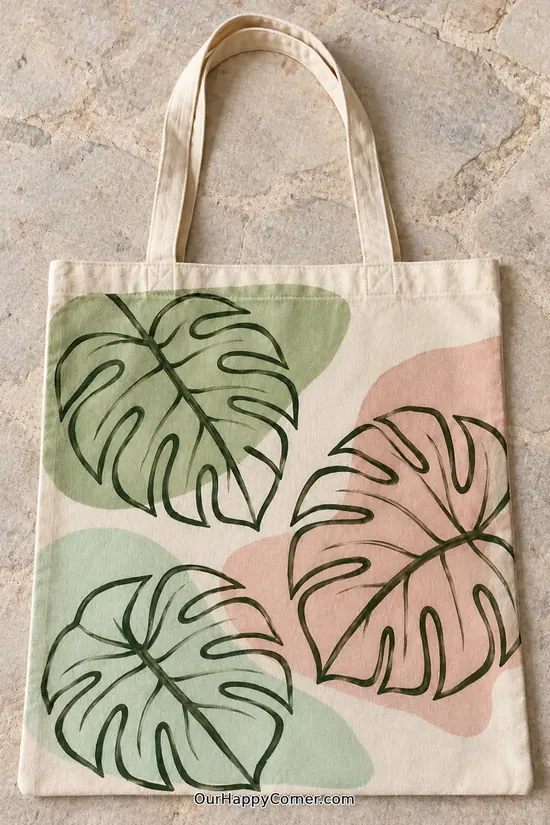
A monstera leaf is easier to approach when you treat it as a bold outline instead of trying to create realistic shading. Begin with three large soft color patches, two green and one blush, arranged across the tote front.
Let them dry before drawing a monstera leaf over each one. Paint the central veins first, then build the outer leaf contours and characteristic curved cutouts.
Use deep forest green for the outlines so they show clearly over both the pastel paint and natural canvas. It is a fresh botanical design that works especially well with simple, casual outfits.
Paint colors: Sage, mint, blush and forest green.
Supplies: Flat brush, liner brush and green and blush fabric paints.
How to paint it: Block in three separated pastel shapes. Sketch monstera veins and leaves over the dry patches. Paint the lines in dark green, including the leaf cutouts.
How to Care for Your Painted Tote
Allow the finished bag to dry and cure for the full period stated on your paint label. If your paint calls for heat-setting, follow those exact directions and protect the painted surface as instructed. When washing is permitted, turn the bag inside out and use gentle handling with cool water and mild detergent. Avoid scrubbing directly over the painted design, and air-dry the tote to help it keep its shape.
Final Thoughts
A plain canvas tote is a brilliant starting point for a personalized project because even a small painted motif can make it feel completely different. Start with a design you would enjoy carrying: cherries for something playful, lavender for a softer look, or the bright mandala if you feel like working with plenty of color.